This project provides Mac OS X Automator actions for downloading and uploading files using the secure copy (scp) protocol.
This action copies files or folders from the specified server using scp. scp must be able to automatically authenticate with the client, for example, using SSH public key authentication.

The most recent version of Download with scp is version 2.0 (released 2010/03/27) and is available in the releases area. This version is for Mac OS X 10.5+.
- 2010/03/27: version 2.0: complete rewrite in Objective-C; better error handling, compatibility with Mac OS X 10.6, update mechanism
- 2007/04/07: version 1.0: initial release
This action copies files or folders to the specified server using scp. scp must be able to automatically authenticate with the client, for example, using SSH public key authentication.
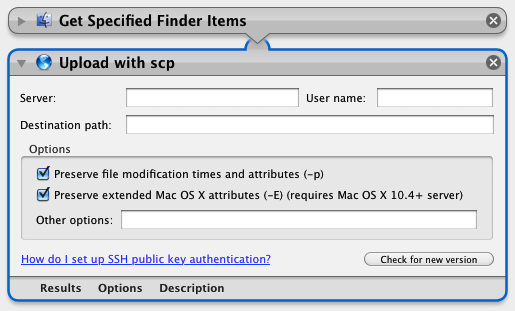
The most recent version of Upload with scp is version 2.0 (released 2010/03/25) and is available in the releases area. This version is for Mac OS X 10.5+.
- 2010/03/25: version 2.0: complete rewrite in Objective-C; better error handling, compatibility with Mac OS X 10.6, update mechanism
- 2010/03/21: switch to Google code for project hosting
- 2008/07/01: version 1.0.3.4: fixed bugs in filename matching
- 2007/07/25: version 1.0.3.3: fixed return values so correct aliases are returned
- 2007/06/11: version 1.0.3.2: enhanced interface for multiple prompts
- 2007/04/07: version 1.0.3.1: changed interface layout
- 2007/03/26: version 1.0.3: added “Prompt for destination path for each file”
- ????/??/??: version 1.0.2: lost to the ravages of time
- 2005/07/17: version 1.0.1: user interface improvements
- 2005/07/13: version 1.0: initial release
This software has been developed by Douglas Stebila and was originally hosted at http://www.douglas.stebila.ca/code/.
The source code for this project is open source and available under the New BSD license. The project makes use of code from the excellent BWToolkit framework.
When you use scp and ssh on the command-line, you might be used to being prompted for your username and password and typing them in. Because the Upload with scp Automator action works in batch mode, it doesn't allow you to type in your password. You'll need to use an automatic form of authentication – SSH public key authentication — for the Upload with scp Automator action to work correctly.
This document describes how to setup SSH public key authentication. It assumes basic familiarity with the command-line.
By following the steps in this document, you will learn how to create an SSH public key / private key pair on your computer, install the public key on the server you want to login to, and install the private key in your Mac OS X keychain.
- Your computer: Mac OS X 10.5.1 or higher
- The server: An account on the server that you can login to with SSH and that you can copy files to using scp (on the command-line).
You will need to execute commands on the command-line. You can use Terminal.app, which can be found in the /Applications/Utilities folder.
In this tutorial, you will see code samples of the form:
$ whoami
jsmith
The line starting with $ denotes the prompt. You should type what appears after the $ and hit the return key. The output appears on the following line(s). In this case, the user typed the command whoami, hit return, and the whoami program printed their username.
In this phase, we will generate your SSH public key / private key pair and store them on your computer.
$ mkdir ~/.ssh
$ chmod 700 ~/.ssh
You will be prompted to pick a new password to protect your private key. You should pick a secure password that is at least 8-10 characters long and hard for someone to guess; you will not need to remember this password on a day-to-day basis, so you should pick a strong password.
$ ssh-keygen -q -t rsa -b 2048 -f ~/.ssh/id_rsa
Enter passphrase (empty for no passphrase): …
Enter same passphrase again: …
$ chmod 600 ~/.ssh/*
In this phase, we will copy your SSH public key to the remote server. In the following, replace jsmith with your username on the remote server and example.com with the domain name (or IP address) of the remote server.
When prompted, enter your password for your account on the remote server.
$ scp ~/.ssh/id_rsa.pub [email protected]:
[email protected]'s password: …
id_rsa.pub
When prompted, enter your password for your account on the remote server.
$ ssh [email protected]
[email protected]'s password: …
$ mkdir ~/.ssh
$ chmod 700 ~/.ssh
$ cat id_rsa.pub >> ~/.ssh/authorized_keys
$ chmod 600 ~/.ssh/authorized_keys
$ rm ~/id_rsa.pub
$ logout
Connection to example.com closed.
$ ssh [email protected]
This time, instead of being prompted for your remote server password in the Terminal, a dialog box like the one below should pop up.
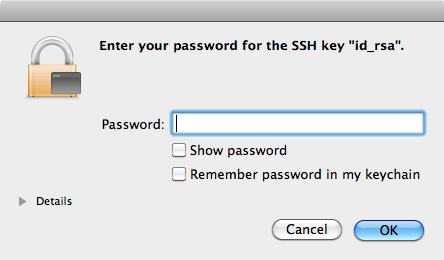
Enter the password that you chose back in Phase 1 for your SSH private key. Then click "Remember password in my keychain" to save that password: you won't need to enter that password every time you try to login to the remote server. Since the keychain encrypts all of its contents under your Mac OS X password, its contents are safe.
Log out of the remote server and close Terminal.app.
$ logout
Connection to example.com closed.
$ logout
If you successfully logged in to the server in Phase 3, entered your password in the dialog box that popped up, and saved the password in your keychain, you are ready to use the Upload with scp Automator action.
These SSH public key authentication instructions are based on information in the following sources:
- Anton Altaparmakov. Using SSH Agent With Mac OS X Leopard. http://www-uxsup.csx.cam.ac.uk/~aia21/osx/leopard-ssh.html
- Jeremy Mates. OpenSSH Public Key Authentication. http://sial.org/howto/openssh/publickey-auth/