-
We all know most of mirror/leech repository is banned from heroku. What heroku ban exactly ?
- Heroku ban specific layer from docker and not all docker layers. In this repository heroku banned
COPYlayer that copy all repository files to docker container. So changingCOPYlayer by removing files, suspension will not occure.
- Heroku ban specific layer from docker and not all docker layers. In this repository heroku banned
-
But how to get repository files to run the code ?
- We are using update feature that clone the files from master branch of official repository to docker container before bot startup.
-
Is there any other way to avoid suspension?
- Yes! deploy master branch twice. But how this works ?! When you deploy heroku app with specific name, heroku store docker cache for next time deploy for this app with it's specific name, so docker image will not be downloaded again and again for this app since already downloaded first time unless there is a change in docker layers.
- If You have deployed an app for first time and after deploying done, you have deleted the app immediately, what will happen? Heroku will store docker cache and your app will not suspened since app already deleted.
- Heroku have issue in this case. When you deploy from same docker with same app name your app will not got suspened. If you are cli user you will notice at layers pushing step that some of layers marked as
layer already exists.
Important Notes for Both Branches
- Don't delete .gitignore file.
- Read all variables definitions from master branch readme.
- Don't edit/add variables from Heroku, if you want to edit/add simply do it in config.env from gists if using gists or from private repository if added in it, then restart your app. Yuo can only add
CONFIG_FILE_URLvariable from heroku. - Keep the programmer inside you away and follow the steps.
- Don't deploy from browser or hmanager app, only from cli or workflow.
Important Notes for Heroku Branch
- This Branch only for DEPLOYING! Don't use it for update!
- Generate all your private files from master branch (token.pickle, config.env, drive_folder, cookies.txt ...).
- If you want to edit aria.sh or qBittorrent.conf or any other file in repository you must add
UPSTREAM_REPOof your edited public or private fork else YOU WILL GET THE OFFICIAL CODE AND ALL YOUR CHANGES WILL NOT TAKE EFFECT. - To stay up to date don't fill
UPSTREAM_REPO, on eachdyno restartyou will get lastest commits from official repository. BUT any change in requirements of official repository you need to update you code and deploy again or your bot will not boot after dyno restart, so if you have problem with this then fillUPSTREAM_REPO. - You can fill
UPSTREAM_REPOby your public/private fork link and fetch manually then you can update your bot byrestart cmdanddyno restart. - If want to add private files before deploying then add them to heroku branch not master branch!
- Clone this repo:
git clone https://github.com/anasty17/mirror-leech-telegram-bot mirrorbot/ && cd mirrorbot
- Switch to heroku branch
- NOTE: Don't commit changes in master branch. If you have committed your changes in master branch and after that you switched to heroku branch, the new added files will
NOTappear in heroku branch. Skip this step if you are deploying master branch.
- NOTE: Don't commit changes in master branch. If you have committed your changes in master branch and after that you switched to heroku branch, the new added files will
git checkout heroku
- After adding your private files
git add . -f
- Commit your changes
git commit -m token
- Login to heroku
heroku login
- Create heroku app
heroku create --region us YOURAPPNAME
- Add remote
heroku git:remote -a YOURAPPNAME
- Create container
heroku stack:set container
- Push to heroku
- 1st cmd for heroku branch and 2nd for master branch
git push heroku heroku:master -f
git push heroku master -f
- To create heroku-postgresql database
heroku addons:create heroku-postgresql
- To delete the app
heroku apps:destroy YOURAPPNAME
- To restart dyno
heroku restart
- To turn off dyno
heroku ps:scale web=0
- To turn on dyno
heroku ps:scale web=1
- To set heroku variable
heroku config:set VARNAME=VARTEXT
- To get live logs
heroku logs -t
- Go to Repository Settings -> Secrets

-
Add the below Required Variables one by one by clicking New Repository Secret every time.
- HEROKU_EMAIL: Heroku Account Email Id in which the above app will be deployed
- HEROKU_API_KEY: Your Heroku API key, get it from https://dashboard.heroku.com/account
- HEROKU_APP_NAME: Your Heroku app name, Name Must be unique
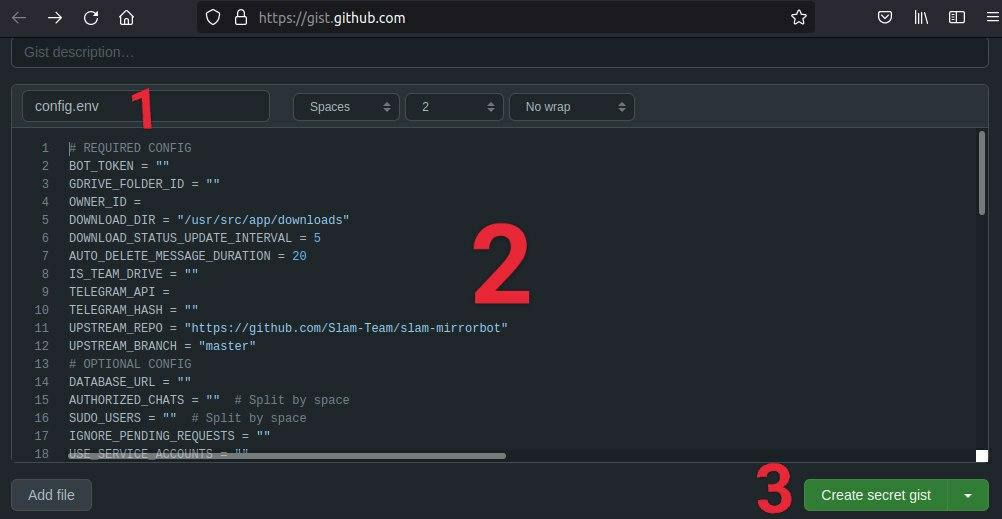
- CONFIG_FILE_URL: Copy This in any text editor.Remove the REMOVE_THIS_LINE=True line and fill the variables. For details about config you can see Here. Go to https://gist.github.com and paste your config data. Rename the file to config.env then create secret gist. Click on Raw, copy the link. This will be your CONFIG_FILE_URL. Refer to below images for clarity.


-
Remove commit id from raw link to be able to change variables without updating the CONFIG_FILE_URL in secrets. Should be in this form: https://gist.githubusercontent.com/username/gist-id/raw/config.env
-
After adding all the above Required Variables go to Github Actions tab in your repository.
- Select Manually Deploy to Heroku workflow as shown below:

- Choose branch then click on Run workflow


