- Understand the steps needed to complete an assignment
- Submit assignments in Canvas through CodeGrade
During this course, you will work on various assignments as you learn to code. All assignments will be interactive pieces of curriculum that require some work. Some assignments may ask you to follow a set of instructions, while others will ask you to figure out your own solution to pass specific tests. This lesson is your first assignment!
All assignments are hosted on GitHub. In order to work on them, however, you will need to complete work on your local machine. Once you're done, you will submit your assignment on a platform called CodeGrade through Canvas.
The general process is:
- Click the blue "Fork" button in Canvas
- Create a personal copy (a 'fork') of the assignment into your GitHub account
- Download your personal copy (referred to as 'cloning') to your computer
- Complete the required work
- Submit your completed work in Canvas through the CodeGrade window
In this assignment, you'll learn the workflow that you will be using to complete your assignments. You can follow along with the steps in the videos below, or continue reading to get a more detailed explanation of the process of working on lessons in Canvas.
For Windows users, follow along with this video:
TO DO: REPLACE VIDEO
For Mac users, follow along with this video:
TO DO: REPLACE VIDEO
Throughout this course, you will be downloading many assignments, so it is important to keep your code organized. If you haven't yet, we recommend that you go through the steps in the previous lesson to set up a directory where you can keep all of your work for this course.
Note: The process we'll go through in this lesson will create sub-folders automatically. Whenever you are starting a new assignment, navigate back to your main
se-prepfolder (cd ~/Development/code/se-prep) before cloning the assignment to ensure these sub-folders don't get created within each other.
All the lessons in this course have a corresponding repository (repo) in GitHub. On this page in Canvas, you should see two icons in the upper right corner. The first says Fork, which will open the lesson's GitHub repo. The second is a flag, which you can use to submit an issue for the lesson (e.g., if you find a typo or other error).
To fork an assignment, click the Fork button to open its GitHub repo. In the top right corner, you should see another button that says Fork. Click on that, and you should get a screen that looks something like this:
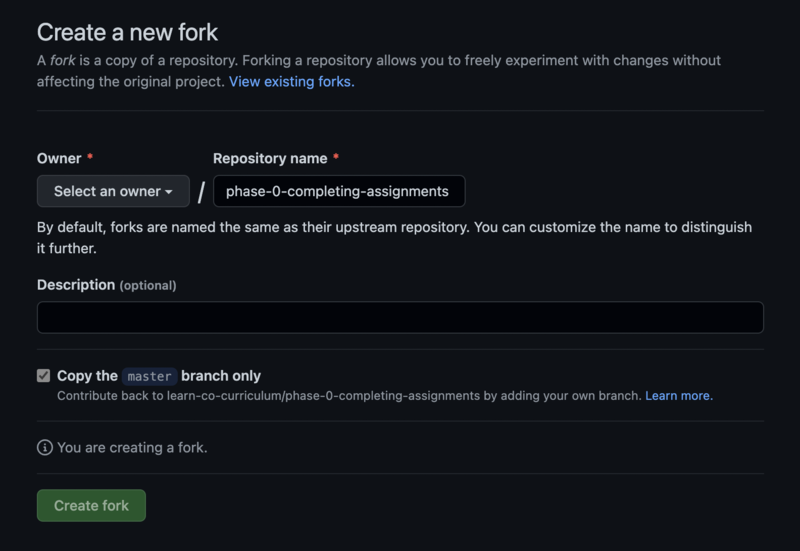
In the Owner dropdown, select your GitHub username, then click the Create fork button.
Forking is a process which creates an exact copy of a collection of code and files. Once you've created a fork on your own GitHub account, you will be able to edit the files in the repository and write your own code solution without interfering with the original copy.
Once your fork is ready, the next step is to download (clone) your new repository to your local machine.
To download the repository for this lesson, make sure you're in your personal
fork on GitHub, then click the Code button. A pop-up will appear which shows
several options for cloning: HTTPS, SSH, and GitHub CLI. Before
doing anything else, be sure to switch to SSH. With SSH selected, you
should see what looks sort of like an email in the box below, starting with
[email protected]:. You should see your GitHub name after the :.
From here, click the copy button.

Now, open your terminal and navigate to where you'd like to download the
assignment (e.g. cd ~/Development/code/se-prep). Type git clone and a space,
then paste in the copied SSH link from GitHub. It should look something like
this:
$ git clone [email protected]:<your-user-name>/phase-0-completing-assignments-codegrade.gitPress enter, and you should see a flurry of terminal activity.
Troubleshooting: If you are a Mac user and you see the following message:
xcrun: error: invalid active developer pathYou need to install the Xcode Command Line Tools. Run the following command to install them:
$ xcode-select --installAnd follow the prompts. Then try running the
git clonecommand again. See this Stack Overflow post for more details. Note that you may need to re-installxcode-selectany time you update your Mac OS version.
Once the terminal gives you control to type again, a new folder with the GitHub name of the assignment will have been created. Change directory into this folder to access the assignment files.
$ cd phase-0-completing-assignments-codegradeNow type code . to open up a text editor window with access to all of the
assignment's files. These instructions are now also available on your local
machine in README.md.
Note: the first time you open a directory in Visual Studio Code, you'll see a message asking "Do you trust the authors of the files in this folders?" This is a security feature of Visual Studio Code. It's safe to choose "Yes", and we recommend selecting the "Trust the authors of all the files in the parent folder" option to prevent this warning from coming up every time you open a lesson. Just be sure to download your code from trusted sources!
Most assignments will have tests that check your work and provide immediate feedback in the terminal. We'll walk through some examples in upcoming lessons.
This assignment has two tests. The first checks to see if you've correctly cloned this assignment to your local machine. If you've followed the steps above, you've completed everything you need to do to pass the first test. Now, we need to run it and find out what our second test is.
First, run npm install to install the tools necessary to run the test. You
should again see a flurry of text as dependencies are installed. Once the
terminal has finished with that command, run npm test. You should see the
results of your tests. By cloning this assignment down, you've already passed
one test!
This assignment
  ✓ has been correctly cloned to your local environment
  1) has a file named myfile.md


1 passing (5ms)
1 failing
Note: If you did not receive a passing test, or if your terminal produced some sort of error, walk through the steps in this lesson again and make sure you've followed each one. If you got a "command not found" error, go back to the Node.js installation lesson for your OS and go through the steps provided there to make sure Node was installed correctly. If you're still receiving errors, we recommend going back through all local environment setup instructions again to ensure everything is set up properly.
However, there is still one test not passing. The terminal gave us a detailed error saying why we did not pass the test:
1) This assignment
      has a file named myfile.md:
    AssertionError: No file named 'myfile.md' found. Create one in the root of the assignment's directory: value: expected './myfile.md' to exist
We can use this error to figure out what we need to do to pass it. In this case,
we just need to create a file called myfile.md inside the assignment
directory. Let's create it with the CLI commands we just learned.
In the terminal, make sure you're in the root of the assignment directory
(phase-0-completing-assignments-codegrade). If you're not already, cd into
it. Then use the touch command to create myfile.md.
To make sure it was created successfully in the correct area, use the ls
command. The output should look like:
CONTRIBUTING.md         README.md               node_modules            package.json
LICENSE.md              myfile.md               package-lock.json       test
When you run npm test again, both tests should now be passing!
This is the general workflow you will follow when working on assignments with tests:
- Install the tools needed for the test by running
npm install(ornpm i) - Run the test initially to see what tests you need to pass.
- Work on the assignment with those tests in mind.
- As you work, run
npm testas many times as you'd like to test your code. - Once all your tests are passing, it's time submit your assignment - or is it?
If you go to your forked version of the assignment on GitHub, you'll see
that the myfile.md file you created is not there. This is because you only
made the change on your local clone. Changes that you make on a locally cloned
repository are not automatically synced to the repo up on GitHub. You have to
manually sync the changes. This is a good thing, it gives you more control over
what changes get "pushed" up to the GitHub repo and when.
The process requires three terminal commands:
git addgit commitgit push
We will learn about these commands in far more detail later on. For now, we'll just cover the surface basics that will allow you to turn in your assignments.
These commands should be run within the directory with changes to push. For
example with this assignment, you should be running the following commands
within the phase-0-completing-assignments-codegrade directory.
This command lets us tell git what changes and files we want to sync within a repo. You can specify certain files to track, or you can track all files at once that have changes to sync.
To track specific files, you just need to add the file names as arguments. For example:
git add file1.md file2.mdTo track all files at once, you can use a period as an argument instead .:
git add .Let's go ahead and track our change by using the git add . shortcut.
Once you've tracked all the changes you want to save with git add, the next
step is to save all those changes at once. This is done with git commit. To
make a commit, the command is:
git commit -m "short message briefly explaining the changes saved in this commit"Any time you commit something, you should include a message with it to explain
what changes are actually in the commit. These messages should be one line and
short. The -m flag says we want to add one and should be followed by the
message in quotes.
Let's commit our tracked change. In the terminal, run:
git commit -m "created myfile.md"We've now tracked and saved our changes - but they're still not up on the
GitHub repo. That's because we haven't told Git where we want these saved
changes to go. We need to do so with git push. The full command is:
git push <remote> <branch>We will learn what a remote and branch are in greater detail later on.
For now, consider the remote as the repository that is on GitHub - in this case, the copy of the assignment that you forked into your GitHub account earlier.
It would be tedious if we had to copy and paste the entire repository link every
time we want to push a change, however. Instead, these remotes use aliases that
point to the URL. When cloning a repository down to your machine, an alias gets
automatically created for you called origin, which is the remote we will push
to.
You can see this yourself by running the command git remote -v. This will list
the remotes your repository has. This is also a good way to verify that you are
pushing your changes to your fork of the assignment
Then consider a branch as the version of the code you want to push the changes
to. In most cases, this branch will be called main or master for older
repositories. You can check what branch your repository uses by using the
command git branch, which will list all the branches your repository has. For
this assignment, it should be main.
Putting that all together, we can now completely fill out the git push command
and push our changes up:
git push origin mainNow, finally, when you load your forked version of the assignment on GitHub, you
should see the myfile.md file! With all your work now available on GitHub, you
can finally submit the assignment.
All assignments for this program utilize a tool called CodeGrade to accept and automatically grade your work.
To submit your work for grading, head back to the assignment on Canvas and scroll down to the bottom of the page. There, you should see a button that says "Load <Assignment Name> in a new window". For this lesson, it should look like:

Click on that button, and a new window of the CodeGrade interface should open up. As you haven't submitted an assignment for this lab yet, click on the "Create submission" button. On the next page that opens, click on the "GitHub" button. As long as you're logged onto GitHub, this step should connect CodeGrade to your account.
If you were not logged in and the connection is unsuccessful where you don't see a list of your repos, log in and try again. If you were logged in and it still did not work, try again, but instead of clicking the "GitHub" button, click the "Or manually connect your Git repository" link underneath. CodeGrade will walk you through the manual set up, be sure to read and follow their instructions carefully.

Once your GitHub account is connected, whether automatically or manually, you
should see a list of your repos in the CodeGrade window. Find the repo that
matches the assignment you're submitting, in this case
phase-0-completing-assignments-codegrade, and click the blue "Connect" button.
When CodeGrade finishes connecting the repo, it should show you a success message with a link to view your submission. Click on that link.

On this new page, there are three different tabs: Code, Feedback Overview, and AutoTest.
The Code tab is as it sounds, all the code you submitted. The Feedback Overview is where you can see feedback on your work from instructors if they've provided any.
The AutoTest tab is what we'll focus on in this lesson. This tab is what runs the test that automatically grades your work. It will take some time, and you can see the progress in the small box on the right side of the Setup section. When it's done, it will say "Done" and your score will update in the Automatic Tests section.

If you don't pass, don't fret, you can still fix it! You can click on the
test(s) within the Automatic Tests section to see which ones failed. Then, you
can fix those errors within your local version of the repo, and go through the
process of using git add, git commit, and git push to push your changes.
CodeGrade will then automatically re-run the test when it detects changes have
been made to the GitHub repo.
To see the results after you've already made the initial submission, navigate back to CodeGrade through the button on Canvas. Instead of on "Create submission", click on the "Latest submission" button to get taken back to the AutoTest page.

Whew, that was a lot. While it will take some time in the beginning, the more assignments you complete and submit, the easier the process should become. If you ever forget a step, that's OK. Come back to this lesson as many times as you need until it becomes second nature.
For most assignments, you will go through the process we just walked through. In our curriculum, these assignments are often referred to as labs — coding lessons that include tests. There are a few other types of assignments, though, that require slightly different submission steps:
- Code-alongs: These also require code, but will guide you through what needs to be written. There are no tests to pass, but you will still need to go through forking, cloning, pushing your changes up, and submitting the repo to CodeGrade to be marked as complete.
- Portfolio Projects: For these assignments, you'll be building fully functional applications. Some guidelines and requirements will be provided, but it will be up to you to design and create your own app. These will eventually become the projects you showcase to potential employers! You will submit your projects in Canvas by submitting a link to your GitHub repo.
- Blog Submissions: Blogs are a required part of our Software Engineering courses. They help to develop your online presence and are a great way to reinforce the concepts you learn. You'll write your blog posts on a different platform, but submit links to them in Canvas.
For both portfolio projects and blog posts, you'll need to manually submit a link to your work on Canvas. While viewing the assignment, you should see a Submit Assignment button in the upper-right section of the page.

Clicking this button will bring you to the bottom of the page where you can submit a URL link to your work.

Upon submission you should see confetti appear, indicating that your submission has been accepted.
Note: It is possible to submit lab and code-along assignments manually this way. However, the assignment will only be marked as Submitted, not Complete.
Congratulations, you've completed your first assignment and submitted it to CodeGrade! You now know how to work on and submit assignments going forward:
- Click the Fork button on the Canvas assignment
- Once the assignment is forked, clone it down to your local machine
- Complete any required work, then run the
git add,git commit, andgit pushcommands - Submit your assignment through CodeGrade by selecting your GitHub account, then connecting the appropriate repo
Equipped with this knowledge, you are now ready to tackle greater challenges!


