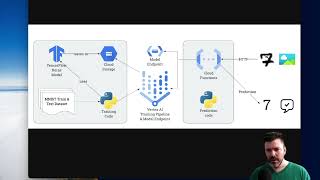
Objective: train, deploy, and get online predictions from a TensorFlow model to recognize handwritten digits.
The deployed project provides a Cloud Function that accepts base64-encoded images of digits and returns the predicted digits.
See also: MNIST Database

As seen on TV 📺 Youtube: Hello, MNIST: Serverless machine learning training & prediction
Install dependencies & create cloud project + bucket in a region (important! example: us-west1).
Export appropriate environment variables: CLOUD_BUCKET_NAME, CLOUD_PROJECT, CLOUD_LOCATION.
gcloud config set project $CLOUD_PROJECT

# 1. Upload the custom training code
cd training-code
./upload-training-code.sh

# 2. Create the Vertex AI training pipeline using Cloud Console.
# This will take a few minutes. When complete, deploy the Vertex
# AI Model to an Endpoint and note the endpoint id. Export the
# endpoint ID to the environment as CLOUD_ENDPOINT_ID

# 3. Upload the prediction function
cd ../prediction-function
./deploy.sh

# 4. Get predictions
cd ..
./get-predictions.py sample-images/sample-digit*
You need a python 3 environment with at least these dependencies:
pip install google-cloud-functions
pip install functions-framework
pip install tensorflow
pip install google-cloud-aiplatform
pip install pillow
pip install jupyterlab
Create a Cloud project, then a Storage bucket. Make sure the bucket is in a specific region (eg us-west1).
Put the following into the .envrc file, adjusting appropriately:
export CLOUD_STORAGE_BUCKET=david-test20230621
export CLOUD_PROJECT=dchaley-2023-06-21-tensorflow
export CLOUD_LOCATION=us-west1
The notebook in training-notebook(adapted from this TensorFlow sample) demonstrates the end-to-end process of:
- Creating & training a model from the MNIST data
- Writing test data to an image file and reading it back
- Classify aka "predict" the saved image file
To create a Vertex AI model, follow these steps. (Make sure .envrc is loaded)
First, upload the "custom training code" which creates & fits the model using our TensorFlow code.
cd training-code
./upload-training-code.sh
Then create a training pipeline.
- Training method: defaults. (Make sure 'Custom training' is selected)
- Model details. Pick a name. (E.g. MNIST)
- Training container. Use TensorFlow 2.1. The package location is
gs://$CLOUD_STORAGE_BUCKET/training/trainer-0.1.tar.gz. The python module istrainer.task. The model output directory isgs://$CLOUD_STORAGE_BUCKET/trained-models/. - Hyperparameters. Don't enable.
- Compute & pricing. Pick your region, and a machine type. I used
n1-standard-4, the smallest available. - Prediction container. Use a pre-built container. It should prepopulate appropriate values.
Click Start Training and wait a while.
See also these docs.
Once the the training pipeline completes, the model is available. To use it "as a service" we need to set up an endpoint.
I used default parameters, and chose the smallest 'standard' machine type (n1-standard-2).
Once the endpoint deploys, fetch the endpoint ID from the sample request and put in .envrc.
export CLOUD_ENDPOINT_ID=2493384508540190720
Now, we can get online predictions:
$ ./get-prediction.py training-notebook/mnist-test-img-0.png
Prediction(predictions=[[-7.2741375, -8.51450443, -1.42691994, 0.146827221, -14.4964466, -5.78822708, -17.5060711, 11.9577522, -5.4256196, -3.20187664]], deployed_model_id='5989409272402804736', model_version_id='1', model_resource_name='projects/931107229183/locations/us-west1/models/9028318674087313408', explanations=None)
7
Our cloud function takes a list of base64 encoded image files, and runs them through the model.
To deploy the function, make sure your .envrc is loaded as above.
Deploy the function:
cd prediction-function
./deploy.sh
To call the function, send it a json object like this:
{
    "b64_images": [
        "base64string",
        "another_b64",
        "etc64"
    ]
}
For example, using gcloud and the shell:
gcloud functions call handler --region $CLOUD_LOCATION --data "{\"b64_images\": [\"`cat sample-images/sample-digit7-example3.png| base64 -w 0`\"]}"
See also prediction README for local development.
Helper to call the cloud function, passing in images from the command line.
./get-predictions.py <filenames>
for example, to generate a prediction for every sample image:
./get-prediction.py sample-images/sample-digit*
Output:
[0, 0, 0, 0, 0, 0, 0, 0, 0, 0, 0, 0, 0, 0, 0, 1, 1, 1, 1, 1, 1, 1, 1, 1, 1, 1, 1, 1, 1, 1, 2, 2, 1, 2, 2, 2, 2, 2, 2, 2, 2, 2, 2, 2, 2, 3, 3, 0, 3, 3, 3, 3, 3, 3, 3, 3, 3, 3, 3, 3, 4, 4, 4, 4, 9, 9, 4, 8, 4, 4, 4, 4, 4, 4, 4, 5, 5, 5, 5, 5, 5, 5, 5, 5, 5, 5, 5, 5, 5, 5, 6, 6, 6, 6, 6, 6, 6, 6, 6, 6, 6, 6, 6, 6, 6, 8, 7, 7, 7, 7, 7, 7, 7, 7, 7, 7, 7, 7, 7, 7, 8, 8, 8, 8, 8, 8, 8, 8, 8, 8, 8, 8, 8, 8, 8, 9, 9, 9, 9, 9, 9, 9, 9, 9, 9, 9, 9, 9, 9, 9]
To test correctness, try something like this:
correct = sum(map(lambda x: [x] * 15, range(10)), [])
result = [0, 0, 0, 0, 0, 0, 0, 0, 0, 0, 0, 0, 0, 0, 0, 1, 1, 1, 1, 1, 1, 1, 1, 1, 1, 1, 1, 1, 1, 1, 2, 2, 1, 2, 2, 2, 2, 2, 2, 2, 2, 2, 2, 2, 2, 3, 3, 0, 3, 3, 3, 3, 3, 3, 3, 3, 3, 3, 3, 3, 4, 4, 4, 4, 9, 9, 4, 8, 4, 4, 4, 4, 4, 4, 4, 5, 5, 5, 5, 5, 5, 5, 5, 5, 5, 5, 5, 5, 5, 5, 6, 6, 6, 6, 6, 6, 6, 6, 6, 6, 6, 6, 6, 6, 6, 8, 7, 7, 7, 7, 7, 7, 7, 7, 7, 7, 7, 7, 7, 7, 8, 8, 8, 8, 8, 8, 8, 8, 8, 8, 8, 8, 8, 8, 8, 9, 9, 9, 9, 9, 9, 9, 9, 9, 9, 9, 9, 9, 9, 9]

percent_correct = [result[x] == correct[x] for x in range(len(correct))].count(True) / len(correct)
print(percent_correct)