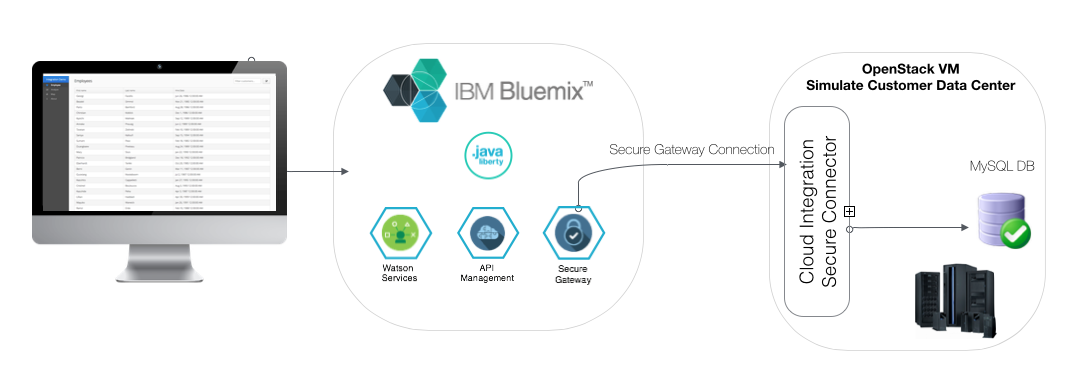
This project shows how a modern web application (running on Bluemix) integrates with a data base that is located in a customers data center. It is meant to illustrate an application in the public cloud is used as a "System of Engagement", while sensitive data remains in a "System of Record" and inside a customers firewall.
We have chosen to implement the Bluemix application in node.js and are using the secure gateway service to implement an encrypted connection between it and the on-premise MySQL database.
For many large customers, the core data that drives their business resides in established databases behind their firewall, accessed through classic middleware (i.e. Oracle Database accessed with .Net software). While this system sustains their business, its evolution is generally slow to non-existent. This structure does not promote the creation of nimble and engaging apps that employees and customers require.
By connecting modern cloud applicatons to these on-prem systems, we are able to quickly create quality user experiences, while safely surfacing the data that we need. Read on to find out how anyone can quickly do this by using IBM Bluemix.
There are several components that need to be set up before being able to give this demo. These are all related to setting up a "mock" back-end system of record that our cloud application will connect to. We estimate it will take you 30 minutes to run through the steps, be aware that you only have to do this once per Bluemix account. The "mock" back-end can then be re-used for future demos.
Important Note: During the following steps, you may see frequent warnings in your console stating sudo: unable to resolve host vm-### when running sudo root commands. You can safely ignore them.
For convenience, we have split the steps up into 4 phases:
Phase 1: Instantiate an OpenStack virtual machine (VM), which will simulate an on-premises data center.
Phase 2: Install a MySQL database instance and seed it with records. This will simulate a data base filled with human resource (HR) data.
Phase 3: Create a Secure Gateway and connect it to the database running in the VM.
Phase 4: Create the app (based on [Vaadin] (https://vaadin.com/home) and JPA [Liberty] (https://en.wikipedia.org/wiki/IBM_WebSphere_Application_Server)), deploy it to Bluemix then connect it to the Secure Gateway endpoint.
We will use a VM in this demo to represent our on-premises data center and will host a MySQL instance in it. This represents our "System of Record".
-
Create a Bluemix Account
Sign up for Bluemix or use an existing account.
-
Create a VM from the console dashboard by clicking on "Run Virtual Machines"
Note: If you do not yet have access to the Bluemix VM beta, complete your request and wait for your confirmation email. This may take up to a few days, so please be patient!
a) Select the
Ubuntu 14.04image for your VMb) Give the VM group any name. We suggest something that identifies it as your "on-premises data center"
c) Select the
m1.smallsize, equivalent to 1.5 GB memory and 1 CPUd) Create an SSH key for securely connecting to your VM. For instructions on how to do this, check out the documentation
e) Default to the
privatenetworkf) Click
Createto create and launch your VM. Once it has started, take note of your public IP address on the VM dashboard -
Open a terminal and make sure that your private key file is in your working directory. It needs to have the correct permissions, to set them use the command:
$ chmod 700 ./NameOfMyPrivateKeyFile.pem -
Use the ssh command to log into your newly created VM. Make sure to substitute the public IP address of your VM (it should start with 129) for XXX.XX.XXX.XX
$ ssh -i ./NameOfMyPrivateKeyFile.pem [email protected] -
Resync your VM's package index files from their sources:
$ sudo apt-get update
-
Install MySQL on your VM:
$ sudo apt-get install mysql-serverNote: During the installation process you will be asked to assign a password to your MySQL server. Make sure to write it down, you will need it for the rest of the setup (specifically in step 4 below).
-
Next, you need to comment out the
bind-addressline in your MySQL options file by using the following command:$ sudo sed -i -e 's/bind-address/#bind-address/g' /etc/mysql/my.cnf -
Open up port 3306 in the VM's firewall:
$ sudo ufw allow 3306/tcp -
Grant remote access to your MySQL DB instance (by using the password you assigned in step 1 above) and then restart the mysql service:
$ mysql -u root -p Enter password: <PasswordFromStep1> mysql> GRANT ALL ON *.* to root@'%' IDENTIFIED BY '<PasswordFromStep1>'; mysql> flush privileges; mysql> exit $ service mysql restart -
Seed your MySQL DB with sample data from this repo:
$ wget https://raw.githubusercontent.com/IBM-Bluemix/onprem-integration-demo/master/db.sql?token=AFP396gx7396eE_EhAt0ap-J6vKnvuJcks5WCUYGwA%3D%3D > db.sql

$ mysql -u root -p -t < db.sql
Create a secure connection between your Bluemix app and the database running in your VM.
-
Navigate to the Bluemix catalog and select the new Secure Gateway service. Choose
Leave Unboundfor now and click Create. -
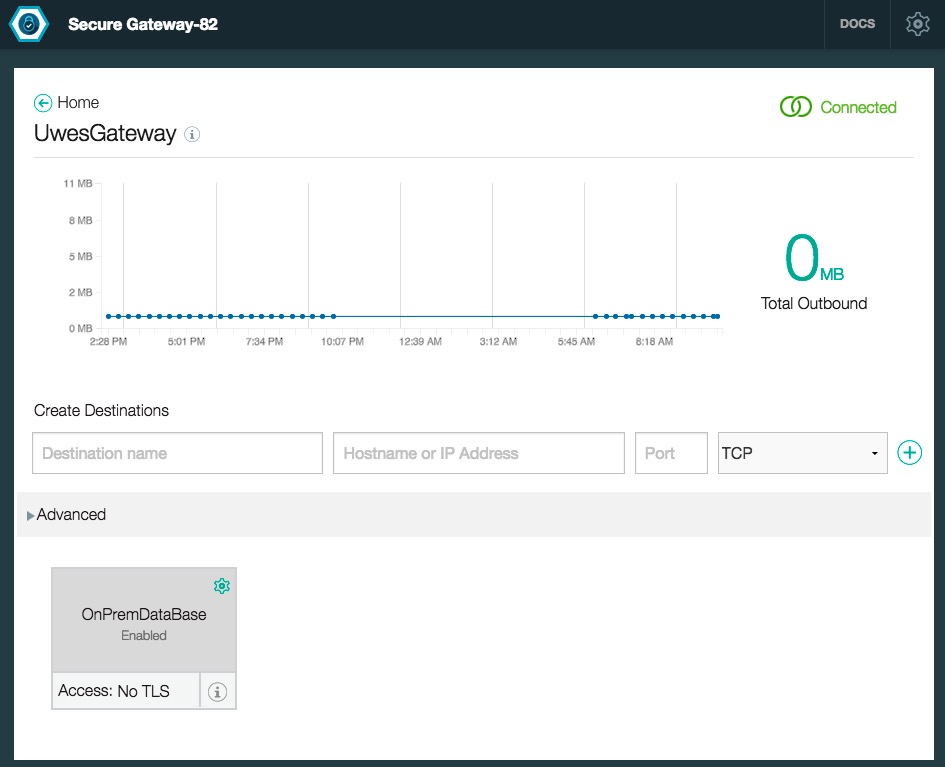
In the secure gateway console choose
Add Gatewayand:a) Give your gateway a name and click on
Add Destinations
b) Give the destination a name, your VM's public IP, port 3306, keep TCP selected, and click the+button c) ClickConnect Itto retrieve the command you will need to establish the secure connection from your VM -
SSH back into your VM and install Docker
$ sudo apt-get install curl $ curl -sSL https://get.docker.com/ | sh -
Run the following command given in step 2c, entering your unique Secure Gateway ID:
$ sudo docker run -d -it ibmcom/secure-gateway-client XXX_prod_ngThis command downloads a Docker image of the Secure Gateway client and runs it as a daemon on your VM
-
The Secure Gateway should now be connected, which can be checked in the secure gateway console:
Now that we have a connection to our MySQL data base (serving as a stand-in for our on-premises SoR) established, we will turn to our System-of-Engagment application. It will ingest (through the secure gateway) and then display the data.
The have chosen a modern web application, written in Java and making use of the Vaadin user interface library.
As a prerequisite, you need Java to be installed on your local machine. If you have not done so, follow these instructions.
To clone, build and deploy the app on Bluemix, follow these steps:
-
Clone the github code repository, navigate to the app folder, and install the Maven dependencies:
$ git clone https://github.com/IBM-Bluemix/onprem-integration-demo.git $ cd onprem-integration-demo/hr_jpa_ui/ -
We will use Apache Maven as our build tool for Java. If you have not done so already, you need to download and install it.
-
Build your app .war file using Maven:
mvn install -
Update the
manifest.ymlfile with a unique host name for your new app (which we will refer to as APPNAME in the remaining steps). -
Download and install the Cloud Foundry CLI tool if you have not already.
-
Connect to Bluemix using the CLI and follow the prompts to log in.
$ cf api https://api.ng.bluemix.net $ cf login -
Push your app to Bluemix:
cf push -p target/vaadin-jpa-application.war -
Create a user provided service to broker communication to your MySQL DB:
cf cups mysql-connect -p '{ "jdbcUrl": "jdbc:mysql://cap-sg-prd-3.integration.ibmcloud.com:15302/employees", "uri": "mysql://cap-sg-prd-3.integration.ibmcloud.com:15302/employees?reconnect=true", "name": "employees", "hostname": "cap-sg-prd-3.integration.ibmcloud.com", "port": "15302", "user": "root", "password": "password" }' -
Now bind the service to your app.
$ cf bind-service <APPNAME> mysql-connect -
Finally, we need to restage our app to ensure the environment variables changes took effect.
$ cf restage <APPNAME>
<Instructions on how a developer/architect would take the sample application and extract the relevant code for reuse.>
<If one or more of the apps in the demo exposes an API, provide a short explanation and how it is used in the sample. Link out to the published REST API documentation.>
<Note how you would like developers to contribute and/or log issues to your project. Also give steps for making pull requests. If your contribution directions become lengthy, break them out into a file called ‘CONTRIBUTING.md’ and link to this.>
The primary source of debugging information for your Bluemix app is the logs. To see them, run the following command using the Cloud Foundry CLI:
$ cf logs <application-name> --recent
For more detailed information on troubleshooting your application, see the Troubleshooting section in the Bluemix documentation.
IBM Redbook: Secure Cloud-to-Mainframe Connectivity with IBM Bluemix


