This is a basic demo that demonstrates ability of HTML5 and JavaScript to make a desktop application.
Here we pickup and example for 8 bit MCU bootloader download software. Which we can get more information from silabs UART bootloader solution:
http://www.silabs.com/Support%20Documents/TechnicalDocs/AN778.pdf
http://www.silabs.com/Support%20Documents/Software/AN778SW.zip
We use HTML5, JavaScript, Node-Webkit to setup the PC application which act as original C# software.
In embedded system design, we need to design desktop application to communicate with embedded devices. It is normally written by C++, C#, or TCL. And it is limited with OS environment. Developer needs to design different software version for Windows, Mac OS and Linux. For those cross platform requirement, we have better solution on it. Browser is common thing on various OS, just follow the HTML5 standard. Design a desktop application with HTML5, we can achieve the cross platform target, it can runs on Windows, Linux and Mac. The programing languages are HTML5, JavaScript and CSS. In the below section, we will investigate it in detail on how to design a HTML5 desktop application in embedded system design.
Sublime is wonderful text editor which support multi-platform. It is recommended to install it before we start looking into HTML5 things.
Go to http://www.sublimetext.com/2, download Sublime Text 2 according your OS environment.
- OS X (OS X 10.6 or later is required)
- Windows - also available as a portable version
- Windows 64 bit - also available as a portable version
- Linux 32 bit
- Linux 64 bit
This helps us easier to install other plugin. Press CTRL+ ~ to console displayed, past below scripts in console and press ENTER.
import urllib2,os;pf='Package Control.sublime-package';ipp=sublime.installed_packages_path();os.makedirs(ipp) if not os.path.exists(ipp) else None;open(os.path.join(ipp,pf),'wb').write(urllib2.urlopen('http://sublime.wbond.net/'+pf.replace(' ','%20')).read())
Once installation completed, restart Sublime Text2, we will see Package Control in Preference -> Package Settings
Sometimes we got JavaScript code which has been compressed. Like below.
It is no convenient to understand the code, press CTRL+ALT+F, the code has been formatted with beautiful form.

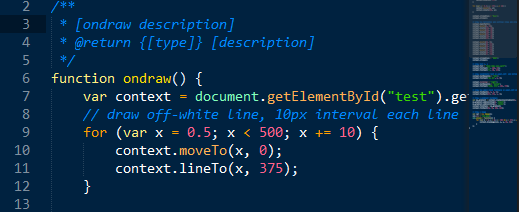
Type /** and press enter, it will automatically generate doxygen compatible function description.
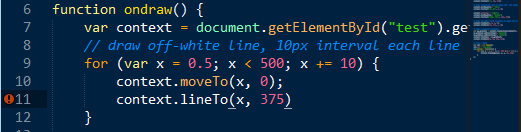
Automatically check programming language grammar error. Below example shows missing semicolon case, it shows a red exclamation mark on left of the line. And display the error information in status bar at bottom of the window.


HTML5 is a markup language used for structuring and presenting content for the World Wide Web and a core technology of the Internet. It is the fifth revision of the HTML standard.
In addition to specifying markup, HTML5 specifies scripting application programming Interfaces (APIs) that can be used with JavaScript. Existing document object model (DOM) interfaces are extended and de facto features documented. There are also new APIs, such as:
HTML5 related APIs.
- The canvas element for immediate mode 2D drawing. See Canvas 2D API Specification 1.0 specification
- Timed media playback
- Offline Web Applications
- Document editing
- Drag-and-drop
- Cross-document messaging
- Browser history management
- MIME type and protocol handler registration
- Microdata
- Web Storage, a key-value pair storage framework that provides behaviour similar to cookies but with larger storage capacity and improved API.
http://diveintohtml5.info/canvas.html
http://www.w3schools.com/html/html5_intro.asp

JavaScript (JS) is an interpreted computer programming language. As part of web browsers, implementations allow client-side scripts to interact with the user, control the browser, communicate asynchronously, and alter the document content that is displayed. It has also become common in server-side programming, game development and the creation of desktop applications.
JavaScript is a prototype-based scripting language with dynamic typing and has first-class functions. Its syntax was influenced by C. JavaScript copies many names and naming conventions from Java, but the two languages are otherwise unrelated and have very different semantics. The key design principles within JavaScript are taken from the Self and Scheme programming languages. It is a multi-paradigm language, supporting object-oriented, imperative, and functional programming styles.
JavaScript was originally developed by Brendan Eich in Netscape.
Although it was developed under the name Mocha, the language was officially called LiveScript when it first shipped in beta releases of Netscape Navigator 2.0 in September 1995, but it was renamed JavaScript when it was deployed in the Netscape browser version 2.0B3.
The change of name from LiveScript to JavaScript roughly coincided with Netscape adding support for Java technology in its Netscape Navigator web browser. The final choice of name caused confusion, giving the impression that the language was a spin-off of the Java programming language, and the choice has been characterized by many as a marketing ploy by Netscape to give JavaScript the cachet of what was then the hot new web programming language.

Node.js is a software platform that is used to build scalable network (especially server-side) applications. Node.js utilizes JavaScript as its scripting language, and achieves high throughput via non-blocking I/O and a single-threaded event loop.
Node.js contains a built-in HTTP server library, making it possible to run a web server without the use of external software, such as Apache or Lighttpd, and allowing more control of how the web server works.
Node.js was created by Ryan Dahl starting in 2009. Its development and maintenance is sponsored by Joyent.
Node.js is a packaged compilation of Google's V8 JavaScript engine, the platform abstraction layer, and a core library, which is itself primarily written in JavaScript.
Dahl's original goal was to create web sites with push capabilities as seen in web applications like Gmail. After trying solutions in several other programming languages he chose JavaScript because of the lack of an existing I/O API. This allowed him to define a convention of non-blocking, event-driven I/O.
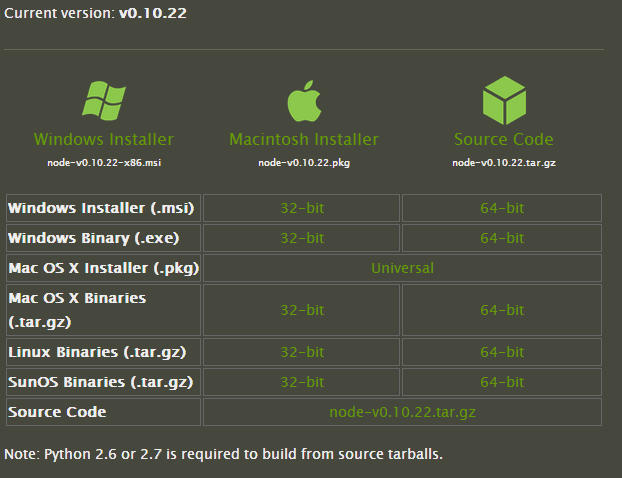
- Download Node.js from http://nodejs.org/
It support Windows, Macintosh and Lnux.
Node.js is released under the MIT license, and bundles other liberally licensed OSS components. - A good place to study node.js, http://www.nodebeginner.org/

Node-webkit is an app runtime based on Chromium and node.js. You can write native apps in HTML and JavaScript with node-webkit. It also lets you call Node.js modules directly from the DOM and enables a new way of writing native applications with all Web technologies.
- Apps written in modern HTML5, CSS3, JS and WebGL.
- Complete support for Node.js APIs and all its third party modules.
- Good performance: Node and WebKit runs in the same thread: Function calls are made straightforward; objects are in the same heap and can just reference each other;
- Easy to package and distribute apps.
- Available on Linux, Mac OSX and Windows.
- Download latest version from https://github.com/rogerwang/node-webkit
- Extract the package and copy all files into directory C:\Program Files\node-webkit
- Configure build and debugging setting in Sublime Text2 for Node-webkit Windows.
- Select Tools->Build system->New Build System, it opens a new file named “untiled.sublime-build”.
- Copy below code into untiled.sublime-build and save it as “Node-webkit.sublime-build”
{
    "cmd": ["nw.exe", "--enable-logging", "${project_path:${file_path}}"],
    "working_dir": "${project_path:${file_path}}",
    "path": "C:/Program Files/node-webkit/"
}-
Press Ctrl+B to build your project.
Please find more information from official website. https://github.com/rogerwang/node-webkit/wiki/Debugging-with-Sublime-Text-2
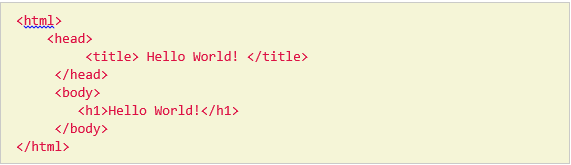
- Create index.html
2. Create package.json
{
    "name": "nw-demo",
    "main": "index.html"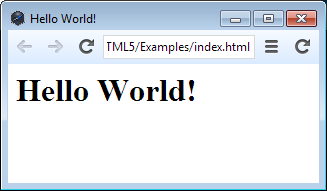
}- Run project by pressing Ctrl+B, it shows below window.
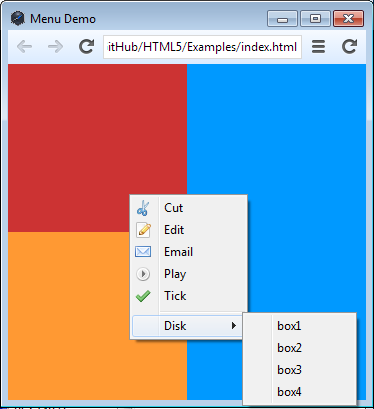
There are several example codes in https://github.com/zcbenz/nw-sample-apps
Here is snap of one example code “menus”
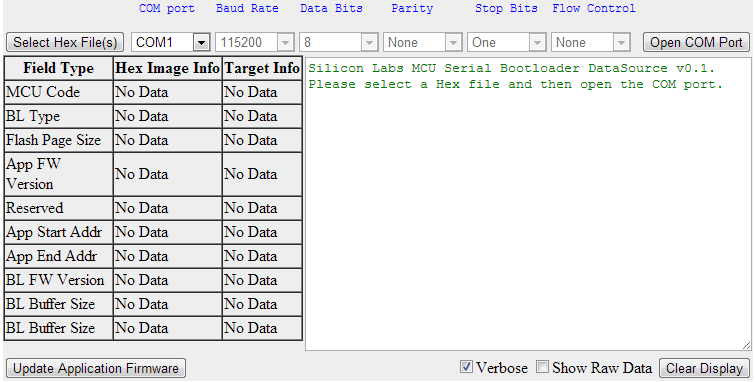
Now we can start working on a real application examples. According the procedure, we can familiar with desktop application development with Node-webkit. We have an F33x UART bootloader PC application, written by C#, the user interface shows below, let us make same one with HTML5 and JavaScript. Get reference from:
http://www.silabs.com/Support%20Documents/TechnicalDocs/AN778.pdf http://www.silabs.com/Support%20Documents/Software/AN778SW.zip
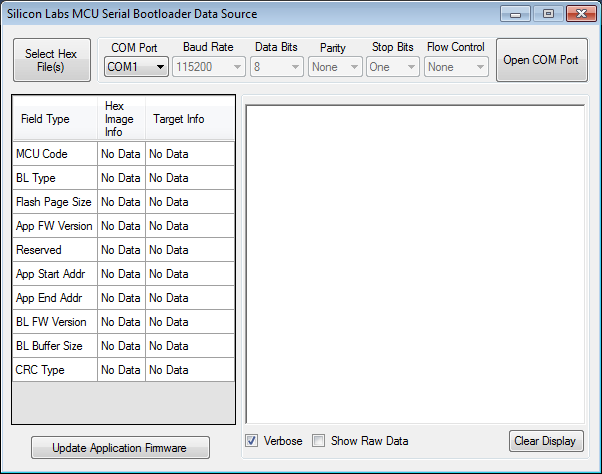
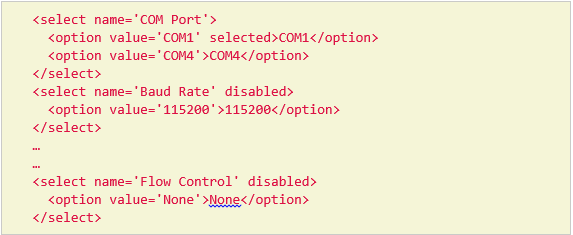
There are four buttons, two check boxes, six drop down lists, one table, and one text area.
a). Add drop down lists
Get reference from http://www.w3schools.com/tags/tag_select.asp.
The effort shows close to C# appearance.

b). Add button
Get reference from http://www.w3schools.com/tags/tag_button.asp
The effort looks good.


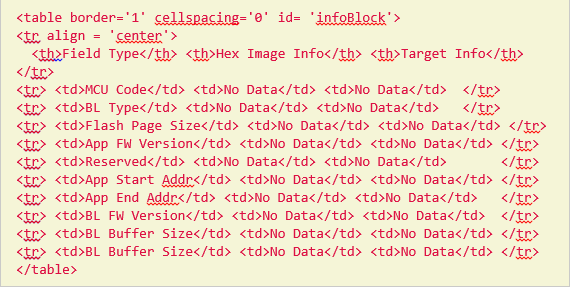
c). Add Tables
Get reference from http://www.w3schools.com/html/html_tables.asp
The effort looks good too.
d). Checkbox
Get reference from http://www.w3schools.com/jsref/prop_checkbox_checked.asp
The effort looks good.


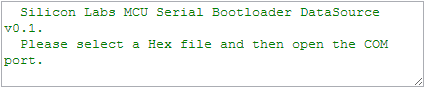
e). Text area
Get reference from http://www.w3schools.com/tags/tag_textarea.asp
The effort looks good too.

f). Final display effort
Get reference from http://www.w3schools.com/html/html_examples.asp
After fine tune UI layout, the final appearance looks like below snapshot.
We need open hex file from explorer window and read file contents.
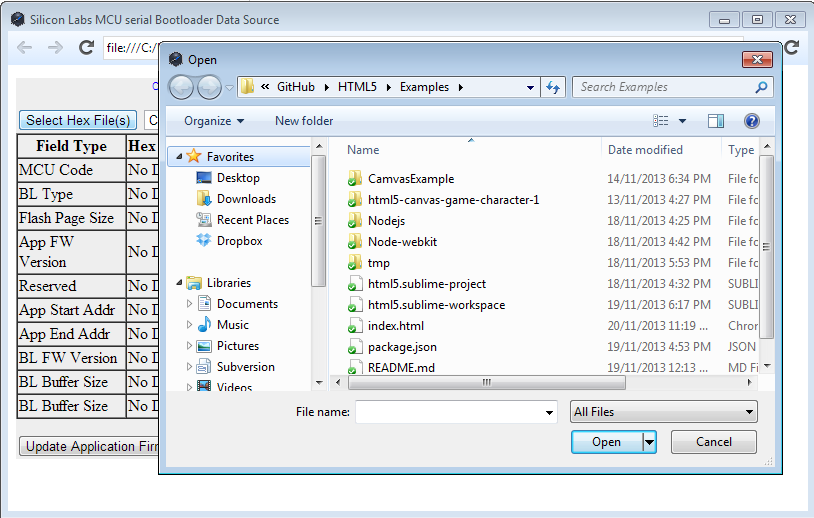
a). Open file Dialog
Here we want click on button “Select Hex File(s)”, it should display file open dialog to select input file. Here we need start coding JavaScript to achieve file access function. Get reference from http://www.w3schools.com/jsref/dom_obj_fileupload.asp
- In index.html
Add input tag to for file upload, the id is “openFile”, the id can be access by JavaScript code. And set it not display style. Also add script tag to execute script.js.
And then change button tag of “Select Hex File(s)”, id is “openHexFile”, onClick event handler function is openFileOption().


- In script.js
Add openFileOption(), notice getElementById() with id ‘openFile’, which defined in indel.html input TAG. And with onClick event of input tag, it call handleFiles, which print out selected file name on console.
function openFileOption() {
  document.getElementById("openFile").click();
}
function handleFiles(files) {
  for (var i = 0; i < files.length; ++i)
         console.log(files[i].name);
}- Press Ctrl+B, click on button “Select Hex File(s)”, we can see a file dialog appeared.
b). Read file contents
Here we need node.js to access local storage file.
Get reference from http://nodejs.org/api/fs.html#fs_fs_readfile_filename_options_callback
In script.js
var fs = require('fs');
function handleFiles(files) {
  fs.readFile(files[0].name, 'utf8', function(err,data) {
         if (err) throw err;
         console.log(data);
  });
}
Press Ctrl+B, click on button ”Select Hex File(s)”, select Sample_User_Application.hex file, and then we can see Hex file contents output in console.
[3928:1120/153906:INFO:CONSOLE(6)]"":03040000020447AC\r\n:0C044700787FE4F6D8FD758107020433CD\r\n:1004330053D9BF1204037FB07E63120415D2AFE415\r\n:04044300F5A780FE9B\r\n:0D040300AFA775A70F75E24043AF048FA7A8\r\n:0104100022C9\r\n:10041500ADA775A70FE4F5C8C39FFFE49EF5CB8F85\r\n:0D042500CA74FFF5CDF5CCD2ADD2CA8DA7BB\r\n:0104320022A7\r\n:030412000204538E\r\n:05045300C2CFB2B2327D\r\n:0B77F500250101020136071BA5C23D63\r\n:00000001FF\r\n"",
a). Introduction
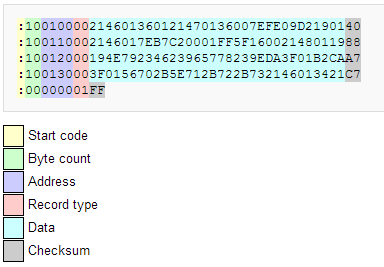
Intel HEX is a file format for conveying binary information for applications like programming microcontrollers, EPROMs, and other kinds of chips. The format is a text file, with each line containing hexadecimal values encoding a sequence of data and their starting offset or absolute address. Each line of Intel HEX file consists of six parts:
- Start code, one character, an ASCII colon ':'.
- Byte count, two hex digits, a number of bytes (hex digit pairs) in the data field. 16 (0x10) or 32 (0x20) bytes of data are the usual compromise values between line length and address overhead.
- Address, four hex digits, a 16-bit address of the beginning of the memory position for the data. Limited to 64 kilobytes, the limit is worked around by specifying higher bits via additional record types.
- Record type, two hex digits, 00 to 05, defining the type of the data field.
- Data, a sequence of n bytes of the data themselves, represented by 2n hex digits.
- Checksum, two hex digits
Example of Hex file
b). Hex parser coding
Get reference from https://github.com/bminer/intel-hex.js
- User firmware structure:
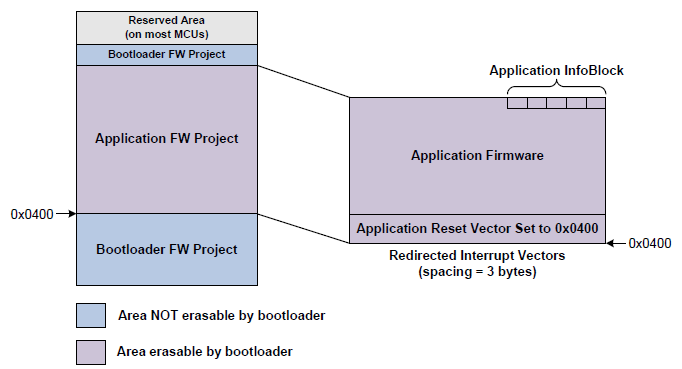
The user firmware application structure look like below. The user firmware start address from 0x400, and at end of user firmware area, there is application info block which record the user firmware information, something like App start Address, App End Address, BL type, etc.
In our example, the user application firmware start address is 0x400, however, the application info block address at 0x77F5. That means two pages are needed for this firmware, and a lot of pages bare between first occurred page and last occurred page.
- Modification on Intel-hex.js:
The original hex parser JavaScript will fill 0xFF in page which is not used. In our case, it will generate a big image from address 0x0000 to 0x7800, which is too large for us. So an array flashPageInUse added in intel-hex.js to record which page is being used. It also as one of return values.
Part of original hex file:
:03040000020447AC The data segment is “020447”.
Part of parsed hex file output:
[3572:1121/101801:INFO:CONSOLE(18)] "{"0":2,"1":4,"2":71, It is 02, 04, 71(0x47), the result shows correct value.
- Parse application info block
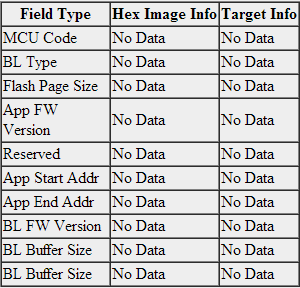
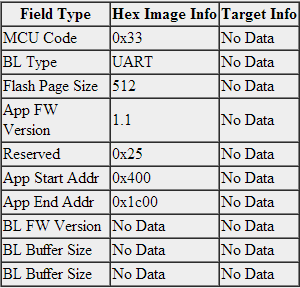
Here is definition of info block, these information needed display to Table in UI.
SEGMENT_VARIABLE(TGT_App_InfoBlock[], const U8, SEG_CODE) =
{
  BL_SPECIFIC_BYTE,
  APP_FW_VERSION_HIGH,
  APP_FW_VERSION_LOW,
  TGT_FLASH_PAGE_SIZE_CODE,
  TGT_BL_TYPE,
  TGT_MCU_CODE,
  TGT_APP_INFOBLOCK_LENGTH,
  SIG_BYTE3,
  SIG_BYTE2,
  SIG_BYTE1,
  SIG_BYTE0,
};- Output to Table
Named table id = ‘infoBlock’ in index.html Open the table by id in script.js, and handle info block from hex parse result.
function infoBlockDisplay(tmp) {
  var infoTable = document.getElementById('infoBlock');
  // MCU code
  infoTable.rows[1].cells[1].innerHTML = '0x' + tmp[FLASH_PAGE_SIZE - 6].toString(16);
  // BL type
  if (tmp[FLASH_PAGE_SIZE - 7] == 1) {
         infoTable.rows[2].cells[1].innerHTML = 'UART';
  }
  // Flash page size
  if (tmp[FLASH_PAGE_SIZE - 8] == 2) {
         infoTable.rows[3].cells[1].innerHTML = '1024';
  } else if(tmp[FLASH_PAGE_SIZE - 8] == 1) {
         infoTable.rows[3].cells[1].innerHTML = '512';
  }
  // App FW Version
  var ver_high = tmp[FLASH_PAGE_SIZE - 10].toString();
  var ver_low  = tmp[FLASH_PAGE_SIZE - 9].toString();
  infoTable.rows[4].cells[1].innerHTML = ver_high + '.' + ver_low;
  // Reserved
  infoTable.rows[5].cells[1].innerHTML = '0x' + tmp[FLASH_PAGE_SIZE - 11].toString(16);
  // App Start Addr
  infoTable.rows[6].cells[1].innerHTML = firmwareStartAddress;
  // App End Addr
  infoTable.rows[7].cells[1].innerHTML = firmwareEndAddress;
}- Run result
Press Ctrl + b, click on button “Select Hex file(s)”, and choose Sample_User_Application.hex in file dialog. The result looks good.
Reference from https://github.com/voodootikigod/node-serialport
-
Install serialport plug in for Node.js
Before install serialport plug in for Node.js, we need to install Python 2.76. http://www.python.org/download/releases/2.7.6/, $npm install serialport -
Install nw-gyp
Things become a little difference between normal node.js third party plugin, node-webkit need to rebuild the plug in. Get reference from https://github.com/rogerwang/node-webkit/wiki/Using-Node-modules 3rd party modules with C/C++ addons. $ npm install nw-gyp –g -
Rebuild node-webkit
Enter serialport module directory. $ nw-gyp rebuild --target=0.8.0 -
To use
- Output string “OMG IT WORS” to COM4
var serialport = require('serialport');
var com = serialport.SerialPort;
var serialPort = new com('COM4', {
  baudrate: 115200
});
function serialPortTesting() {
  console.log('COM port open test\n');
  serialPort.write("OMG IT WORKS\r");
}
Also add serialPortTesting() function in anywhere you want. Check the COM4 output with serial terminal tool, we can see sting “OMG IT WORKS” appear on the terminal tool. That means the serial port operation works.
- List all COM ports
 serialport.list(function (err, ports) {
         ports.forEach(function(port) {
                 console.log(port.comName);
                 console.log(port.pnpId);
                 console.log(port.manufacturer);
         });
  });
We can see the output from console.
 ""COM3"",
 ""USB\\VID_10C4&PID_EA60\\0001"",
 ""Silicon Laboratories"" ,
 ""COM1"",
 ""ACPI\\PNP0501\\0"",
 ""(Standard port types)"",
 ""COM4"",
 ""USB\\VID_10C4&PID_EA60\\0003""
 ""Silicon Laboratories"",
- Update COM port dropdown list
function serialPortList() {
  serialport.list(function (err, ports) {
         var coms = [];
         var cnt = 0;
         ports.forEach(function(port) {
                 coms[cnt++] = port.comName;
         });
         coms.sort();
         var comPortInput = document.getElementById('comPort');
         coms.forEach(function(com) {
                 var option = document.createElement('option');
                 option.text = com;
                 comPortInput.add(option, null);
         });
  });
}- Open COM Port button function implementation
function serialPortOpen() {
  var comPortInput = document.getElementById('comPort');
  var comSelected = comPortInput.options[comPortInput.selectedIndex].text;
  console.log(comSelected);
  var SerialPort = serialport.SerialPort;
  var serialPort = new SerialPort(comSelected, {
         baudrate: 115200
  }, false);
  serialPort.open(function (err) {
         if (err) {
                 var textArea = document.getElementById('textArea');
                 var tmp = textArea.value + err + '\n';
                 textArea.value = tmp;
                 return;
         }
         serialPort.write('OMG IT WORKS\r');
  });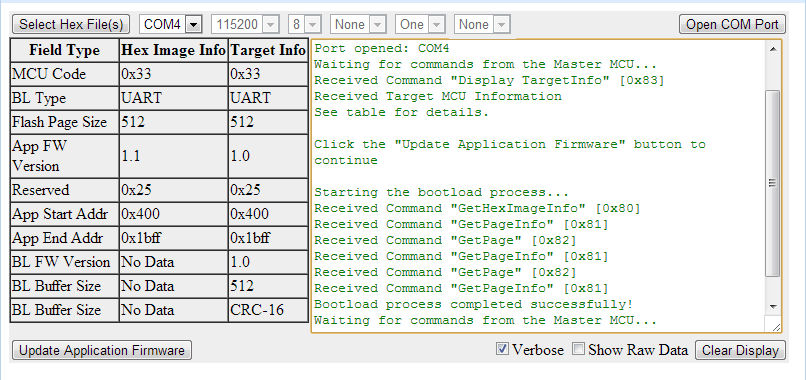
}- The protocol can get reference from F330 UART bootloader firmware.
For quick demonstration purpose, we remove CRC function from firmware. The firmware main loop like below.
 while(SRC_Disp_TGT_Info() != SRC_RSP_OK);
  SRC_Response = SRC_Get_Info();
  SRC_Validate_Response(SRC_Response, SRC_CMD_GET_INFO);
  if (Last_Error != 0)
     goto error;
  Flash_Key0 = rx_buf[5];
  Flash_Key1 = rx_buf[6];
  while(1){
      SRC_Response = SRC_Get_Page_Info();
      SRC_Page_CRC = rx_buf[4] | (rx_buf[5] << 8);
      page_addr = rx_buf[1] | (rx_buf[2] << 8);
      SRC_Validate_Response(SRC_Response, SRC_CMD_GET_PAGE_INFO);
      if (Last_Error != 0)
          break;
      // Exit this loop if no more pages are available from source
      if (SRC_Response == SRC_RSP_DATA_END)
         break;
      SRC_Response = SRC_Get_Page(Page_Buf);
      SRC_Validate_Response(SRC_Response, SRC_CMD_GET_PAGE);
      if (Last_Error != 0)
         break;
      TGT_Erase_Page(page_addr);
      TGT_Write_Flash(Page_Buf, page_addr);
}- Test result.
a. Prepare C8051F330-TB board.
b. Download UART bootloader firmware in it.
c. Connect UART interface to PC, it appears COM4.
d. Press Ctrl+b to run the HTML5 updater.
e. Select blink sample application hex file by clicking Select Hex Files button.
f. Select COM4 from dropdown list, and click on Open COM Port button.
g. The blinky application will download to target board automatically. And reset MCU at end of updating.
h. We can see a green LED(D2) on board is blinking.
i. We are done!
The source code can be found from https://github.com/MarkDing/HTML5_UART_BL
The MIT License (MIT)
Copyright (c) 2013 Mark Ding([email protected])
Permission is hereby granted, free of charge, to any person obtaining a copy of this software and associated documentation files (the "Software"), to deal in the Software without restriction, including without limitation the rights to use, copy, modify, merge, publish, distribute, sublicense, and/or sell copies of the Software, and to permit persons to whom the Software is furnished to do so, subject to the following conditions:
The above copyright notice and this permission notice shall be included in all copies or substantial portions of the Software.
THE SOFTWARE IS PROVIDED "AS IS", WITHOUT WARRANTY OF ANY KIND, EXPRESS OR IMPLIED, INCLUDING BUT NOT LIMITED TO THE WARRANTIES OF MERCHANTABILITY, FITNESS FOR A PARTICULAR PURPOSE AND NONINFRINGEMENT. IN NO EVENT SHALL THE AUTHORS OR COPYRIGHT HOLDERS BE LIABLE FOR ANY CLAIM, DAMAGES OR OTHER LIABILITY, WHETHER IN AN ACTION OF CONTRACT, TORT OR OTHERWISE, ARISING FROM, OUT OF OR IN CONNECTION WITH THE SOFTWARE OR THE USE OR OTHER DEALINGS IN THE SOFTWARE.