Table of Contents
Participants Data Automation
Introduction
This data automation collects participants' data, calculate the average level and assigns participants to their respective class levels. The different music areas that takes into account when assigning classes are piano level, musicianship level, solfa level and conducting level. Flow chart below shows the logic of my project.

Data Model
A Google Sheet is used to store participants' data. There are two worksheets:
-
participants
- This worksheet stores participants' first and last names, piano level, musicianship level, solfa level and conducting level.

- This worksheet stores participants' first and last names, piano level, musicianship level, solfa level and conducting level.
-
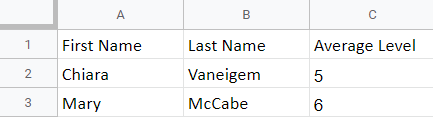
levels
- This worksheet stores participants' first and last names, and their average level of music knowledge based on their piano, musicianship, solfa and conducting skills.

- This worksheet stores participants' first and last names, and their average level of music knowledge based on their piano, musicianship, solfa and conducting skills.

API Credentials
To allow access from the project to Google Sheets, credentials must be generated and provided.
- Google Drive API
- Google Sheets API
Testing
User Input Testing
- Parameters: First Name, Last Name, Piano Level, Musicianship Level, Solfa Level and Conducting Level
- An error message will be printed to the console if the following requirements are not met:
- Has 6 input values
- Values are separated by commas without space
- First 2 inputs in alphabets and last 4 inputs in numbers
- First and last names provided must be more than one letter
- The terminal will repeatedly request for data until data is valid
- An error message will be printed to the console if the following requirements are not met:
Validator Testing
- No errors were returned when passing through code validation PEP8
Deployment
- The site was deployed to Heroku. The steps to deploy are as follows:
- In order for the project to run on Heroku, list of dependencies are installed into requirements.txt file
- Clicked "create new app" button to create app and named "level_of_participants"
- Selected "Europe" as the region and clicked "Create app"
- Navigated to the Config vars section under the Settings tab in Heroku
- Entered and added "CREDS" in the field for key and copied the entire creds.json file from the workspace into the value field
- Entered and added "PORT" in the field for key and "8000" in the field for value
- Navigated to the Buildpacks section and clicked "Add buildpack" button
- Selected Python and saved changes
- Selected node.js and saved changes
- Navigated to the Deploy tab in Heroku
- Selected GitHub as the deployment method
- Confirmed connection to Github and searched "third-portfolio" as the Github repository name to connect
- Manually deployed by using deploy branch option
- Clicked the "Deploy" button
- Terminal is up and running and no errors, indicating the successful deployment
Live Link
Repository
Credits
- The flowchart is generated from Lucid.
