The Abandon Rate Generator
Call center abandonment is a critical KPI, that must be closely monitored at all times. Abandon rate is the percentage of customers that abandon their call before speaking to a call center representative. This is calculated by dividing the number of abandonded calls by the total number of calls received.
Project Purpose
This app is not intended to be used by multiple users at one time. This app was created for an individual call centre to track their perfomance by generating their abandon rate. It allows a user to generate the abandon rate as many times as they please. This app is available to any member of staff within the call center. Tracking this KPI will assist in adhering to SLA's, creating an overall better experience for the customer and improving the call centers performance. We also offer the user an option to view the spreadsheet for further data analysis.
User Experience
Target Audience Goals:
- An app that is easily navigated and interactive.
- An app that is clear and easy to digest.
- To understand the purpose of the app.
- An option to input data.
- To be provided with an abandon rate.
- An option to view all input data.
App Owner Goals:
- An app that is clear and easy to navigate.
- Allow the user to input data.
- Create loyal users.
- Clearly explain the purpose of the app.
- Provide the user with the abandon rate.
- Give the user an option to view previous input data.
User Stories
-
As a app owner:
- I want a simple and interactive user experience.
- I want to clearly explain the purpose of the app and how an abandon rate is generated.
- I want clear output data in the terminal.
- I want the user to confirm their inputs before posting to the spreadsheet.
- I want to provide the user with feedback if an incorrect input is entered.
- I want to give the user the option to view all data inputs.
-
As an app user:
- I want to easily enter in data.
- I want to be provided with feedback if the data entered is incorrect.
- I want an option to confirm all my data is correct before submitting.
- I want to be able to confirm my inputs before the abandon rate is generated.
- I want a simple and easy to navigate app.
- I want to understand the purpose of that app.
Fuctional Scope
The following flowchart displays the flow of "The Abandon Rate Generator".
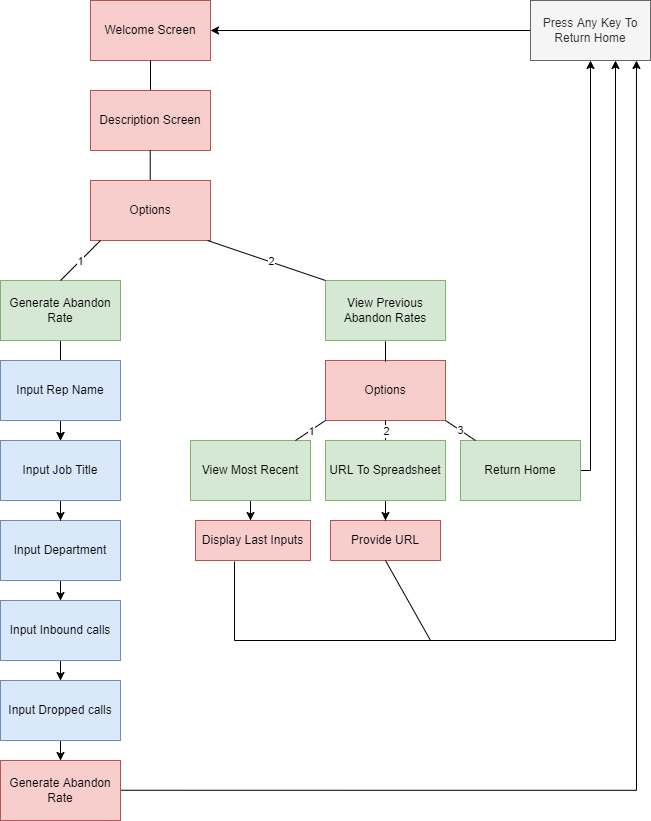
Features
Welcome Message
Welcomes the user to the app.
Description
Informs the user ont the meaning of abandon rate and explains the functionality.
User Options
The user is provided with two options. One to generate an abandon rate and the other, to view prevous abandon rate inputs.
Option 1: Generate an abandon rate
The user will be requested to provide multiple inputs including their name, job title, departement, the number of inbound calls and the number of outbound calls. Before submitting the data the user must confirm if the inputs are correct. Once confirmed the user will be presented with the abandon rate %. If the details are incorrect the user has the option to return home to try again.
Option 2: View previous abandon rates
The user will be provided with 3 options. To view the most recent abandon rate, a link to the spreadsheet to view all previous input data or to return home. If the user choses view the most recent abandon rate they will be provided with the last submission. They will provided with the URL of the spreadsheet if they chose the second option to view all of the inputs. The last option will return the user to the home page to start again if they chose.
Future Features
- I would like to provide the user with an input to provide the number of agents working during the times the inbound calls were recieved. When the data is analysed it may come to light they may have needed more staff which caused a hih abandon rate of calls. Over time the call center will have the data to forcast how busy it will be on certain days at certain times. The agent input will allow the call center to forcast how many agents they may need at those times to reduce the abandon rate. In turn this will help increase the overall performance of the call center.
- I would like to use a data base instead of a spreadsheet.
Language Used
- Python 3.0
Modules & API's Used
- OS
This module allowed me to create and use a clear terminal function. This removed all previous input by the user and outputs by the generator. This helps the readability and flow.
- Time
This module allowed me to retrieve the current date, append it to the list and then post it to the spreadsheet. Using this allows the user to clearly see the date of the abandon rate entries when viewing previous abandon rates.
- Gspread
Using gspread saves the users input and allows the user to view the data when requested.
User Testing:
Testing
- All testing was validated when each feature was added to confirm the functionality had not changed after a significant piece of code or change was added.
User testing that was conducted during the development of this project:
- As a user who lands on the welcome screen, I would expect to have some indication of the apps use. This test passed.
- As a user I would then expect to be provided with some further information and the apps purpose. This test passed.
- As a user I would expect the app will continue when I press enter. This test passed.
- As a user I would expect the options would have different functionalities. This test passed.
- As a user I would expect to be made aware if my inputs were incorrect. This test passed.
- As a user I would expect to move the next page if my inputs were correct. This tests passed.
- As a user I would expect my confirmed inputs to post to the spread sheet. This test passed
- As a user I would then expect to be presented with the abandon rate %. This test passed.
- As a user when I press enter to return home, I expect to be brought to the home page. This test passed.
- As a user I would expect to be made aware if my inputs were incorrect, when chosing my next option - option 2. This test passed.
- As a user I would expect to be provided with the previous abandon rate entry when this option is selected. This test passed.
- As a user I would expect to be presented with the spreadsheet URL when this option is selected. This test passed.
- As a user when I press enter to return home, I expect to be brought to the home page. This test passed.
Pep8 Validator
-
Pep8 validator was user to validate python code.
-
-
-

Bugs
- Bugs that occured during development that are now fixed in deployment:
Issue with terminal was appearing when building the application. In some situations you click a menu option, and expect the function to be carried out and display the next steps or be prompted with a question, the terminal was clearing just as the information was returning. The user experience was effected by this and was a high priority bug to resolve. The process of fixing this was simply to comment out all clear_terminal statements and work backwards to find the issue. This was done as it was hard to see straight away where I may have placed it incorrectly, as they all seemed to be in the right place. Once I found the clear_terminal issue that was effecting the flow, I moved it from its location and added it to a more relevant place where it does not break the flow.
Issues validating text and numbers. When starting this app I never really handled a user input properly before, or even to a point where we only accept a specific input. At first I was accepting any data and not validating the text correctly. You could input any char, spaces, special characters etc. This would have been a major bug if these chars were accepted to the spreadsheet. A simple and elegant solution to this was adding the isalpha() method and the .isspace(), this ensured only alphabetical chars were accepted and you could also leave in a space if you had a double barreled name.
Deployment Steps
Heroku Deployment
- Go to the Heroku site.
- Log in.
- Click the "New" button and click "Creat new app"
- Provide a name for the app in the "App name" field.
- Select your region from the dropdown menu.
- Click "Create App".
- Then proceed to the settings tab.
- Click "config vars".
- Enter a KEY of PORT and it's value of 8000. The click "add".
- Enter a KEY of CREDS. Go to workspace and copy the entire creds.json file and copy this into the value.
- Next click "Add buildpack".
- The python buildpack needs to be added first followed by the nodejs buildpack.
- After the buildpacks been added, proceed to the deploy tab.
- In the deploy tab, select GitHub as the deployment method and connect your GitHub profile.
- Search for the repository name you want to deploy to Heroku and click "connect".
- When your repository is connected to Heroku you can then choose to either manually or automatically deploy your app.
- If you select automatic deploys, Heroku will build a new version of the app each time a change has been pushed to the repository.
- If you select manual deploys, Heroku will allow you to build a new version of your app whenever you click manual deploy.
- You will then see a message off "App was successfully deployed" and a button to take you to your deployed link.
This project uses Google spreadsheet
To activate the Google API credential follow these steps:
- Go to the google cloud website Google Cloud
- Sign in or login.
- Click new project.
- Add project name.
- Navigate on the left panel to API and services.
- Click library.
- Enable google drive API
- Enable google spread sheets API.
- Click in create credentials and fill out the form.
- Service account Id must be copied from your table on google spreadsheets share option.
- Click the application button.
- Select I am not using them from computer engine, App engine or cloud platform.
- Click the next and the done button.
- Go to the APIs and services, click credential.
- Click the service account and keys tab.
- Click on the Add key and select Create New Key.
- Select JSON and the click create.
- It will promt a download json file, this has all your credientals.
To run this application locally follow these steps:
- Clone the repository by clicking code on this page and download as zip.
- Extract contents to your desired location.
- Open the folder in your IDE.
- Create a creds.json file.
- Add your google worksheet credentials to this see above on how to retrieve them.
- It should look similar to this, with your own private keys.
{
  "type": "service_account",
  "project_id": "",
  "private_key_id": "",
  "private_key": "",
  "client_email": "",
  "client_id": "",
  "auth_uri": "https://accounts.google.com/o/oauth2/auth",
  "token_uri": "https://oauth2.googleapis.com/token",
  "auth_provider_x509_cert_url": "https://www.googleapis.com/oauth2/v1/certs",
  "client_x509_cert_url": ""
}
- Also ensure this file is listed in the .gitignore file so nobody gets your credentials.
- Next you want to open a terminal and type python3 run.py.
To run this application locally follow these steps:
- Ensure you have the gitpod google extension added.
- Click the gitpod button on this page.
- Let the environment spin up and load (this will take a few minutes).
- Add your google credientials to the creds.json file.
- Ensure the creds.json file is declared in the .gitignore file.
- Open the terminal.
- Type python3 run.py
Acknowledgements
I would to say a big thank you to my mentor Rahul Lakhanpal, for his support and constant feedback throughout developing the website.
This project is for educational purposes only. It was created as a first milestone project for Code Institutes full stack web development course.
