stated

Stated allows fields in json or yaml to be computed via embedded JSONata expressions, like this:
{
  "to": "world",
  "msg": "${'hello ' & to}"
}
Unlike an ordinary program that executes sequentially, Stated builds a directed acyclic graph (DAG) to determine which order to evaluate the expressions, based on the content of the expressions themselves. This allows complex templates like this to execute efficiently:
{
  "a": "${c}",
  "b": "${d+1+e}",
  "c": "${b+1}",
  "d": "${e+1}",
  "e": 1
}
Unlike an ordinary program, Stated templates can be kept "alive" indefinitely. A change to any of the independent fields
causes change propagation throughout the DAG. Stated includes a node REPL, stated.ts, for testing Stated json templates, and a JS library for embedding stated
in applications. A typical REPL session consists of loading a template with the init command, viewing the computed
output with the .out command and then setting values with the .set command and observing the changed output.
falken$ stated
> .init -f "example/ex08.json"
{
  "a": "${c}",
  "b": "${d+1+e}",
  "c": "${b+1}",
  "d": "${e+1}",
  "e": 1
}
> .out
{
  "a": 5,
  "b": 4,
  "c": 5,
  "d": 2,
  "e": 1
}
> .set /e 42
{
  "a": 87,
  "b": 86,
  "c": 87,
  "d": 43,
  "e": 42
}
Stated templates are modular and can be imported from a URL:
> .init -f "example/ex18.json"
{
  "noradCommander": "${ norad.commanderDetails  }",
  "norad": "${ $import('https://raw.githubusercontent.com/geoffhendrey/jsonataplay/main/norad.json')}"
}
> .out
{
  "noradCommander": {
    "fullName": "Jack Beringer",
    "salutation": "General Jack Beringer",
    "systemsUnderCommand": 4
  },
  "norad": {
    "commanderDetails": {
      "fullName": "Jack Beringer",
      "salutation": "General Jack Beringer",
      "systemsUnderCommand": 4
    },
    "organization": "NORAD",
    "location": "Cheyenne Mountain Complex, Colorado",
    "commander": {
      "firstName": "Jack",
      "lastName": "Beringer",
      "rank": "General"
    },
    "purpose": "Provide aerospace warning, air sovereignty, and defense for North America",
    "systems": [
      "Ballistic Missile Early Warning System (BMEWS)",
      "North Warning System (NWS)",
      "Space-Based Infrared System (SBIRS)",
      "Cheyenne Mountain Complex"
    ]
  }
}
Why Do We Need stated?
Consider this ordinary program:
let a=1;
let b=a;
a=42;
console.log(b); //prints out 1
In an ordinary sequential program the value of b is not affected by changes to the value of a
at any point after the value of b has been assigned. But there are many situations where we
do NOT want a sequential program execution Instead, we actually want b to change when a changes. Broadly, these cases fall under the rubric
of "reactive" or "state driven" applications. When we try to build reactive applications
upon a sequential execution model we are forced to code the data flow graph ourselves and things become
very complex quickly. How could we make b change any time a changes in a sequential world? Perhaps naively like this?
let a=1;
let b=a;
function setA(val){
    a=val;
    b=a;
}
...or perhaps more generally like this:
let data = {
  a: 1,
  b: 1
};

let handler = {
  set: function(target, property, value) {
    if (property === 'a') {
      target.b = value; // When 'a' changes, also change 'b'
    }
    target[property] = value;
    return true; // The set operation was successful
  }
};

let proxy = new Proxy(data, handler);

proxy.a = 2; // Setting a new value for 'a'
console.log(proxy.a); // Outputs: 2
console.log(proxy.b); // Outputs: 2
Every "coding" approach requires us to understand and implement code for propagating data dependencies. Stated solves for this by natively parsing and understanding dependencies.
{
  "a": 1,
  "b$": "a"
}
b$ is now declared to be continuously dependent upon a and reactive to any changes in a. This greatly
simplifies the development of systems that are naturally reactive or dependency heavy, such as:
- dynamic/continuous reactive UI state
- lambda-like computations
- workflows
- configuration file
Getting Started
Installation
To install the stated-js package, you can use yarn or npm. Open your terminal and run one of the following commands:
Using Yarn:
yarn global add stated-jsUsing Npm:
npm install -g stated-jsRunning the REPL
To use the Stated REPL (Read-Eval-Print Loop) it is recommended to have at least version 19.2 or higher of node.js. The
Stated REPL is built on Node REPL.
You can start the REPL by running the stated command in your terminal:
statedThe REPL will launch, allowing you to interact with the stated-js library. For example you can enter this command in the REPL:
> .init -f "example/ex01.json"Oneshot mode
in oneshot mode, stated.ts simply computes the output template and exits. This is useful when you do not intend to change any if the fields after the initial output render
falken$ stated example/ex01.json
{
"to": "world",
"msg": "hello world"
}
Using the lib
To use the stated-js library in your own projects, you can require it as a dependency. Here's an example of how you can import it into your JavaScript file:
import TemplateProcessor from 'stated-js'

async function tryIt() {
    const tp = new TemplateProcessor({
        "a": "aaa",
        "b": "${a}"
    });
    await tp.initialize();
    await tp.setData("/a", 42);
    console.log(JSON.stringify(tp.output));
    // console will print...
    //    {
    //        "a": 42,
    //        "b": 42
    //    }
}
tryIt().catch(err => console.error(err));
Stated-js package.json exports
The distribution of stated-js exports two different webpacks, one for ES Module (ie "import") which is in ./dist/bundle.mjs,
and one for Common JS (ie "require") which is in ./dist/bundle-common-js.cjs. Using import or require in your JS
code from a project with a package.json will automatically choose the correct dist target. Both the ES and Common JS
exports are designed for use in the browser. Here is an excerpt of package.json showing exactly what is exported.
"exports": {
    ".": {
      "import": "./dist/bundle.mjs",
      "require": "./dist/bundle-common-js.cjs"
    },
    "./dist/src/TemplateProcessor.js": "./dist/src/TemplateProcessor.js",
    "./dist/src/CliCore.js": "./dist/src/CliCore.js",
    "./dist/src/StatedREPL.js": "./dist/src/StatedREPL.js"
  }
Node.js based projects
If you are building for a Node.js environment you should not use the webpacked exports for import or require.
Instead, use the 'raw' TemplateProcessor.js, CliCore.js, and StatedREPL.js. Write your import statement like this
for Node.js :
import TemplateProcessor from 'stated-js/dist/src/TemplateProcessor.js';When you run Node.js, you must pass --experimental-vm-modules flag to the Node.js runtime. This is due to the
fact that stated-js is written using ES Module syntax.
REPL Commands
stated provides a set of REPL commands to interact with the system. The .open command is the easiest way to get started
opening an example template:

| Command | Description | flags & args | Example |
|---|---|---|---|
.open |
Interactive command to open a template (defaults to examples folder) | .open |
|
.cd |
Change directory (then use .open command) | .cd .. |
|
.init |
Initialize the template from a JSON file. | • -f <path> • --tags=<taglist>• --options=<json> • --xf=<path>• --importPath=<path> • --tail "<tailargs>" |
.init -f "example/hello.json" --tags=FOO,BAR --xf=~/falken/myEnv.json --options={"strict":{"refs":true}} --importPath=~/falken/mytemplates --tail "/ until msg='hello world'" |
.set |
Set data to a JSON pointer path. | <path> <data> |
.set /to "jsonata" |
.from |
Show the dependents of a given JSON pointer. | <path> |
.from /a |
.to |
Show the dependencies of a given JSON pointer. | <path> |
.to /b |
.in |
Show the input template. | None |
.in |
.out |
Show the current state of the template. | [<jsonPtr>] |
.out .out /data/accounts |
.state |
Show the current state of the template metadata. | None |
.state |
.plan |
Show the execution plan for rendering the template. | None |
.plan |
.note |
Show a separator line with a comment in the REPL output. | <comment> |
.note "Example 8" |
.log |
Set the logging level | [silent, error, warn, info, verbose, debug] |
.log silent |
.color |
Enable Colors | [on,off] |
.color on |
.tail |
Tail part of the document for changes | <jsonPointer> (until <jsonata_expr>)? |
.tail / .tail "/ until foo='bar'" |
.svg |
Serve an SVG diagram of the DAG | --port <portnumber> (defaults to 4242) |
.svg --port 3000 |
The stated repl lets you experiment with templates. The simplest thing to do in the REPL is load a json file. The REPL
parses the input, builds an execution plan, and executes the result. To see the result you have to use the .out
> .init -f "example/ex09.json"
{
  "a": [
    0,
    1,
    "${ $[0] + $[1] }"
  ]
}
> .out
{
  "a": [
    0,
    1,
    1
  ]
}
Color
> .note color does not appear in this markdown file
"============================================================="
> .color on
> .init -f "example/ex01.json"
{
  "a": 42,
  "b": "${a}",
  "c": "${'the answer is: '& b}"
}
Error Handling
if a JSONata expression evaluation throws an exception, the exception is converted to an error and placed into the template output.
> .log silent
{
  "log level": "silent"
}
> .init -f "example/errors.json"
{
  "a": 42,
  "b": "${a + ' is not a string'}"
}
> .out
{
  "a": 42,
  "b": {
    "error": {
      "name": "JSONata evaluation exception",
      "message": "The right side of the \"+\" operator must evaluate to a number"
    }
  }
}
Logging
the .log command can set the log level to [silent, error, warn, info, verbose, debug]. Enabling high
log levels like debug can help you track down problems with expressions.
> .log debug
{
  "log level": "debug"
}
.init -f "example/errors.json"
arguments: {"_":[],"f":"example/errors.json","filepath":"example/errors.json","tags":[],"oneshot":false,"options":{}}
verbose: initializing...
debug: tags: {}
verbose: evaluating template...
error: Error evaluating expression at /b
error: The right side of the "+" operator must evaluate to a number {"code":"T2002","position":3,"stack":"Error\n at evaluateNumericExpression (/Users/ghendrey/proj/jsonataexperiments/node_modules/jsonata/jsonata.js:4122:25)\n at evaluateBinary (/Users/ghendrey/proj/jsonataexperiments/node_modules/jsonata/jsonata.js:3900:30)\n at async evaluate (/Users/ghendrey/proj/jsonataexperiments/node_modules/jsonata/jsonata.js:3490:26)\n at async Object.evaluate (/Users/ghendrey/proj/jsonataexperiments/node_modules/jsonata/jsonata.js:5558:26)\n at async TemplateProcessor._evaluateExprNode (file:///Users/ghendrey/proj/jsonataexperiments/src/TemplateProcessor.ts:637:25)\n at async TemplateProcessor._evaluateExpression (file:///Users/ghendrey/proj/jsonataexperiments/src/TemplateProcessor.ts:556:28)\n at async TemplateProcessor.evaluateJsonPointersInOrder (file:///Users/ghendrey/proj/jsonataexperiments/src/TemplateProcessor.ts:515:31)\n at async TemplateProcessor.evaluateDependencies (file:///Users/ghendrey/proj/jsonataexperiments/src/TemplateProcessor.ts:358:16)\n at async TemplateProcessor.evaluate (file:///Users/ghendrey/proj/jsonataexperiments/src/TemplateProcessor.ts:123:9)\n at async TemplateProcessor.initialize (file:///Users/ghendrey/proj/jsonataexperiments/src/TemplateProcessor.ts:113:9)","token":"+","value":" is not a string"}
debug: Expression: a + ' is not a string'
debug: Target: {
"a": 42,
"b": "${a + ' is not a string'}"
}
debug: Result: null
verbose: _evaluateExpression at /b completed in 13 ms.
verbose: evaluation complete in 13 ms...
verbose: initialization complete...
{
"a": 42,
"b": "${a + ' is not a string'}"
}Error Reporting
The .errors command will produce a report of all errors in the template
> .log silent
{
  "log level": "silent"
}
> .init -f "example/errors.json"
{
  "a": 42,
  "b": "${a + ' is not a string'}"
}
> .errors
{
  "/b": {
    "name": "JSONata evaluation exception",
    "message": "The right side of the \"+\" operator must evaluate to a number"
  }
}
$errorReport function
JSONata does not have a throw/catch syntax. However, JSONata has a $error function that you can use
to throw an error. However, doing so will end the execution of the JSONata expression. If you wish to
simply record the fact that an error occured without exiting the expression, use the $errorReport function
which returns an error object but does not throw.
> .init -f example/errorReport.json
{
   "a": [
      0,
      1,
      2,
      "${$errorReport('oops', 'my_custom_error')}",
      4,
      5
   ],
   "b": "${($errorReport('e0');$errorReport('e1');$errorReport('e2'))}"
}
> .out
{
   "a": [
      0,
      1,
      2,
      {
         "error": {
            "message": "oops",
            "name": "my_custom_error"
         }
      },
      4,
      5
   ],
   "b": {
      "error": {
         "message": "e2"
      }
   }
}
> .errors
{
   "/a/3": {
      "error": {
         "message": "oops",
         "name": "my_custom_error"
      }
   },
   "/b": [
      {
         "error": {
            "message": "e0"
         }
      },
      {
         "error": {
            "message": "e1"
         }
      },
      {
         "error": {
            "message": "e2"
         }
      }
   ]
}
Expressions and Variables
What makes a Stated template different from an ordinary JSON file? JSONata Expressions of course! Stated analyzes the
Abstract Syntax Tree of every JSONata expression in the file, and learns what references are made by each expression
to other fields of the document. The references of an expression become the dependencies of the field, which are
used to build a DAG. The DAG allows Stated to know what expressions to compute if any fields of the document change.
Fields of the document are changed either via the REPL .set function, or by calling the equivalent library function.
Many classes of reactive application need to maintain state, and need to propagate state changes through the dependees
of a particular field (a dependee of foo is a field that depends on foo). Stated can be used as state store for
reactiver applications.
Dollars-Moustache
returning to our example/hello.json, the msg field is a simple example of a dollars-moustache.
Stated allows JSONata expressions to be embedded in a JSON document using ${<...JSONata here...>} syntax. The ${}
tells stated that a field such as msg is not an ordinary string field, but rather a JSONata expression that has to be
evaluated in order to compute the value of the field.
falken$ cat example/hello.json
{
"to": "world",
"msg": "${'hello ' & to}"
}
Dollars-Variables
There is also a more concise alternative to ${}. The field can simply be named with a trailing
dollars sign.
{
  "to": "world",
  "msg$": "'hello ' & to"
}
However the foo$ style can only be used when the expression is being assigned to a field. It won't work for array
elements like this, where there is no field name. For array elements the ${} must be used:
[1, 2, "${$[0]+$[1]}"]Temporary Expressions
The ! symbol is used mark fields as temporary. The ! can be used both as a prefix to the expression, and as a suffix
to a key. Temporary fields are removed from the output.
Notice how /b and /c! are removed from the output. Also notice that when an expression like ${`c!`.c1} refers to c!
that backtics must be used.
> .init -f "example/tempVars.json"
{
   "a": 42,
   "b": "!${a}",
   "c!": {
      "c1": "../${a + 1}"
   },
   "d": "${`c!`.c1}"
}
> .out
{
   "a": 42,
   "d": 43
}
References
The most important thing stated does is analyze your embedded jsonata programs to understand their references. This
means that as the user you don't have to tell stated what an expression depends on, and
consequently you don't have to instruct Stated on how it should react to changes. It knows. In the example below, a JSONata block is used to produce defcon$. It
defines local variables like $tmp which are pure JSONata constructs. The JSONata program also references fields
of the input like MAX_DEFCON and threatLevel. States understands that if threatLevel changes,
defcon$ must be recalculated. As shown below after viewing the output with the .out commnand, we
mutate the threatLevel field which results in defcon$ changing from 3 to 5.
> .init -f "example/ex20.json"
{
  "defcon$": "($tmp:=$floor(intelLevel * threatLevel);$tmp:= $tmp<=MAX_DEFCON?$tmp:MAX_DEFCON;$tmp>=MIN_DEFCON?$tmp:MIN_DEFCON)",
  "MAX_DEFCON": 5,
  "MIN_DEFCON": 1,
  "intelLevel": 1.45,
  "threatLevel": 2.2
}
> .out
{
  "defcon$": 3,
  "MAX_DEFCON": 5,
  "MIN_DEFCON": 1,
  "intelLevel": 1.45,
  "threatLevel": 2.2
}
> .set /threatLevel 3.5
{
  "defcon$": 5,
  "MAX_DEFCON": 5,
  "MIN_DEFCON": 1,
  "intelLevel": 1.45,
  "threatLevel": 3.5
}
Tags
JSONata "dollars moustache" expressions can be tagged with @tag syntax. In the example below our template
declares tags WAR and PEACE. Expressions with a tag will only be executed when the corresponding tag is
provided in the --tags flag. When tags are provided with --tags untagged expressions will be ignored.
Tags such as @WAR and @PEACE are automatically propagated transitively to all dependent expressions.
Therefore, in the example below only peace requires the @PEACE tag, which is transitively applies to
peaceMsg and warAndPeaceMsg. In large templates this is extrememly desirable to as it alleviates the
developer of having to maintain the tag by continually checking that any expressions that depend on a tagged
expression are also tagged.
> .init -f "example/ex23.json"
{
  "peace": "@PEACE ${'DEFCON 1'}",
  "war": "@WAR ${'DEFCON 5'}",
  "warMsg": "${'war is ' & war}",
  "peaceMsg": "${'Peace is ' & peace}",
  "warAndPeaceMsg": "${ [warMsg,peaceMsg]~>$join(' ') }",
  "untaggedExpr": "${'A strange game. The only winning move is not to play.'}"
}
> .out
{
  "peace": "@PEACE ${'DEFCON 1'}",
  "war": "@WAR ${'DEFCON 5'}",
  "warMsg": "${'war is ' & war}",
  "peaceMsg": "${'Peace is ' & peace}",
  "warAndPeaceMsg": "${ [warMsg,peaceMsg]~>$join(' ') }",
  "untaggedExpr": "A strange game. The only winning move is not to play."
}
> .init -f "example/ex23.json" --tags=PEACE
{
  "peace": "@PEACE ${'DEFCON 1'}",
  "war": "@WAR ${'DEFCON 5'}",
  "warMsg": "${'war is ' & war}",
  "peaceMsg": "${'Peace is ' & peace}",
  "warAndPeaceMsg": "${ [warMsg,peaceMsg]~>$join(' ') }",
  "untaggedExpr": "${'A strange game. The only winning move is not to play.'}"
}
> .out
{
  "peace": "DEFCON 1",
  "war": "@WAR ${'DEFCON 5'}",
  "warMsg": "${'war is ' & war}",
  "peaceMsg": "Peace is DEFCON 1",
  "warAndPeaceMsg": "${ [warMsg,peaceMsg]~>$join(' ') }",
  "untaggedExpr": "${'A strange game. The only winning move is not to play.'}"
}
> .init -f "example/ex23.json" --tags=PEACE,WAR
{
"peace": "@PEACE ${'DEFCON 1'}",
"war": "@WAR ${'DEFCON 5'}",
"warMsg": "${'war is ' & war}",
"peaceMsg": "${'Peace is ' & peace}",
"warAndPeaceMsg": "${ [warMsg,peaceMsg]~>$join(' ') }",
"untaggedExpr": "${'A strange game. The only winning move is not to play.'}"
}
> .out
{
"peace": "DEFCON 1",
"war": "DEFCON 5",
"warMsg": "war is DEFCON 5",
"peaceMsg": "Peace is DEFCON 1",
"warAndPeaceMsg": "war is DEFCON 5 Peace is DEFCON 1",
"untaggedExpr": "${'A strange game. The only winning move is not to play.'}"
}
Liveness
Templates can contain generative expressions that cause their content to change over time.
For instance the $setInterval function behaves exactyl as it does in Javascript. Below,
it causes the incr function to be called forever, every 10 ms.
> .init -f "example/tail.json"
{
  "incr": "${function(){$set('/counter',counter+1)}}",
  "counter": 0,
  "upCount": "${  $setInterval(incr, 10)  }"
}
The tail command can be used to watch changes on a particular field. Below we use --tail "/ until counter=5" to tail
the document root until the value of counter reaches 5, at which point --tail stops
producing output, though the incr function is still being called every 10 ms.
field:
> .init -f "example/tail.json" --tail "/ until counter=5"
Started tailing... Press Ctrl+C to stop.
{
"incr": "{function:}",
"counter": 5,
"upCount": "--interval/timeout--"
}
Here was have a more complex example, again using $setInterval to increment a counter that drives rotation and scrolling of arrays and strings.
> .init -f "example/tailgraphs.yaml"
{
   "i": 0,
   "mod": "${i%10}",
   "ms": 30,
   "chars": [
      "この世界は広いですね。いろいろな人がいます。",
      "日本語はとても美しい言語です。詩を書くには最適。",
      "明日もきっといい日になる。希望を持って生きよう。",
      "プログラミングは楽しいですね。論理的思考が必要。",
      "本を読むことは、心を豊かにする。知識は無限だ。",
      "花が咲いて、山は緑が多い。自然は素晴らしい。",
      "春夏秋冬、日本の四季ははっきりしている。",
      "友達と一緒に遊ぶ時が最も楽しい時間だ。",
      "美しい海を見ていると、心が穏やかになる。",
      "映画を見るのは、私の趣味の一つです。"
   ],
   "wave": [
      "................==................................................................==................................................",
      ".............o......o..........................................................o......o.............................................",
      "..........o............o....................................................o............o..........................................",
      "........o................o................................................o................o........................................",
      "......o....................o............................................o....................o......................................",
      ".....o......................o..........................................o......................o.....................................",
      "...o..........................o......................................o..........................o...................................",
      "..o............................o....................................o............................o..................................",
      ".o...............................o.................................o...............................o................................",
      "..................................o..............................o..................................o..............................o",
      "...................................o............................o....................................o............................o.",
      "....................................o..........................o......................................o..........................o..",
      "......................................o......................o..........................................o......................o....",
      ".......................................o....................o............................................o....................o.....",
      ".........................................o................o................................................o................o.......",
      "...........................................o............o....................................................o............o.........",
      "..............................................o......o..........................................................o......o............",
      ".................................................==................................................................==..............."
   ],
   "chart": [
      "║█████████████████████████████",
      "║███████████████████████████████",
      "║██████████████████████",
      "║████████████",
      "║█████████",
      "║████",
      "║███████",
      "║██████████",
      "║██████████████████████",
      "║████████████████████████"
   ],
   "rot": "${  function($arr){$arr.($substring($, $$.i%$length($)) & $substring($, 0, $$.i%$length($)))}     }",
   "incr": "${ function(){ $set('/i', i+1) } }",
   "upCount": "${  $setInterval(incr, ms)  }",
   "scroll": "${  function($arr){ $arr[[$$.mod..9]] ~> $append($arr[[0..$$.mod]])}     }",
   "stars": "${[1..$$.i%20].($=19?'🚀':'⭐')~>$join}",
   "wavy": "${ (i;rot(wave)) }",
   "rotate": "${ (i;rot(chars)) }",
   "scrolled": "${ (i;scroll(chars))}",
   "moveBars": "${ (i;scroll(chart))}"
}
Setting --tail / instructs the REPL to tail the root of the
document "in place" so the screen does not scroll and you can observe
live changes to the json document.
> .init -f "example/tailgraphs.yaml" --tail /
Reactive Behavior
Stated is naturally reactive. In the example below, story will evaluate when the promises for partI and partII have both
resolved, simply because story has references to partI and partII, each of which respectively is triggered by the
resolution of the two fetch functions they each depend on.
> .init -f "example/ex21.json"
{
  "story": "${ [partI, 'then', partII]~>$join(' ')}",
  "handleRes": "${ function($res){$res.ok? $res.json():$res.status?{'status': $res.status}:$res} }",
  "call": "${function($url){$fetch($url) ~> handleRes}}",
  "partI": "${ [han, 'piloted the', falcon] ~> $join(' ')}",
  "luke": "${ call('https://swapi.dev/api/people/?search=luke').results[0].name}",
  "xwing": "${ call('https://swapi.dev/api/starships/?search=x').results[0].name}",
  "partII": "${ [luke, 'piloted the', xwing] ~> $join(' ')}",
  "han": "${ call('https://swapi.dev/api/people/?search=han').results[0].name}",
  "falcon": "${ call('https://swapi.dev/api/starships/?search=Millennium').results[0].name}"
}
> .plan
[
  "/handleRes",
  "/call",
  "/falcon",
  "/han",
  "/luke",
  "/partI",
  "/xwing",
  "/partII",
  "/story"
]
> .out
{
  "story": "Han Solo piloted the Millennium Falcon then Luke Skywalker piloted the X-wing",
  "handleRes": "{function:}",
  "call": "{function:}",
  "partI": "Han Solo piloted the Millennium Falcon",
  "luke": "Luke Skywalker",
  "xwing": "X-wing",
  "partII": "Luke Skywalker piloted the X-wing",
  "han": "Han Solo",
  "falcon": "Millennium Falcon"
}
SVG command
The .svg command serves an SVG diagram of the DAG
> .init -f "example/ex21.json"
{
   "story": "${ [partI, 'then', partII]~>$join(' ')}",
   "handleRes": "${ function($res){$res.ok? $res.json():$res.status?{'status': $res.status}:$res} }",
   "call": "${function($url){$fetch($url) ~> handleRes}}",
   "partI": "${ [han, 'piloted the', falcon] ~> $join(' ')}",
   "luke": "${ call('https://swapi.dev/api/people/?search=luke').results[0].name}",
   "xwing": "${ call('https://swapi.dev/api/starships/?search=x').results[0].name}",
   "partII": "${ [luke, 'piloted the', xwing] ~> $join(' ')}",
   "han": "${ call('https://swapi.dev/api/people/?search=han').results[0].name}",
   "falcon": "${ call('https://swapi.dev/api/starships/?search=Millennium').results[0].name}"
}
> .svg --port=4042
Server is running on port 4042
"http://localhost:4042"
Access the URL from your web browser to view the SVG diagram.

YAML
Input can be provided in YAML. YAML is convenient because JSONata prorgrams are often multi-line, and json does not support text blocks with line returns in a way that is readable. For instance if we compare ex12.json and ex12.yaml, which is more readable?
falken$ cat ex12.json
{
  "url": "https://raw.githubusercontent.com/geoffhendrey/jsonataplay/main/games.json",
  "selectedGame": "${game.selected}",
  "respHandler": "${ function($res){$res.ok? $res.json():{'error': $res.status}} }",
  "game": "${ $fetch(url) ~> respHandler ~> |$|{'player':'dlightman'}| }"
}
In YAML the respHandler function can be written as a text block, whereas in JSON it must appear on a single line.
falken$ cat ex12.yamlurl: "https://raw.githubusercontent.com/geoffhendrey/jsonataplay/main/games.json"
selectedGame: "${game$.selected}"
respHandler$: |
function($res){
$res.ok? $res.json():{'error': $res.status}
}
game$: "$fetch(url) ~> respHandler$ ~> |$|{'player':'dlightman'}|"However, once a YAML file is parsed with the JavaScript runtime it becomes a JavaScript object. Hence, in the example below a YAML is the input file, but the REPL displays the resulting Javascript object using JSON syntax. As we can see below, loading the yaml file still results in the function being deisplayed as it's parsed in-memory JS representation.
> .init -f "example/ex12.yaml"
{
  "url": "https://raw.githubusercontent.com/geoffhendrey/jsonataplay/main/games.json",
  "selectedGame": "${game$.selected}",
  "respHandler$": "function($res){\n  $res.ok? $res.json():{'error': $res.status}\n}\n",
  "game$": "$fetch(url) ~> respHandler$ ~> |$|{'player':'dlightman'}|"
}
Setting Values in the stated REPL
The stated REPL also allows you to dynamically set values in your templates, further aiding in debugging and development.
In the example below .set /a/0 100 sets a[0] to 100. The syntax of /a/0 is RFC-6901 JSON Pointer.
> .init -f "example/ex09.json"
{
  "a": [
    0,
    1,
    "${ $[0] + $[1] }"
  ]
}
> .set /a/0 100
{
  "a": [
    100,
    1,
    101
  ]
}
Expression Scope
Individual JSONata programs are embedded in JSON files between ${..}. What is the input to the JSONata program?
The input, by default, is the object or array that the expression resides in. For instance in the example above, you can see that the JSONata $ variable refers to the array itself. Therefore, expressions like $[0]
refer to the first element of the array.
Rerooting Expressions
In Stated templates, one way to declare a JSONata expression is by surrounding it by "dollars moustaches".
E.g ${...some expression...}. JSONata expressions always have a context.
The $ variable always points to the current context. The $$ variable always points to the input (root context) for an
expression.
In a Stated template, the root context for an expression is the object in which the expression is contained. For
Example:
> .init -f "example/context.json"
{
   "a": {
      "b": "${[c,' and ',$.c,' and ',$$.c,' are the same thing. $ (current context) is /a, the object in which this expression resides']~>$join}",
      "c": "hello"
   }
}
> .out
{
   "a": {
      "b": "hello and hello and hello are the same thing. $ (current context) is /a, the object in which this expression resides",
      "c": "hello"
   }
}
Now we will show how we can change the context of an expression using 'rerooting.' Rerooting allows the expression's root
context to be pointed anywhere in the json document.
In the example below, consider greeting & ', ' & player1'. We want player1 to refer to the content at json pointer /player1 (the field named 'player1' at the root of the document).
But our expression greeting & ', ' & player1 is located deep in the document at /dialog/partI. So how can we cause
the root of the document to be the context for the JSONata expression greeting & ', ' & player1?
You can reroot an expression in a different part of the document using relative rooting ../${<expr>} syntax or you can root an
at the absolute doc root with /${<expr>}. The example below shows how expressions located below the root object, can
explicitly set their context using the rooting syntax. Both absolute rooting, /${...} and relative rooting ../${...}
are shown.
> .init -f "example/ex04.json"
{
  "greeting": "Hello",
  "player1": "Joshua",
  "player2": "Professor Falken",
  "dialog": {
    "partI": [
      "../../${greeting & ', ' &  player1}",
      "../../${greeting & ', ' &  player2}"
     ],
    "partII": {
      "msg3": "/${player1 & ', would you like to play a game?'}",
      "msg4": "/${'Certainly, '& player2 & '. How about a nice game of chess?'}"
    }
  }
}
> .out
{
  "greeting": "Hello",
  "player1": "Joshua",
  "player2": "Professor Falken",
  "dialog": {
    "partI": [
      "Hello, Joshua",
      "Hello, Professor Falken"
    ],
    "partII": {
      "msg3": "Joshua, would you like to play a game?",
      "msg4": "Certainly, Professor Falken. How about a nice game of chess?"
    }
  }
}
An advanced rerooting operator is the // absolute root operator. The / rooting operator, that we showed above, will never allow the expression
to 'escape' outside of the template it was defined in. But what if we intend for a template to be imported into another template
and we expect there to be a variable defined in the other template that we should use? This is where the // absolute root
operator can be used. The // operator will set the expression context to the absolute root of whatever the final document is
after all imports have been performed.
> .init -f "example/absoluteRoot.json"
{
   "to": "!${'Professor Falken'}",
   "greeting": "//${'Hello, ' & to}"
}
> .out
{
   "greeting": "Hello, Professor Falken"
}
> .init -f "example/importsAbsoluteRoot.json"
{
   "to": "Joshua",
   "message": "${$import('example/absoluteRoot.json')}"
}
> .out
{
   "to": "Joshua",
   "message": {
      "greeting": "Hello, Joshua"
   }
}
DAG
Templates can grow complex, and embedded expressions have dependencies on both literal fields and other calculated expressions. stated is at its core a data flow engine. Stated analyzes the abstract syntax tree (AST) of JSONata expressions and builds a Directed Acyclic Graph (DAG). Stated ensures that when fields in your JSON change, that the changes flow through the DAG in an optimal order that avoids redundant expression calculation.
stated helps you track and debug transitive dependencies in your templates. You can use the
from and to commands to track the flow of data. Their output is an ordered list of JSON Pointers, showing
you the order in which changes propagate.
> .init -f "example/ex01.json"
{
"a": 42,
"b": "${a}",
"c": "${'the answer is: '& b}"
}
> .out
{
"a": 42,
"b": 42,
"c": "the answer is: 42"
}
> .from /a
[
"/a",
"/b",
"/c"
]
> .to /b
[
"/a",
"/b"
]
> .to /c
[
"/a",
"/b",
"/c"
]
The .plan command shows you the execution plan for evaluating the entire template as a whole, which is what happens
when you run the out command. The execution plan always ensures the optimal data flow so that no expression is
evaluated twice.
> .init -f "example/ex08.json"
{
  "a": "${c}",
  "b": "${d+1+e}",
  "c": "${b+1}",
  "d": "${e+1}",
  "e": 1
}
> .plan
[
  "/d",
  "/b",
  "/c",
  "/a"
]
> .out
{
  "a": 5,
  "b": 4,
  "c": 5,
  "d": 2,
  "e": 1
}
Complex Data Processing
The example below uses JSONata $zip function to combine related data.
> .init -f "example/ex03.json"
{
  "data": {
    "fn": [
      "john",
      "jane"
    ],
    "ln": [
      "doe",
      "smith"
    ]
  },
  "names": "${ $zip(data.fn, data.ln) }"
}
> .out
{
  "data": {
    "fn": [
      "john",
      "jane"
    ],
    "ln": [
      "doe",
      "smith"
    ]
  },
  "names": [
    [
      "john",
      "doe"
    ],
    [
      "jane",
      "smith"
    ]
  ]
}
The example below uses the $sum function to compute a costs of each product, and then
again uses $sum to sum over the individual product costs to get the totalCost. In a round-about fashion each
individual product pulls in its cost from the costs array.
> .init -f "example/ex10.json"
{
  "totalCost": "${$sum(costs)}",
  "costs": "${products.$sum(quantity * price)}",
  "products": [
    {
      "name": "Apple",
      "quantity": 5,
      "price": 0.5,
      "cost": "/${costs[0]}"
    },
    {
      "name": "Orange",
      "quantity": 10,
      "price": 0.75,
      "cost": "/${costs[1]}"
    },
    {
      "name": "Banana",
      "quantity": 8,
      "price": 0.25,
      "cost": "/${costs[2]}"
    }
  ]
}
> .plan
[
  "/costs",
  "/products/2/cost",
  "/products/1/cost",
  "/products/0/cost",
  "/totalCost"
]
> .out
{
  "totalCost": 12,
  "costs": [
    2.5,
    7.5,
    2
  ],
  "products": [
    {
      "name": "Apple",
      "quantity": 5,
      "price": 0.5,
      "cost": 2.5
    },
    {
      "name": "Orange",
      "quantity": 10,
      "price": 0.75,
      "cost": 7.5
    },
    {
      "name": "Banana",
      "quantity": 8,
      "price": 0.25,
      "cost": 2
    }
  ]
}
Here is a different approach in which cost of each product is computed locally
then rolled up to the totalCost. Note the difference in the execution plan between the example above and this example.
> .init -f "example/ex11.json"
{
  "totalCost": "${ $sum(products.cost) }",
  "products": [
    {
      "name": "Apple",
      "quantity": 5,
      "price": 0.5,
      "cost": "${ quantity*price }"
    },
    {
      "name": "Orange",
      "quantity": 10,
      "price": 0.75,
      "cost": "${ quantity*price }"
    },
    {
      "name": "Banana",
      "quantity": 8,
      "price": 0.25,
      "cost": "${ quantity*price }"
    }
  ]
}
> .plan
[
  "/products/0/cost",
  "/products/1/cost",
  "/products/2/cost",
  "/totalCost"
]
> .out
{
  "totalCost": 12,
  "products": [
    {
      "name": "Apple",
      "quantity": 5,
      "price": 0.5,
      "cost": 2.5
    },
    {
      "name": "Orange",
      "quantity": 10,
      "price": 0.75,
      "cost": 7.5
    },
    {
      "name": "Banana",
      "quantity": 8,
      "price": 0.25,
      "cost": 2
    }
  ]
}
Functions
stated let's you define and call functions.
Simple Function Example
> .init -f "example/ex05.json"
{
  "hello": "${ (function($to){'hello ' & $to & '. How about a nice game of ' & $$.game})}",
  "to": "David",
  "game": "chess",
  "greeting$": "hello(to)"
}
> .out
{
  "hello": "{function:}",
  "to": "David",
  "game": "chess",
  "greeting$": "hello David. How about a nice game of chess"
}
Fetch
This example fetches JSON over the network and uses the JSONata transform operator to set the
player field on the fetched JSON.
Here is the JSON file that it downloads and operates on.
You can see why DAG and evaluation order matter. selectedGame does not exist until the game field has been populated by
fetch.
> .init -f "example/ex12.json"
{
  "url": "https://raw.githubusercontent.com/geoffhendrey/jsonataplay/main/games.json",
  "selectedGame": "${game.selected}",
  "respHandler": "${ function($res){$res.ok? $res.json():{'error': $res.status}} }",
  "game": "${ $fetch(url) ~> respHandler ~> |$|{'player':'dlightman'}| }"
}
> .out
{
  "url": "https://raw.githubusercontent.com/geoffhendrey/jsonataplay/main/games.json",
  "selectedGame": "Global Thermonuclear War",
  "respHandler": "{function:}",
  "game": {
    "titles": [
      "chess",
      "checkers",
      "backgammon",
      "poker",
      "Theaterwide Biotoxic and Chemical Warfare",
      "Global Thermonuclear War"
    ],
    "selected": "Global Thermonuclear War",
    "player": "dlightman"
  }
}
Import
The sequence below explains by example that the $import function which is used to fetch and initialize remote templates (or local literal templates) into the current template
> .note "let's take a simple template..."
"============================================================="
> .init -f "example/ex17.json"
{
  "commanderDetails": {
    "fullName": "../${commander.firstName & ' ' & commander.lastName}",
    "salutation": "../${$join([commander.rank, commanderDetails.fullName], ' ')}",
    "systemsUnderCommand": "../${$count(systems)}"
  },
  "organization": "NORAD",
  "location": "Cheyenne Mountain Complex, Colorado",
  "commander": {
    "firstName": "Jack",
    "lastName": "Beringer",
    "rank": "General"
  },
  "purpose": "Provide aerospace warning, air sovereignty, and defense for North America",
  "systems": [
    "Ballistic Missile Early Warning System (BMEWS)",
    "North Warning System (NWS)",
    "Space-Based Infrared System (SBIRS)",
    "Cheyenne Mountain Complex"
  ]
}
> .note "now let's see what it produced"
"============================================================="
> .out
{
  "commanderDetails": {
    "fullName": "Jack Beringer",
    "salutation": "General Jack Beringer",
    "systemsUnderCommand": 4
  },
  "organization": "NORAD",
  "location": "Cheyenne Mountain Complex, Colorado",
  "commander": {
    "firstName": "Jack",
    "lastName": "Beringer",
    "rank": "General"
  },
  "purpose": "Provide aerospace warning, air sovereignty, and defense for North America",
  "systems": [
    "Ballistic Missile Early Warning System (BMEWS)",
    "North Warning System (NWS)",
    "Space-Based Infrared System (SBIRS)",
    "Cheyenne Mountain Complex"
  ]
}
> .note "what happens if we put it on the web and fetch it?"
"============================================================="
> .init -f "example/ex19.json"
{
  "noradCommander": "${ norad.commanderDetails  }",
  "norad": "${ $fetch('https://raw.githubusercontent.com/geoffhendrey/jsonataplay/main/norad.json') ~> handleRes }",
  "handleRes": "${ function($res){$res.ok? $res.json():{'error': $res.status}} }"
}
>  .note "If we look at the output, it's just the template."
"============================================================="
> .out
{
  "noradCommander": {
    "fullName": "../${commander.firstName & ' ' & commander.lastName}",
    "salutation": "../${$join([commander.rank, commanderDetails.fullName], ' ')}",
    "systemsUnderCommand": "../${$count(systems)}"
  },
  "norad": {
    "commanderDetails": {
      "fullName": "../${commander.firstName & ' ' & commander.lastName}",
      "salutation": "../${$join([commander.rank, commanderDetails.fullName], ' ')}",
      "systemsUnderCommand": "../${$count(systems)}"
    },
    "organization": "NORAD",
    "location": "Cheyenne Mountain Complex, Colorado",
    "commander": {
      "firstName": "Jack",
      "lastName": "Beringer",
      "rank": "General"
    },
    "purpose": "Provide aerospace warning, air sovereignty, and defense for North America",
    "systems": [
      "Ballistic Missile Early Warning System (BMEWS)",
      "North Warning System (NWS)",
      "Space-Based Infrared System (SBIRS)",
      "Cheyenne Mountain Complex"
    ]
  },
  "handleRes": "{function:}"
}
> .note "Now let's use the import function on the template"
"============================================================="
> .init -f example/ex16.json
{
   "noradCommander": "${ norad.commanderDetails  }",
   "norad": "${ $fetch('https://raw.githubusercontent.com/geoffhendrey/jsonataplay/main/norad.json') ~> handleRes ~> $import}",
   "handleRes": "${ function($res){$res.ok? $res.json():{'error': $res.status}} }"
}
> .out
{
   "noradCommander": {
      "fullName": "Jack Beringer",
      "salutation": "General Jack Beringer",
      "systemsUnderCommand": 4
   },
   "norad": {
      "commanderDetails": {
         "fullName": "Jack Beringer",
         "salutation": "General Jack Beringer",
         "systemsUnderCommand": 4
      },
      "organization": "NORAD",
      "location": "Cheyenne Mountain Complex, Colorado",
      "commander": {
         "firstName": "Jack",
         "lastName": "Beringer",
         "rank": "General"
      },
      "purpose": "Provide aerospace warning, air sovereignty, and defense for North America",
      "systems": [
         "Ballistic Missile Early Warning System (BMEWS)",
         "North Warning System (NWS)",
         "Space-Based Infrared System (SBIRS)",
         "Cheyenne Mountain Complex"
      ]
   },
   "handleRes": "{function:}"
}
> .note "You can see above that 'import' makes it behave as a template, not raw JSON."
"============================================================="
> .note "We don't have to fetch ourselves to use import, it will do it for us."
"============================================================="
> .init -f "example/ex18.json"
{
  "noradCommander": "${ norad.commanderDetails  }",
  "norad": "${ $import('https://raw.githubusercontent.com/geoffhendrey/jsonataplay/main/norad.json')}"
}
> .out
{
  "noradCommander": {
    "fullName": "Jack Beringer",
    "salutation": "General Jack Beringer",
    "systemsUnderCommand": 4
  },
  "norad": {
    "commanderDetails": {
      "fullName": "Jack Beringer",
      "salutation": "General Jack Beringer",
      "systemsUnderCommand": 4
    },
    "organization": "NORAD",
    "location": "Cheyenne Mountain Complex, Colorado",
    "commander": {
      "firstName": "Jack",
      "lastName": "Beringer",
      "rank": "General"
    },
    "purpose": "Provide aerospace warning, air sovereignty, and defense for North America",
    "systems": [
      "Ballistic Missile Early Warning System (BMEWS)",
      "North Warning System (NWS)",
      "Space-Based Infrared System (SBIRS)",
      "Cheyenne Mountain Complex"
    ]
  }
}
Importing bits of other templates
Suppose you just want to import a function defined in another template. The $import function understands
URL fragments with JSON Pointers. In this example we use a URL with a fragment to import just a function
from a remote template. Note that the URL ends in #/resourceMapperFn
> .init -f "example/resourceMapperB.json"
{
  "input": {
    "foo": 42,
    "bar": "something",
    "zap": "zing"
  },
  "resourceMapperAFn": "${$import('https://raw.githubusercontent.com/cisco-open/stated/main/example/resourceMapperA.json#/resourceMapperFn')}",
  "resourceMapperBFn": "${ function($in){$in.foo < 30 and $in.zap='zing'?[{'type':'B', 'id':$in.foo, 'bar':$in.bar, 'zap':$in.zing}]:[]}  }",
  "BEntities": "${ (resourceMapperBFn(input))}",
  "entities": "${ BEntities?BEntities:resourceMapperAFn(input)}"
}
> .out
{
  "input": {
    "foo": 42,
    "bar": "something",
    "zap": "zing"
  },
  "resourceMapperAFn": "{function:}",
  "resourceMapperBFn": "{function:}",
  "BEntities": [],
  "entities": [
    {
      "Type": "A",
      "id": 42,
      "bar": "something"
    }
  ]
}
More Complex Function Example
Here is an elaborate example of functions. The fibonnaci function itself is pulled into the last element of x
using the expression /${fibonacci}. The first element of the array contains $[2]($[1]). Can you see that
it invokes the fibonacci function passing it the value 6? Hint: $[2] is the last element of the array which
will pull in the fibonacci function and $[1] is the middle element of the array, holding the static value 6.
So $[2]($[1]) expands to fibonacci(6). The value 6th fibonacci number is 8, which is what fibonacci(6) returns.
> .init -f "example/ex06.json"
{
  "x": [
    "${$[2]($[1])}",
    6,
    "/${fibonacci}"
  ],
  "fibonacci": "${ function($n){$n=1?1:$n=0?0:fibonacci($n-1)+fibonacci($n-2)}}"
}
> .out
{
  "x": [
    8,
    6,
    "{function:}"
  ],
  "fibonacci": "{function:}"
}
Let's take a more complex example where we generate MySQL instances:
> .init -f "example/mysql.json"
{
  "name": "mysql",
  "count": 1,
  "pn": 3306,
  "providerName": "aws",
  "tmp": {
    "host": "/${ [1..count].{'database_instance.host':'mysql-instance-' & $ & '.cluster-473653744458.us-west-2.rds.amazonaws.com'}}",
    "port": "/${ [1..count].{'database_instance.port:':$$.pn}}",
    "provider": "/${[1..count].{'cloud.provider': $$.providerName}}",
    "instanceId": "/${[1..count].{'cloud.database_instance.id':'db-mysql-instance-' & $formatBase($,16)}}",
    "instanceName": "/${[1..count].{'database_instance.name':'MySQL instance' & $}}",
    "clusterName": "/${[1..count].{'database_instance.cluster._name':'MySQL cluster' & $}}"
  },
  "instances": "${$zip(tmp.host, tmp.port, tmp.provider, tmp.instanceId, tmp.instanceName, tmp.clusterName)~>$map($merge)}"
}
> .out
{
  "name": "mysql",
  "count": 1,
  "pn": 3306,
  "providerName": "aws",
  "tmp": {
    "host": {
      "database_instance.host": "mysql-instance-1.cluster-473653744458.us-west-2.rds.amazonaws.com"
    },
    "port": {
      "database_instance.port:": 3306
    },
    "provider": {
      "cloud.provider": "aws"
    },
    "instanceId": {
      "cloud.database_instance.id": "db-mysql-instance-1"
    },
    "instanceName": {
      "database_instance.name": "MySQL instance1"
    },
    "clusterName": {
      "database_instance.cluster._name": "MySQL cluster1"
    }
  },
  "instances": {
    "database_instance.host": "mysql-instance-1.cluster-473653744458.us-west-2.rds.amazonaws.com",
    "database_instance.port:": 3306,
    "cloud.provider": "aws",
    "cloud.database_instance.id": "db-mysql-instance-1",
    "database_instance.name": "MySQL instance1",
    "database_instance.cluster._name": "MySQL cluster1"
  }
}
> .from /count
[
  "/count",
  "/tmp/clusterName",
  "/tmp/host",
  "/tmp/instanceId",
  "/tmp/instanceName",
  "/tmp/port",
  "/tmp/provider",
  "/instances"
]
> .set /count 3
{
  "name": "mysql",
  "count": 3,
  "pn": 3306,
  "providerName": "aws",
  "tmp": {
    "host": [
      {
        "database_instance.host": "mysql-instance-1.cluster-473653744458.us-west-2.rds.amazonaws.com"
      },
      {
        "database_instance.host": "mysql-instance-2.cluster-473653744458.us-west-2.rds.amazonaws.com"
      },
      {
        "database_instance.host": "mysql-instance-3.cluster-473653744458.us-west-2.rds.amazonaws.com"
      }
    ],
    "port": [
      {
        "database_instance.port:": 3306
      },
      {
        "database_instance.port:": 3306
      },
      {
        "database_instance.port:": 3306
      }
    ],
    "provider": [
      {
        "cloud.provider": "aws"
      },
      {
        "cloud.provider": "aws"
      },
      {
        "cloud.provider": "aws"
      }
    ],
    "instanceId": [
      {
        "cloud.database_instance.id": "db-mysql-instance-1"
      },
      {
        "cloud.database_instance.id": "db-mysql-instance-2"
      },
      {
        "cloud.database_instance.id": "db-mysql-instance-3"
      }
    ],
    "instanceName": [
      {
        "database_instance.name": "MySQL instance1"
      },
      {
        "database_instance.name": "MySQL instance2"
      },
      {
        "database_instance.name": "MySQL instance3"
      }
    ],
    "clusterName": [
      {
        "database_instance.cluster._name": "MySQL cluster1"
      },
      {
        "database_instance.cluster._name": "MySQL cluster2"
      },
      {
        "database_instance.cluster._name": "MySQL cluster3"
      }
    ]
  },
  "instances": [
    {
      "database_instance.host": "mysql-instance-1.cluster-473653744458.us-west-2.rds.amazonaws.com",
      "database_instance.port:": 3306,
      "cloud.provider": "aws",
      "cloud.database_instance.id": "db-mysql-instance-1",
      "database_instance.name": "MySQL instance1",
      "database_instance.cluster._name": "MySQL cluster1"
    },
    {
      "database_instance.host": "mysql-instance-2.cluster-473653744458.us-west-2.rds.amazonaws.com",
      "database_instance.port:": 3306,
      "cloud.provider": "aws",
      "cloud.database_instance.id": "db-mysql-instance-2",
      "database_instance.name": "MySQL instance2",
      "database_instance.cluster._name": "MySQL cluster2"
    },
    {
      "database_instance.host": "mysql-instance-3.cluster-473653744458.us-west-2.rds.amazonaws.com",
      "database_instance.port:": 3306,
      "cloud.provider": "aws",
      "cloud.database_instance.id": "db-mysql-instance-3",
      "database_instance.name": "MySQL instance3",
      "database_instance.cluster._name": "MySQL cluster3"
    }
  ]
}
The set function
You have already seen how the REPL .set command works. The REPL simply calls the internal $set function.
The $set function can be called from your JSONata blocks or function. The $set function is used to push data into
other parts of the template. The function signature is $set(jsonPointer, value). The
set command returns an array of JSON Pointers that represent the transitive updates that resulted from calling set.
In the example below $set('/systems/1', 'JOSHUA') is used to push the string "JOSHUA" onto the systems array.
> .init -f "example/ex13.json"
{
  "systems": [
    "WOPR"
  ],
  "onBoot": "${ $set('/systems/1', 'JOSHUA')}",
  "newSystem": "${systems[1]}"
}
> .out
{
  "newSystem": "JOSHUA",
  "onBoot": [
    "/systems/1",
    "/newSystem"
  ],
  "systems": [
    "WOPR",
    "JOSHUA"
  ]
}
options
The cli and REPL both support --options. Options are set using a json object
strict
The strict option currently supports the refs property. Setting {"strict":{"refs":true}} will cause templates
to throw an Exception when references in the template cannot be resolved. Reference checking is only performed against
the template itself; it is not performed agains variables that are injected into the execution context by the TemplateProcessor
library.
> .log silent
{
  "log level": "silent"
}
> .init -f "example/strictref.json" --options={"strict":{"refs":true}}
{
  "a": 42,
  "b": "${a}",
  "c": "${z}"
}
> .out
{
  "a": 42,
  "b": 42,
  "c": {
    "error": {
      "name": "strict.refs",
      "message": "/z does not exist, referenced from /c (strict.refs option enabled)"
    }
  }
}
Options can also be used in oneshot mode. Note the use of backslashes to escape quotes in the JSON on the CLI
falken$ stated --options={\"strict\":{\"refs\":true}} example/strictref.json
error: /z does not exist, referenced from /c (strict.refs option enabled)
{
  a: 42,
  b: 42,
  c: {
    error: {
      name: 'strict.refs',
      message: '/z does not exist, referenced from /c (strict.refs option enabled)'
    }
  }
}
Setting the context with --xf
The --xf argument can be used to provide a context file. Context is used
to provide JSONata Bindings
> .note here is a regular json file
"============================================================="
> .init -f "example/env.json"
{
  "env": {
    "name": "Dr. Stephen Falken",
    "addr": "Goose Island, OR, USA"
  }
}
> .note let's use it as context to a stated template
"============================================================="
> .init -f "example/useEnv.json" --xf=example/env.json
{
  "name": "${$env.name}",
  "address": "${$env.addr}"
}
> .out
{
  "name": "Dr. Stephen Falken",
  "address": "Goose Island, OR, USA"
}
Setting up local imports with --importPath
You can import local files by specifying a folder where stated will look for the imported files
> .init -f "example/localImport.json" --importPath=./example
{
  "noradCommander": "${ norad.commanderDetails  }",
  "norad": "${ $import('ex17.json')}"
}
> .out
{
  "noradCommander": {
    "fullName": "Jack Beringer",
    "salutation": "General Jack Beringer",
    "systemsUnderCommand": 4
  },
  "norad": {
    "commanderDetails": {
      "fullName": "Jack Beringer",
      "salutation": "General Jack Beringer",
      "systemsUnderCommand": 4
    },
    "organization": "NORAD",
    "location": "Cheyenne Mountain Complex, Colorado",
    "commander": {
      "firstName": "Jack",
      "lastName": "Beringer",
      "rank": "General"
    },
    "purpose": "Provide aerospace warning, air sovereignty, and defense for North America",
    "systems": [
      "Ballistic Missile Early Warning System (BMEWS)",
      "North Warning System (NWS)",
      "Space-Based Infrared System (SBIRS)",
      "Cheyenne Mountain Complex"
    ]
  }
}
Import JS functions
Repl and cli support importing javascript functions. If provided file to --xf has a .js or .mjs extension, it will be loaded and all exported functions will be added to TemplateProcessor's execution context.
An example "src/test/test-export.js" exports 2 functions
const barFunc = (input) => `bar: ${input}`;

// explicitly define exported functions and their names
export const foo = () => "foo";
export const bar = barFunc;
Which can be used in the stated tempalate context
> .init -f example/importJS.json --xf=example/test-export.js
{
  "res": "${ $bar($foo()) }"
}
> .out
{
  "res": "bar: foo"
}
This can be combined with the --importPath option to import files relative to that path
> .init -f example/importJS.json --importPath=example --xf=test-export.js
{
  "res": "${ $bar($foo()) }"
}
> .out
{
  "res": "bar: foo"
}
The $open function
Allowing expressions to open local files is a security risk. For this reason the core TemplateProcessor does
not support the $open function. However, the CLI/REPL which are for local usage allow the $open function. Additionally,
programs that want to allow properly guarded $open operations may inject a $open function of their choosing
into the TemplateProcessor contexet. $open accepts a relative path, and parses the JSON or YAML file on that path into
an object.
> .note This shows two equivalent ways to open a json or yaml file using $open
"============================================================="
> .cd example
"Current directory changed to: /Users/falken/proj/jsonataexperiments/example"
> .init -f "importLocal.json"
{
   "a": "${'ex01.json'~>$open~>$import}",
   "b": "${$import($open('ex01.json'))}"
}
> .out
{
   "a": {
      "a": 42,
      "b": 42,
      "c": "the answer is: 42"
   },
   "b": {
      "a": 42,
      "b": 42,
      "c": "the answer is: 42"
   }
}
> .cd ..
"Current directory changed to: /Users/falken/proj/jsonataexperiments"
$debounce function
Debouncing is a technique used in software development, particularly in web development and event handling, to control or limit the frequency of a particular action or event when it occurs rapidly or frequently. It helps prevent excessive or redundant executions of the action, making applications more efficient and responsive.
In this example we rapidly change a counter and feed it into a debounced function that appends the count to
an accumulator array, acc. The interval is terminated when count reaches 100, and due to debouncing,
only a single value, 100, is written into acc. We use the --tail "/ until acc[0]=100" to tail the
root document (/) until a jsonata expression condition is met. The condition we check is
acc[0]=100 which is the expected debounced value.
> .init -f "example/debounce.yaml"
{
   "acc": [],
   "appendAcc": "${ function($v){$set('/acc/-', $v)} ~> $debounce(15)}",
   "counter": "${   function(){($set('/count', $$.count+1); $$.count)}    }",
   "count": 0,
   "rapidCaller": "${$setInterval(counter~>appendAcc, 10)}",
   "stop": "${ count=100?($clearInterval($$.rapidCaller);'done'):'not done'  }"
}
> .init -f "example/debounce.yaml" --tail "/ until acc[0]=100"
Started tailing... Press Ctrl+C to stop.
{
"acc": [
100
],
"counter": "{function:}",
"count": 100,
"rapidCaller": "--interval/timeout--",
"stop": "done"
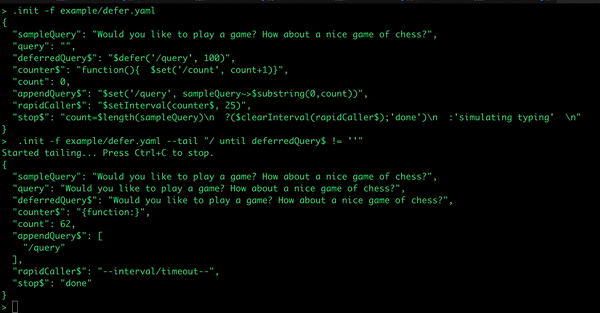
}$defer function
While $debounce is used to create a debounced function, $defer can be a more concise approach when you simply want a
"slowed down" version of a rapidly changing variable. $defer takes two arguments:
- The json pointer to the field you wish to defer (or "slow down")
- An optional number of milliseconds, T.
$defer will always produce one initial value, which comes from the deferred field. $defer will not produce a
subsequent value until the deferred field has remained unchanges for T ms.
For example, suppose you are collecting a query string from a user
input. Each character entered mutates the query field, but we don't want to do anything with query unless the user
pauses or stops typing characters. In the example below, an $setInterval call is used to simulate a user entering
the characters of a sampleQuery into the query field at a rate of one every 25ms. Fast typer! The deferredQuery$ will begin with the inital value of query ("") and remain unchanged
until the querystops receiving changes and reaches its final state of "Would you like to play a game? How about a nice game of chess?"
> .init -f "example/defer.yaml"
{
   "sampleQuery": "Would you like to play a game? How about a nice game of chess?",
   "query": "",
   "deferredQuery$": "$defer('/query', 100)",
   "counter$": "function(){  $set('/count', count+1)}",
   "count": 0,
   "appendQuery$": "$set('/query', sampleQuery~>$substring(0,count))",
   "rapidCaller$": "$setInterval(counter$, 25)",
   "stop$": "count=$length(sampleQuery)\n  ?($clearInterval(rapidCaller$);'done')\n  :'simulating typing'  \n"
}
To watch the data changing we can use the --tail until to tail the changing template output until it reaches the final state.
> .init -f example/defer.yaml --tail "/ until deferredQuery$ = 'Would you like to play a game? How about a nice game of chess?'"
Started tailing... Press Ctrl+C to stop.
{
  "sampleQuery": "Would you like to play a game? How about a nice game of chess?",
  "query": "Would you like to play a game? How about a nice game of chess?",
  "deferredQuery$": "Would you like to play a game? How about a nice game of chess?",
  "counter$": "{function:}",
  "count": 62,
  "appendQuery$": [
    "/query"
  ] ,
  "rapidCaller$": "--interval/timeout--",
  "stop$": "done"
}
Here is a screencapture showing the two commands above executed in the REPL.
$rateLimit function
Rate limiting allows to ensure than no than one function call is executed withing some time. For exameple, we want to ensure that a function calling external APIs does not overload it.
>.init -f example/rateLimit.yaml
{
  "acc": [],
  "appendAcc": "${ function($v){$set('/acc/-', $v)} ~> $rateLimit(100)}",
  "counter": "${   function(){($set('/count', $$.count+1); $$.count)}    }",
  "count": 0,
  "rapidCaller": "${$setInterval(counter~>appendAcc, 10)}",
  "stop": "${ count=100?($clearInterval($$.rapidCaller);'done'):'not done'  }",
  "accCount": "${ $count(acc) }"
}
Below output demonstrates, that rateLimit function calls to to set acc to once in no less than 100ms, which will
result in only 10 counts added o the acc array, the first one, the last one, and 10 in between.
.init -f example/rateLimit.yaml --tail "/ until accCount=12"
Started tailing... Press Ctrl+C to stop.
{
  "acc": [
    1,
    10,
    19,
    28,
    38,
    48,
    57,
    66,
    75,
    85,
    94,
    100
  ],
  "counter": "{function:}",
  "count": 100,
  "rapidCaller": "--interval/timeout--",
  "stop": "done",
  "accCount": 12
}
Understanding Plans
This information is to explain the planning algorithms to comitters. As a user you do not need to understand how Stated formulates plans. Before explaining how a plan is made, let's show the end-to-end flow of how a plan is used with an example:
- A template is shown with a graph tree visualizing the JSON.
The template contains 3 expressions. For any valid template there is at least one ordering
of all expressions that produces a correct output. We call such as correct ordering a Plan.
A Plan is an ordered Array whose elements are JSON Pointers to expressions. To illustrate the importance
of a correct plan, what would happen if the first expression executed was
${e.i+100}? The result would be garbage/undefined becausee.ihas not been evaluated. - From the template, a plan is formulated (we will explain how this happens in the following section)
- The Plan is executed sequentially producing the final
output
Planning
Planning is the process of
- Analyzing each expression to produce a MetaInfo Node recording facts about the Node such as its dependencies
- Organizing MetaInfo into a tree structure mirroring the template JSON
- Traversing the tree using a DFS algorithm to produce a single ordering of expression evaluation (a Plan)
MetaInfo Graph
A plan is built by traversing a metainfo graph that has these features.
- labels - each node is labeled with its JSON POinter
- ordinary nodes - A node such as
/a/dis an ordinary node with a value 100 - expression nodes - A node such as
/b/econtains a JSONata expression like/${a.c.g} - dependency arrows - Expressions like
a.c.grefer to another part of the document, hence have a dependency - non-materialized nodes - These metadata nodes are created any time a reference creates a dependency on a node
that does not exist in the JSON template. Such non-materialized nodes come in 2 flavors
- results of expressions (since clearly results of expressions don't exist in the input template). In the
diagram below,
e.iis a local reference to a non-materialized node, from the expression${e.1+100}found in node/b/f. Hence the absolute JSON Pointer for the non-materialized node is/b/e/i. - information that simply isn't present yet in the template. An example of this can be a dashboard whose expressions
depend on a field that is expected to arrive at runtime, for instance
query.result. Clearly the result of a query is not material in the template.
- results of expressions (since clearly results of expressions don't exist in the input template). In the
diagram below,
The MetaInfo graph for our example above is:

DFS Tree Traversal
The core algorithm is in the method TemplateProcessor.topologicalSort. This method is passed a metaImnfo node, and
recursively calls itself as it followDependencies and followChildren. A scope is used to detect circular
dependencies within a given subgraph.
const listDependencies = (metaInfo) => {
   markAsVisited(metaInfo);
   addToScope(metaInfo);

   followDependencies(metaInfo);
   emit(metaInfo);
   followChildren(metaInfo);

   removeFromScope(metaInfo);
}
The only 'interesting' thing differentiating this from standard DFS tree-walking and dependency following, is that
there is special treatment for non-materialized nodes. when a non-materialized node is encountered as a result of
following a dependency, the algorithm travels to the parent of non-materialized node until it finds a node with an
expression. The step labled 2 in the diagram below illustrates how the non-materialized node is followed up to its
materialized parent expression.
Assuming we call findDeps on node /b/f the diagram below shows the order (1,2,3,4) in which links are traversed. Since
the algorithm is DFS, expression nodes are added in reverse traversal order: ['/a/c/g/i', '/b/e', '/b/f']


