EasyGen is a visual user interface to help set up simple neural network generation tasks.
There are a number of neural network frameworks (Tensorflow, TFLearn, Keras, PyTorch, etc.) that implement standard algorithms for generating text (e.g., recurrent neural networks, sequence2sequence) and images (e.g., generative adversarial networks). They require some familairity with coding. Beyond that, just running a simple experiment may require a complex set of steps to clean and prepare the data.
For example: to use a neural network to generate a history for a fictional country, I would:
- Get superhero names from somewhere. If it is Wikipedia, we see a lot of names are followed by parentheticals.
- Strip off parenthetical information.
- Remove empty lines and strip off any whitespace at the end of lines.
- Feed the resultant file into a character-rnn algorithm.
- Run the resultant model and store the outputs to a file.
EasyGen allows one to quickly set up the data cleaning and neural network training pipeline using a graphical user interface and a number of self-contained "modules" that implement stardard data preparation routines. EasyGen differs from other neural network user interfaces in that it doesn't focus on the graphical instantiation of the neural network itself. Instead, it provides an easy to use way to instantiate some of the most common neural network algorithms used for generation. EasyGen focuses on the data preparation.
Here is how EasyGen can be used to run the superhero name generation example above:
 Each box is a chunk of standard code that can be selected from a library of options. Arrows indicate the data flow from module to module.
What is a neural network? A neural network is a machine learning algorithm very loosely inspired by the brain. I'm not a fan of the brain metaphor (see introduction to neural networks without the brain metaphor).
What you need to know is that a neural network is an automated function approximation technique. If you remember back to grade school, your teacher might have asked you to solve a problem like this:

That is, given the inputs and outputs, guess the function that turns the inputs into outputs. Probably you could figure out the exact function (y = 2x + 1). How did you do it? You might have guessed a function based on the first example, like y = x + 2 and then checked to see if it worked on the next example. This guess won't work: x=2 gives y=4, which is off by 1. So you probably updated your guess to y = 2x + 1. Now that example is right. What about the next example? Yup. What about the previous example? Yup.
That is more or less the process that a neural network goes through to approximate a function. Except it doesn't just work on algebra equations. It turns out that one can set up a graph of nodes and edges that connect inputs to outputs and allow information to flow through the box. If the weights on the edges are designed correctly, then the box will generate the right answer for any given input.

Neural network training is a process of constructing a lot of examples of inputs and outputs and running them through the network graph. When the the network gives the wrong answer, some of the weights are fiddled with so that the answer is closer to the desired output. Then you run the examples through the network again (each time you do this is called an epoch) to make sure the weight fiddling didn't screw anything up. Do this enough times and the weights will converge on some numbers that make the network produce the right answer (or close to the right answer) more often than not.
Now that the network has been trained--that is, we have a really good guess about the function that might have generated the data--we can apply run the neural network on inputs we have never seen before and have some confidence that it does the right thing.
There are a lot of ways to set up the neural network based on what you want to do.
If your x's are values from radar sensors on a car and your y's are steering instructions that humans perform at the same time that the radar sensor information comes in, then one can train a neural network that approximates the "human driver" function.

(Example from here)
If your x's are words from sentences in one language and your y's are words from corresponding sentences in another language, then you can do language translation.
If your x's are a string of characters and your y's are the same string of characters but offset by one, then you can perform prediction. That is, given a string of n characters, predict the n+1th character.

That last one sounds like a really strange thing to do. But if you start with some random characters and your neural network was trained on data that comprised superhero names, then the network try to predict the superhero name that would start with those random characters.
-
Install Python 2.7
-
Clone or download this repository.
git clone https://github.com/markriedl/easygen.git -
Install Tensorflow 0.12
pip install -I tensorflow==0.12.1If you are using a GPU, follow these Instructions
-
Install TFLearn 0.2.1
pip install -I tflearn==0.2.1 -
Install Beautiful Soup 4
pip install beautifulsoup4
If you will be pulling data from Wikipedia, you must do the following:
-
Download an English language Wikipedia dump. From this link you will find a file named something like "enwiki-20170401-pages-articles-multistream.xml.bz2". Make sure you download the .bz2 file that is not the index file.
-
Unzip the bz2 file to extract the .xml file.
-
Run a script to extract the information in the Wikipedia dump:
python wikiextractor/wikiextractor.py -o wiki --json --html --lists -s enwiki-...xmlBe sure to fill in the exact path and name to the XML file. This will create a directory called "wiki".
-
Superhero name generator

First, you will need to run the easygen server.
- Open a terminal window. Depending on your computer's operating system, this will be done in different ways. On my computer, the terminal screen looks like this:

-
Change directory to where you saved EasyGen
We need to change the working directory of the terminal window to the directory where you installed EasyGen. On my computer it is in the "easygen" directory on my Desktop, so I would do this
cd Desktop/easygen. (Thecdmeans change directory). -
Run the server.
Type
python easygen.py superhero_programinto the terminal and press Enter. See the image above for what it should look like when you are done.
Now, you are ready to use the visual editor.
First, open editor.html in a web browser. You will find the file in the directory where you saved EasyGen. Typically you can just double-click on editor.html and it will open in your default browser.
You will see a row of numbers across the top of the browser window. Mouse over them. When you do so, they will highlight green empty boxes. These are columns. They are where we will put stuff. They will help us keep things organized, although it doesn't matter where things are put.

Right-click on the "1". You will see a menu appear. The menu items are modules. Modules are chunks of code that you can arrange into a program.
Pick ReadTextFile. You will see a box appear in the first column under the "1" called "ReadTextFile1". You have indicated that you want this module in your program. Click on the plus sign in the corner of the module. Now you should see that the module has gotten bigger and has some more boxes inside. Like this:

Modules have three types of components:
- White boxes: parameters that can be set.
- Green boxes: accept inputs from other modules.
- Red boxes: send output to other modules.
ReadTextFile loads a text file so that the data inside can be used by other modules later. Click on the white "file" box. A pop-up window will ask you where the file is located that you want to use. Enter datasets/superheroes and press "ok".
Let's add another module. Right-click on the "2" column to get another menu of modules. This time, pick "RandomizeLines". Go ahead and click the plus on this new module to expand it.

"RandomizeLines" takes all the lines in some text data and randomizes the order of those lines. If we want to randomize all the lines in the superheroes data, we need to indicate that we want the data that we read in from the text file in the first module to be used by the second module. To do this, click on the red "output" box inside the "ReadTextFile1" module and drag an arrow over to the green "input" box inside the "RandomizeLines1" module. It should look like this:

Once the data has been randomize, it needs to go somewhere. Right-click on the "3" column and pick the "WriteTextFile" menu option. Expand the new module.

"WriteTextFile" takes some text data and writes it to a new file. Connect the output from "RandomizeLines1" to the input of "WriteTextFile". It should look like this:

Click on the white "file" box in "WriteTextFile" and enter randomized_superheroes into the pop-up box.
Okay, now we are ready to run our program, which is covered in the next section.
By the way, you can drag modules from column to column. It doesn't matter where the modules are, as long as the arrows move the data in the right order.
If you make a mistake and need to start over, you can just refresh the browser.
Push the "Done" button in the editor. You will see a pop-up box that asks you for a filename. The editor is going to write the code for your program to a file. The default is "programs/myprogram". You can use this or change the name to whatever you want. Once you click "ok" a new file will be created. If you used the default, you should see that a new file has been created in the "programs" directory inside the "easygen" directory.
Now you are going to need to open another terminal window and change directory to the place where you saved EasyGen.
Now to finally run your program: type python easygen.py superhero_program into the terminal and press Enter.

A bunch of text will be printed to the terminal. You can ignore that. Once the program is done, you can verify that it worked. A new file should have been created called "randomized_superheroes". Open it up and look at it. You can compare it to the original "superheroes" file in the "datasets" directory. They should have the same name, but on different lines.
You probably want to train and run a neural network.
Go back to the editor and close the pop-up window. We can just keep building on what we have done so far.
In column "4", add a "CharacterLSTM_Train" module. The CharacterLSTM_Train module teaches a neural network to predict the next character in text data. That is, when it sees certain characters in the superheroes text file, it will try to learn what character should go next. When we run the neural net later, it will try to construct new superhero names character by character. But first things first.

CharacterLSTM_Train is significantly more complicated than the other modules we've seen so far. There are a lot of settings. they all have defaults, so you don't have to do anything. But from trial and error I happen to know that some settings can make the neural network work better.
-
Click on the "history" box and change the value to
5. The history is how much text to keep in memory when trying to predict the next character. That is, it will look at the most recent 5 characters when trying to guess what the 6th character should be. -
Click on the "layers" box. You can keep this number as
2. The layers parameter determines how deep the neural network will be. The more layers the more complex the patterns are that can be learned. But more layers means a bigger neural network that will take longer to train and require more data. -
Click on the "hidden_nodes" box and change the value to
64. The hidden_nodes setting indicates how many nodes will be in the neural network. If layers is depth, think of hidden_nodes as width. A wider neural network may be able to learn more patterns but will take longer to train and require more data. -
Click on the "epochs" box and change the value to
100. The epochs setting tells the neural network how many times to look at the data. The more times it looks at the data, generally the more accurate the neural network gets (but also the longer it takes). This dataset is small, so it is harder to find coherent patterns. I found that this dataset works better to have a lot of epochs.
Let's send our dataset into the neural network training module. Connect the red "output" box in "Randomizedline1" to the green "data" box inside "CharacterLSTM_Train".
It is okay that there are two arrows coming out of "RandomizeLines". The program will write the randomized data to file and also use the randomized data to train the neural network.

Once the neural network is trained, it must be run. The trained neural network is output as the "model". When the model was created, it converted all the characters into numbers. Neural networks don't really understand anything other than numbers. The "dictionary" is a file that remembers which numbers are mapped to which characters. It's just one of those things.
In column "5", create a "CharacterLSTM_Run" module. Connect the red "model" in the training module to the green "model" in the "CharacterLSTM_Run" module. Do the same for the "dictionary". It should look like this:

Inside the "CharacterLSTM_Run" module, the "history", "layers", and "hidden_nodes" settings must all be the same as those in the "CharacterLSTM_Train" module. This is a pain in the butt. But there is a shortcut. If you drag from the white "history" box in "CharacterLSTM_Train" to the white "history" box in "CharacterLSTM_Run", the editor will set the values to be the same. Furthermore, it will remember that these values should always be the same, so that if you change one later, all will change to stay the same. This is indicated by dashed lines between the white boxes.

Two more settings still need to be set in "CharacterLSTM_Run":
-
Click on the "steps" box. The value of
600is okay and stay the same. This is how many characters to generate when the neural network is run. The bigger the number, them more characters (and thus more names) you will get. -
Click on the "temperature" box. The default values is
0.5, which can stay the same. The temperature setting will be a number between0.0and1.0. A higher temperature means the neural network will make more risky choices and the output will be a bit weirder. A lower temperature means the neural network will try to generate things that look more like the original data if possible.
There is one more input to "CharacterLSTM_Run" that we have to deal with. The "seed" is a random sequence of characters to get the neural network started. It works best when the seed is a random sequence pulled from the original data. We can use the "RandomSequence" module. Let's add that module to column "3" (although it can go anywhere you want I like to keep things flowing from a left-to-right fashion). You can have more than one module in a column. You can always drag the other modules into other columns if need to make room.

Connect the output of the "RandomizeLines" to the input of "RandomSequence". Connect the output of "RandomSequence" to the green "seed" of "CharacterLSTM_Run". It should look like this:
The "length" inside the "RandomSequence" module can be anything, although I like to set it to be the same as "history". You can use the dashed-line trick.

Finally, we need the generated data from the neural network to go somewhere. Add another "WriteTextFile" module to column 6. Connect the output of CharacterLSTM_Run to the input of WriteTextFile2 in column 6. Like this:

Change the "file" setting to new_superheroes.
You are all set. Follow the instructions above to save your program and run it in the terminal.
-
To delete a link, click on the link and hit the Delete or Backspace button.
-
You can't (yet) delete modules. However, you can delete all incoming and outgoing links and it won't be included in the program.
This module parses content out of Wikipedia. It requires a download of a English Wikipedia dump (see installation instructions above).
Inputs:
None.
Parameters:
| Component | Type | Description | Default |
|---|---|---|---|
| wiki_directory | directory path | This is the directory that the English Wikipedia dump was extracted into. | None |
| pattern | string | Describes what should be extracted using a special pattern language (described below). | "*" |
| categories | string | Describes what categories you are looking for (described below) | "*" |
| break_sentences | true/false | Should each sentence be on a separate line in the output? | False |
Outputs:
| Component | Type | Description |
|---|---|---|
| out_file | text data | The text mined from Wikipedia. May have many sentences per line, or a single sentence per line. |
| titles_file | text data | A list of Wikipedia articles from which data was mined. Each title is on a separate line. |
Patterns:
The pattern takes a specially formatted text string as follows: title_keywords:header1_keywords:header2_keywords:.... title_keywords is a set of keywords to look for in Wikipedia article titles. If the keyword is "*", then all titles match. Any word in title_keywords must be present in the article title. To look for different possibilities, use the "|" to indicate that any of two or more words could be matched.
If the title matches, then the article is checked to see if it has a 1st-level header that matches the header1_keywords. If no header1_keywords are given or if the header1_keywords are "*", then all the text underneath that header are grabbed.
If the title keywords match and the article contains a 1st-level header that matches header1_keywords and header2_keywords is given, then the article must also have a 2nd-level header underneath a matching 1st-level that maches the header2_keywords. If all of this happens, then all text underneath the 2nd-level header is grabbed.
More levels can be provided.
Pattern examples:
*- grab all text in all articles.cat|tiger|leopard|cougar|feline|cheetah- grab all text in all articles containing any of those words in the titles. This would match on "Leopard" and "Snow Leopard"*:plot- grab text from all articles that have a 1st-level section header that containing the word "plot". The text grabbed is that below the "plot" header. This would grab plot summary text from most books, movies, and computer games. Theout_filewill contain the plot summary text and thetitles_filewould contain the titles of the books/movies/games.*:discography- graph text from all articles that have a 1st-level section header that contains the word "discography". This tends to be articles about bands. Thetitles_filewould contain the list of band names.*:*:taxonomy- grab text from all articles that have a 2nd-level section header containing the word "taxonomy". This will grab a lot of articles about animals. For some reason the section in taxonomy tends to be buried at the 2nd level.
(Advanced feature: If any keyword is replaced with the word "list", then the module will only retrieve the text contained in lists at the specified level. For example *:*:taxonomy:list would retrieve any lists beneath the 2nd-level header.)
Categories:
All articles have a list of categories. They can usually be found at the bottom of article pages. The categories setting takes a list of keywords separated by the "|" symbol, or "*" to indicate all categories.
This can be used in conjunction with patterns for more control over article matching. When categories are used, any Wikipedia article must first match one of the keywords within one of its categories. After the category match, then it proceeds with the pattern matches in title and headers.
Warning: This module can take a long time to run. Perhaps a day or more.
This module parses content out of Wikipedia. It requires a download of a English Wikipedia dump (see installation instructions above). Unlike ReadWikipedia, PickFromWikipedia takes as input a list of titles to match. Categories can also be specified, but there is no additional selection criteria that can occur.
The standard use case for this module is to provide a list of titles and extract the text in a particular section of the article.
Inputs:
| Component | Type | Description |
|---|---|---|
| input | text data | A list of Wikipedia article titles. |
Parameters:
| Component | Type | Description | Default |
|---|---|---|---|
| wiki_directory | directory path | This is the directory that the English Wikipedia dump was extracted into. | None |
| categories | string | Describes what categories you are looking for (described below) | "*" |
| sections | string | Keyword for a section header. | None |
| break_sentences | true/false | Should each sentence be on a separate line in the output? | False |
Outputs:
| Component | Type | Description |
|---|---|---|
| out_file | text data | The text mined from Wikipedia. May have many sentences per line, or a single sentence per line. |
| titles_file | text data | A list of Wikipedia articles from which data was mined. Each title is on a separate line. |
Example: A list of superhero names passed into input, and categories set to "*", and section set to "biography" would grab all the fictional biographies for all superheroes.
Warning: This module can take a long time to run. Perhaps a day or more.
The ReadTextFile module is used for loading data into the program from a text file. ReadTextFile makes no assumptions about how the text file is formatted. It has no inputs other than the name of the file, so makes a good module to start a program with. The intended use is that modules will take the output and format it in preparation for use by a neural network, stripping out characters, deleting blank lines, breaking it up into separate datasets, etc.
Inputs:
None
Parameters:
| Component | Type | Description | Default |
|---|---|---|---|
| file | directory path | This is the directory path to a text file that should be loaded in. | None |
Outputs:
| Component | Type | Description |
|---|---|---|
| output | text data | The exact text data from the specified file. |
The WriteTextFile module is used for saving data from the program from a text file. WriteTextFile makes no assumptions about how the text file is formatted. It has no outputs, so makes a good module to end a program with. For example, the outputs of a neural network could be saved.
Inputs:
| Component | Type | Description |
|---|---|---|
| input | text data | The text data to be written to file as is. |
Parameters:
| Component | Type | Description | Default |
|---|---|---|---|
| file | directory path | This is the directory path to a text file that should be saved to. | None |
Outputs:
None
A character-level LSTM is a recurrent neural network for generating text, one character at a time. This module trains the neural network on a chunk of text data. The model predicts the next character based on the previous characters it has seen. This module is paired with CharacterLSTM_Run which can take the model produced by this module and use to do the actual text generation.
Inputs:
| Component | Type | Description |
|---|---|---|
| data | text data | The text data to train the network with. |
Parameters:
| Component | Type | Description | Default |
|---|---|---|---|
| history | int | This is how many characters of the input data are held in memory at any given time. The more characters in memory, the more like the neural network will recognize long-range relationships. | 25 |
| layers | int | Number of layers in the network/ how deep the network should be | 2 |
| hidden_nodes | int | How many nodes in each layer of the network? | 512 |
| epochs | int | How many times should the network look at the data/ how long the network should train for | 10 |
Outputs:
| Component | Type | Description |
|---|---|---|
| model | neural network model | The model learned by the neural network. |
| dictionary | dictionary | A mapping from characters to numbers. |
The default parameters are probably good for most paragraph generation tasks, such as generating Shakespearean text. The epochs should probably be increased for most tasks however, especially if there isn't a lot of data to work with.
For book title generation, superhero name generation, bandname generation, etc, where each line of text is relatively small, one will want to reduce the history, and number of hidden nodes. I've found that history=5 and hidden_nodes=64 work better for this task.
A character-level LSTM is a recurrent neural network for generating text, one character at a time. A model trained with CharacterLSTM_Train can be used to generate text. The model and dictionary from CharacterLSTM_Train should be connected to the inputs of this module. In addition, the history, layers, and hidden_nodes should be identical to that from CharacterLSTM_Train because it can't load the model without knowing the dimensions of the network.
Inputs:
| Component | Type | Description |
|---|---|---|
| model | neural network model | The model learned by the neural network. |
| dictionary | dictionary | A mapping from characters to numbers. |
| seed | text data | A string of text to get the neural network started. The length of the text data should be at least as long as the history parameter below. See below for more information. |
Parameters:
| Component | Type | Description | Default |
|---|---|---|---|
| history | int | This is how many characters of the input data are held in memory at any given time. The more characters in memory, the more like the neural network will recognize long-range relationships. Should be same as CharacterLSTM_Train. | 25 |
| layers | int | Number of layers in the network/ how deep the network should be. Should be same as CharacterLSTM_Train. | 2 |
| hidden_nodes | int | How many nodes in each layer of the network? Should be same as CharacterLSTM_Train. | 512 |
| steps | int | How many characters to generate. | 600 |
| temperature | decimal between 0.0 and 0.1 | How risky the generation should be. 0.0 means try to replicate the data as well as possible. 1.0 means make a lot of risky moves. | 0.5 |
Outputs:
| Component | Type | Description |
|---|---|---|
| output | text data | The text generated by running the neural network. |
The seed can come from the original data set that was fed into CharacterLSTM_Train. A typical thing to do is to grab a random string from the original dataset because the neural network will be happy starting out with something it recognizes. One can use RandomSequence to grab a random string from the original text data. Alternatively, one could use MakeString or UserInput.
The temperature parameters affects how random-appearing the generated text will be. A value close to 1.0 will make the output look more random because the neural network will not always take the most likely next character. A value close to 0.0 will make output that looks more like the original input data (assuming the model is properly trained) because it will always take the most likely next character given a history.
This module takes some text data and grabs a random chunk of it, discarding the rest. The random chunk could be from anywhere in the text data, or it could always start at the start of a random line. The most typical use of this module is to create a seed from text data to be used in CharacterLSTM_Run.
Inputs:
| Component | Type | Description |
|---|---|---|
| input | text data | Some text data. |
Parameters:
| Component | Type | Description | Default |
|---|---|---|---|
| length | int | This is how many characters to grab from the text data. | 25 |
Outputs:
| Component | Type | Description |
|---|---|---|
| output | text data | The random sequence. |
When using this module with CharacterLSTM_Run, it is best to make sure the length is the same as the LSTM's history parameter.
Hard code a text string to be sent into other modules. This is kind of like making a string variable in other programming languages.
Inputs:
None.
Parameters:
| Component | Type | Description | Default |
|---|---|---|---|
| string | string | The characters to save in the string data. | None |
Outputs:
| Component | Type | Description |
|---|---|---|
| output | text data | The text of the string to be passed along to other modules. |
Pause the program and ask the user to enter some text in the terminal.
Inputs:
None.
Parameters:
| Component | Type | Description | Default |
|---|---|---|---|
| prompt | string | The prompt to be printed out before the user enters some text. | None |
Outputs:
| Component | Type | Description |
|---|---|---|
| output | text data | The text of the string to be passed along to other modules. |
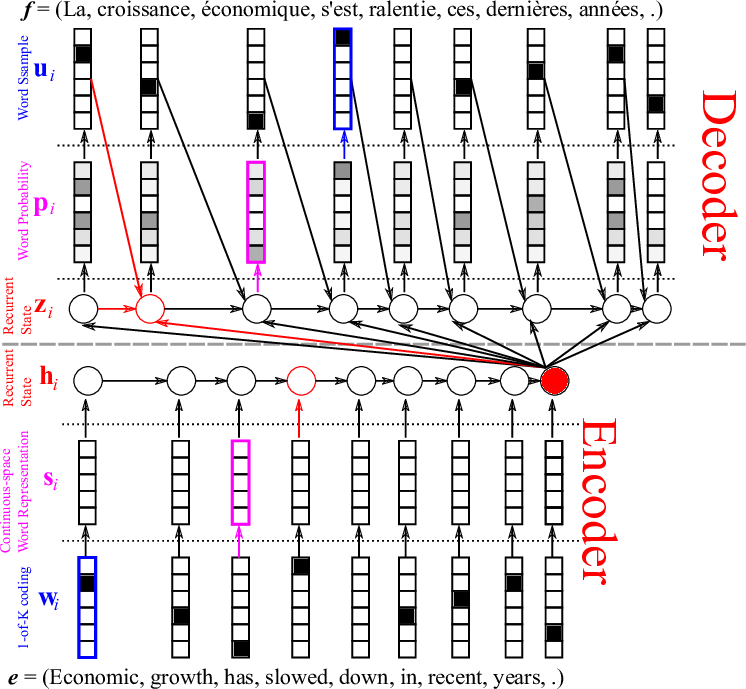
A Sequence2Sequence neural network is used for translation or prediction (Also called an encoder/decoder network). Given an input sequence, it trains a neural network to predict the output. To do this, it is given pairings of known inputs and outputs. When the inputs and outputs are the same sentence but in different languages (e.g., English and French), a Sequence2Sequence learns to do language translation. When the outputs are identical to the outputs but shifted so that the ith input is the i+1th input, then it learns to predict (i.e., generate) the next word.
Once the Sequence2Sequence neural network has been trained on pairs of inputs and outputs, the model can be applied to new inputs that have never been seen before.
To avoid confusion, we refer to the paired data as X and Y. For example, X can be a list of English sentences, and Y can be a list of French sentences that mean the same thing. Each line of X should be paired with a line of Y. Line 1 of X is paired with Line 1 of Y, Line 2 of X is paired with Line 2 of Y, and so on. The number of lines in X must be the same as the number of lines in Y.
Inputs:
| Component | Type | Description |
|---|---|---|
| all_data | text data | This input should contain all the text data (including what is referred to as X and Y). |
| x | text data | The x component of the training data. |
| y | text data | the y component of the training data. |
Parameters:
| Component | Type | Description | Default |
|---|---|---|---|
| layers | int | Number of layers in the network/ how deep the network should be | 2 |
| hidden_nodes | int | How many nodes in each layer of the network? | 1024 |
| epochs | int | How many times should the network look at the data/ how long the network should train for | 10 |
Outputs:
| Component | Type | Description |
|---|---|---|
| model | neural network model | The trained neural network model. |
| dictionary | dictionary | A mapping of words to numbers. |
To perform translation, you need text files. One that has sentences in one language, and the other that has sentences in another language. The sentence on any particular line in one file should mean the same thing as the sentence on that same line in the other file. You will need to concatenate the files together to fill all_data, but then one file should be passed in a X and the other as Y. Order matters, if you want the neural network to learn to translate from language A to language B, make sure you put the file with the source language into X and put the file with the target language into Y.
To perform prediction, you need to do something slightly different. You need to take a chunk of text data which is split up into lines, and duplicate the text data. The second text data needs to be shifted so that line 2 in the first file is the same as line 1 in the second file. That is, if you line up the two files side by side the ith line in the first file is next to the 1+1th file in the second file. This is telling the neural network to learn to predict the next line. The first file becomes X and the second file becomes Y. You can use the MakePredictionData module to take a single chunk of text data and split it up exactly for this purpose.
A Sequence2Sequence neural network is used for translation or prediction (Also called an encoder/decoder network). This module runs a Sequence2Sequence model trained by Seq2Seq_Train.
Inputs:
| Component | Type | Description |
|---|---|---|
| data | text data | This is the data that you want translated or to use for prediction. It can be different from the data used to train the model. |
| model | text data | The model trained by Seq2Seq_Train. |
| dictionary | text data | A mapping from words to numbers. This dictionary should have been created by Seq2Seq_Train. |
Parameters:
| Component | Type | Description | Default |
|---|---|---|---|
| layers | int | Number of layers in the network/ how deep the network should be. Should be the same as that used in Seq2Seq_Train. |
2 |
| hidden_nodes | int | How many nodes in each layer of the network? Should be the same as that used in Seq2Seq_Train. |
1024 |
| stop | string | Stop generating words early when this sequence of characters is seen. | None |
Outputs:
| Component | Type | Description |
|---|---|---|
| output | text data | The output of the neural network model applied to the input data. |
The neural network model will run on all the data passed in as an input, and each line of the input data will create a line of output data. You can also specify a special stop string that tells the neural network to stop generating output lines when the particular string is generated. This is particularly useful for prediction, when you know you need to stop making predictions.
It is often the case that neural network researchers will create what are called "training" and "testing" datasets. A portion of the total data (e.g., 90%) will be used for training and then the model will be applied to the remaining data. The reason this is done is to verify that the trained model can make sense of data that it has never seen before. You might not want to do this for non-research, but the MakeTrainTestData and MakeTransTrainTestData will do this splitting for you. Note that if you do this, make sure Seq2Seq_Train gets a text data input that includes all the data from before the split is made so that it can make a dictionary.
Inputs:
This module takes a chunk of text data and splits it into two chunks of text data. A percentage is given to indicate where the split should happen. For testing a neural network, the recommendation is a 90/10 split between training data and testing data.
| Component | Type | Description |
|---|---|---|
| data | text data | This is the data that you want split |
Parameters:
| Component | Type | Description | Default |
|---|---|---|---|
| training_percent | int | A number between 0 and 100 indicating the percentage of the input data that will be training data | 90 |
Outputs:
| Component | Type | Description |
|---|---|---|
| training_data | text data | The data from before the split. |
| testing_data | text data | The data from after the split. |
This modules takes two sources of text data (called x and y) and splits both the x and the y into training and testing datasets. This module is useful for training and testing with Seq2Seq_Train. For testing a neural network, the recommendation is a 90/10 split between training data and testing data.
Inputs:
| Component | Type | Description |
|---|---|---|
| data_x | text data | This is the x data that you want split. |
| data_y | text data | This is the y data that you want split. |
Parameters:
| Component | Type | Description | Default |
|---|---|---|---|
| training_percent | int | A number between 0 and 100 indicating the percentage of the input data that will be training data | 90 |
Outputs:
| Component | Type | Description |
|---|---|---|
| training_x_data | text data | The x data from before the split. |
| training_y_data | text data | The y data from before the split. |
| testing_x_data | text data | The x data from after the split. |
| testing_y_data | text data | The y data from after the split. |
This model takes text data and breaks it up into individual lines when it seed end-of-sentence punctuation (e.g., ".", "!", "?", or ":").
Inputs:
| Component | Type | Description |
|---|---|---|
| input | text data | This is the data that you want split up into individual lines, one per sentence. |
Parameters:
None.
Outputs:
| Component | Type | Description |
|---|---|---|
| output | text data | The data with each sentence on its own line. |
Takes text data and deletes any lines that are empty.
Inputs:
| Component | Type | Description |
|---|---|---|
| input | text data | This is the data. |
Parameters:
None.
Outputs:
| Component | Type | Description |
|---|---|---|
| output | text data | The data but with no empty lines. |
Takes text data and deletes any whitespace from the front and end of each line.
Inputs:
| Component | Type | Description |
|---|---|---|
| input | text data | This is the data. |
Parameters:
None.
Outputs:
| Component | Type | Description |
|---|---|---|
| output | text data | The data but with no whitespace characters on the front or end of any line. |
| --- | --- | --- |
This module looks for subsequences of characters in text data and replaces it with other subsequences. Like Find and Replace All in your favorite text editor.
Inputs:
| Component | Type | Description |
|---|---|---|
| input | text data | The text data. |
Parameters:
| Component | Type | Description | Default |
|---|---|---|---|
| find | string | The string subsequence to find and replace. | None |
| replace | string | The string subsequence to replace with. | None |
Outputs:
| Component | Type | Description |
|---|---|---|
| output | text data | The data will all occurrences of find replaced with replace. |
You can remove characters from text data by leaving the replace parameter blank.
For each line in text data, if it contains a character (or string subsequence), split that line into two and put the first part in one output file and the second part in another output file. This module only splits on the first instance of the character (or subsequence).
Inputs:
| Component | Type | Description |
|---|---|---|
| input | text data | The text data. |
Parameters:
| Component | Type | Description | Default |
|---|---|---|---|
| character | string | The character (or string subsequence) to look for on each line to make the split at. | None |
Outputs:
| Component | Type | Description |
|---|---|---|
| output1 | text data | The data containing lines with text from before the split (or complete lines if the split character wasn't found). |
| output2 | text data | The data containing lines with text from after the split (or empty lines if the split character wasn't found). |
Take two text data files and merge them together.
Inputs:
| Component | Type | Description |
|---|---|---|
| input_1 | text data | The text data from the first file. |
| input_2 | text data | The text data from the second file. |
Parameters:
None.
Outputs:
| Component | Type | Description |
|---|---|---|
| output | text data | The data containing all lines from both inputs. |
This module takes text data and randomizes the lines. This is useful for training sometimes.
Inputs:
| Component | Type | Description |
|---|---|---|
| input | text data | The text data to be randomized. |
Parameters:
None.
Outputs:
| Component | Type | Description |
|---|---|---|
| output | text data | The randomized data. |
This module removes HTML (and XML) tags from text data. This leaves the text between tags intact.
Inputs:
| Component | Type | Description |
|---|---|---|
| input | text data | The text data. |
Parameters:
None.
Outputs:
| Component | Type | Description |
|---|---|---|
| output | text data | The text data without HTML and XML tags. |
Makes all the text in a text file lowercase.
Inputs:
| Component | Type | Description |
|---|---|---|
| input | text data | The text data. |
Parameters:
None.
Outputs:
| Component | Type | Description |
|---|---|---|
| output | text data | The text data with no uppercase characters. |
This module takes text data and inserts a blank space between all words and punctuation marks. For example, it will convert "Mark's" to "Mark" and "'s". This is useful for Seq2Seq_Train because it won't confuse the "Mark" in "Mark's" with other instances of "Mark". It treats "." and other punctuation as if they were words.
Inputs:
| Component | Type | Description |
|---|---|---|
| input | text data | The text data. |
Parameters:
None.
Outputs:
| Component | Type | Description |
|---|---|---|
| output | text data | The text data with words and punctuation with blank spaces between. |
A Generative Adversarial Network (GAN) is a type of neural network that learns to generate images similar to a set of input images.
Inputs:
| Component | Type | Description |
|---|---|---|
| input_images | set of images | This is a set of images to use as examples. |
Parameters:
| Component | Type | Description | Default |
|---|---|---|---|
| epochs | int | The number of times the input data is looked at. | 10 |
| input_height | int | Each image must be of the same height. Width must be same as height. | 108 |
| output_height | int | Each image will be output with this height. Width will be same as height. | 108 |
| filetype | string | Format of input images (jpg, png). | jpg |
| crop | true/false | Should input images be center-cropped? | True |
| num_images | int | Number of images to generate. | 1 |
Outputs:
| Component | Type | Description |
|---|---|---|
| output_images | set of images | The set of generated images. |
Read in a set of images to be passed to other modules.
Inputs:
None
Parameters:
| Component | Type | Description | Default |
|---|---|---|---|
| file | directory path | This is the directory path to a set of images file that should be loaded in. Each image will be a separate file in the directory. | None |
Outputs:
| Component | Type | Description |
|---|---|---|
| output | set of images | The images. |
The WriteImages module is used for saving image data.
Inputs:
| Component | Type | Description |
|---|---|---|
| input | set of images | The set of images to be saved. Each image will be saved to a different file in the specified directory. |
Parameters:
| Component | Type | Description | Default |
|---|---|---|---|
| file | directory path | This is the path to a directory to save the images files. | None |
Outputs:
None
Load a neural network model.
Inputs:
None
Parameters:
| Component | Type | Description | Default |
|---|---|---|---|
| file | directory path | This is the filename of the model to load. | None |
| Outputs: |
| Component | Type | Description |
|---|---|---|
| model | neural network model | The model. |
The model may be saved as a group of several files all with the same start of the filename, e.g., "mymodel", "mymodel.index", "mymodel.meta", and "mymodel.data-00000-of-00001". The file name is just the common part before the period. All files will be loaded.
Note: hasn't been tested with DCGAN.
Save a neural network model.
Inputs:
| Component | Type | Description |
|---|---|---|
| model | neural network model | The model. |
Parameters:
| Component | Type | Description | Default |
|---|---|---|---|
| file | directory path | This is the filename to save the model to. | None |
Outputs:
None
The model may be saved as a group of several files all with the same start of the filename, e.g., if you give the file name as "mymodel", the following files may be save: "mymodel", "mymodel.index", "mymodel.meta", and "mymodel.data-00000-of-00001".
Note: hasn't been tested with DCGAN.
Load a neural network dictionary.
Inputs:
None
Parameters:
| Component | Type | Description | Default |
|---|---|---|---|
| file | directory path | This is the filename of the dictionary to load. | None |
| Outputs: |
| Component | Type | Description |
|---|---|---|
| dictionary | neural network dictionary | The dictionary. |
Save a neural network dictionary.
Inputs:
| Component | Type | Description |
|---|---|---|
| dictionary | neural network dictionary | The dictionary. |
Parameters:
| Component | Type | Description | Default |
|---|---|---|---|
| file | directory path | This is the filename to save the dictionary to. | None |
Outputs:
None
This is not implemented (yet), please do not use this module.

