###Build a Web Application with Spring Boot + Spring Web MVC + Thymeleaf
####Configuration with Spring Boot
Spring Boot offers a fast way to build "just run" applications with less configuration code.
My application is based on Java maven project, and we should add these code to our dependency file pom.xml.
<parent>
	<groupId>org.springframework.boot</groupId>
	<artifactId>spring-boot-starter-parent</artifactId>
	<version>1.3.3.RELEASE</version>
	<relativePath/> <!-- lookup parent from repository -->
</parent>
<dependencies>
	<dependency>
    	<groupId>org.springframework.boot</groupId>
    	<artifactId>spring-boot-starter-web</artifactId>
	</dependency>
</dependencies>
Then, we can write a simple Web application in Java.
SampleController.java
@Controller
@EnableAutoConfiguration
public class SampleController {
	@RequestMapping("/hello") // Use Spring MVC to handle web requests
	@ResponseBody
	String home(){
		return "Hello World";
	}
	public static void main(String args[]) throws Exception{
		SpringApplication.run(SampleController.class,args);
	}
}
@Controller represents "C" in Spring MVC, by using this annotation, Spring knows that this class is used for handling web requests.
@EnableAutoConfiguration tells Spring to "guess" and help you do the configuration, since spring-boot-starter-web added Spring MVC and Tomcat, the auto configuration will assume that you are developing a web application and setup Spring accordingly.
@RequestMapping annotation provides "routing" information, it tells Spring that any HTTP request with the path "/hello" should be mapped to the home() method.
Tomcat is started on tcp port 8080, so if we type http://localhost:8080/hello in a web browser, we will see "Hello World" in the openning page.
####Spring Web MVC
Until now, we have not use Model and View in our application, and that is what we will going to do in this section.
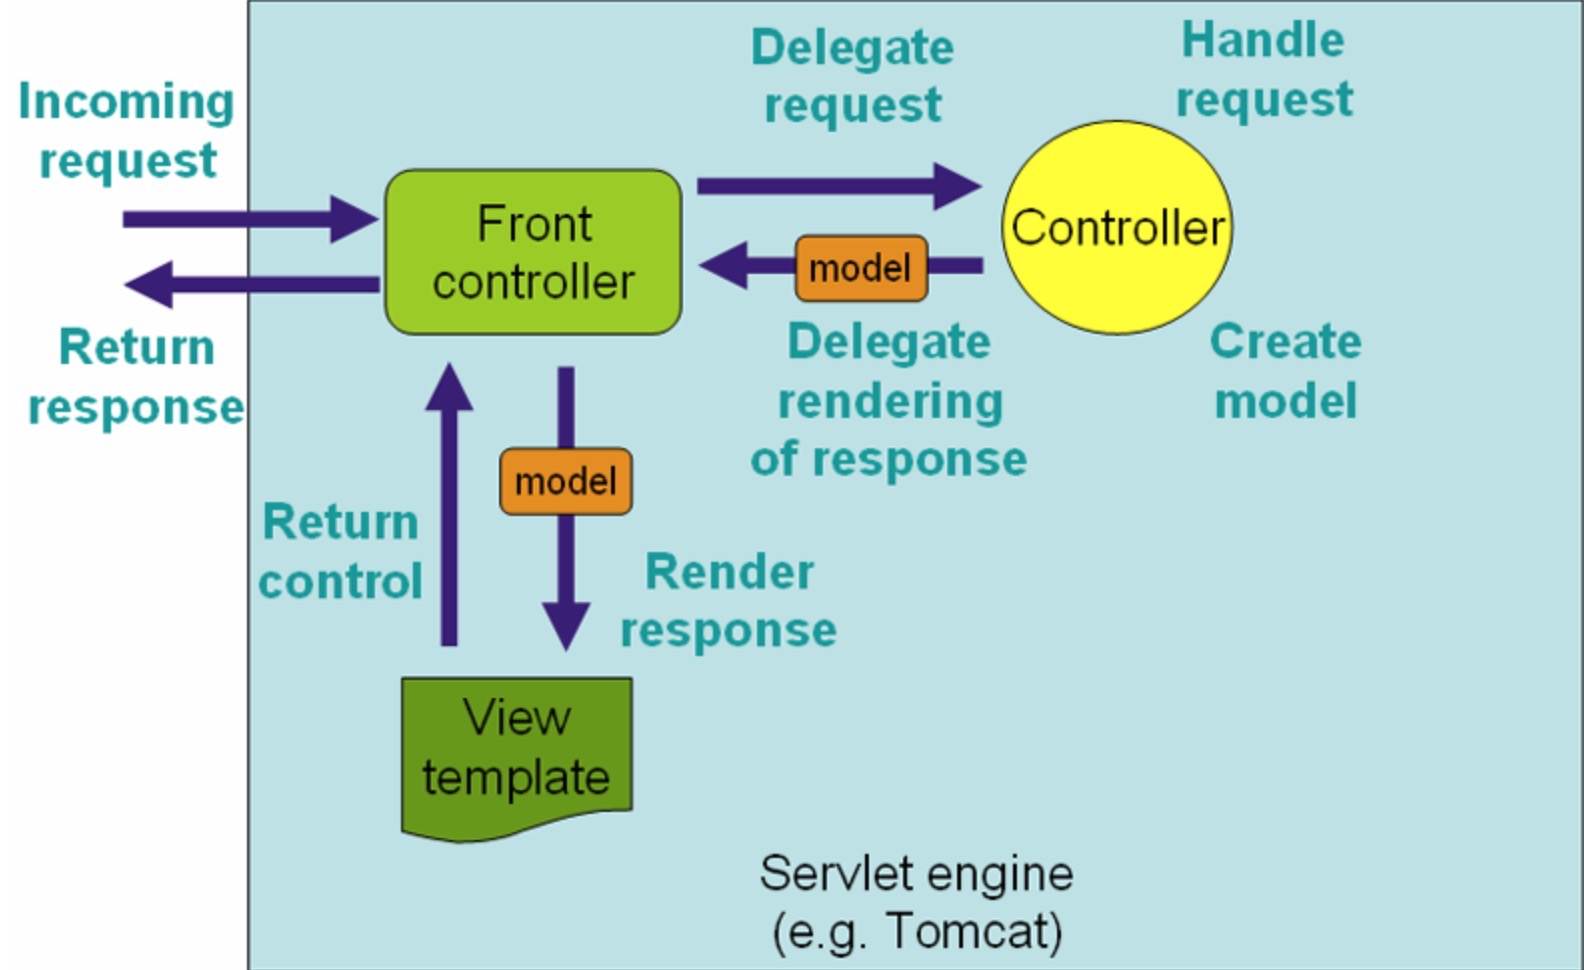
The Spring Web model-view-controller (MVC) framework is designed around a DispatcherServlet that dispatches requests to handlers (ususally are @Controller and @RequestMapping annotations), and the workflow of this process is showing below.
Firstly, we should add @SpringBootApplication in our SampleController.java
@Controller
@SpringBootApplication
public class SampleController {
	public static void main(String args[]) throws Exception{
		SpringApplication.run(SampleController.class,args);
	}
}
@SpringBootApplication annotation is equivalent to using @Configuration, @EnableAutoConfiguration and @ComponentScan with their default attributes, and I have deleted "hello" method here.
Then, I create a new controller named GreetingController.
@Controller
public class GreetingController {
    @RequestMapping(value = "/hello.html", method = RequestMethod.GET)
    public String showPage(GreetingForm greetingForm){
    	return "/hello";
    }
    @RequestMapping(value = "/greeting", method = RequestMethod.POST)
    public String editGreetingForm(GreetingForm greetingForm){
    	//System.out.println(greetingForm.getName());
    	greetingForm.setContent("Hello," + greetingForm.getName());
    	return "/greeting";
    }
}
We have already known that @RequestMapping is used for mapping a http request to a hanlding method, and in showPage method, we handle the request for the html page hello.html and provide a model (GreetingForm) as part of the return response.
GreetingForm.java
package model;
public class GreetingForm {
	private String content;
	private String name;
	public String getContent() {
		return content;
	}
	public void setContent(String content) {
		this.content = content;
	}
	public String getName() {
		return name;
	}
	public void setName(String name) {
		this.name = name;
	}
}
And this is the code of our model GreetingForm, it has two attributes content and name, method showPage generates a object of this model and provides it to view, and in our html file, we can use <input> with th:field tag directly fill this model with input data.
####Thymeleaf
hello.html
<!DOCTYPE html>
<html xmlns="http://www.w3.org/1999/xhtml" xmlns:th="http://www.thymeleaf.org" xmlns:sec="http://www.thymeleaf.org/thymeleaf-extras-springsecurity3">
<head>
<title>Hello</title>
<script type="text/javascript" th:src="@{/jquery-2.1.4/jquery-2.1.4.min.js}"></script>
<script type="text/javascript" th:src="@{/bootstrap-3.3.5/js/bootstrap.min.js}"></script>
<link rel="stylesheet" th:href="@{/bootstrap-3.3.5/css/bootstrap.min.css}"></link>
</head>
<body>
	<form class="greeting-form" action="#" th:action="@{/greeting}" th:object="${greetingForm}" method = "POST">
		<div class="input-field-group">
			<div class="input-label">
				Please Input Your Name
			</div>
			<input class="form-control" type="text" th:field="*{name}" th:value="${greetingForm.name}">
		</div>
		<button class="btn btn-primary" type="submit">Submit</button>
	</form>
</body>
</html>
In first section, we only return a string to the browser, now we use thymeleaf template engine to help us generate html code for users. We can use non-XHTML tags (like th:value) in the code and browsers will ignore all those tags they don't understand. During the template working process, thymeleaf will automatically subsitute these tags with corresponding vaules after evaluation.
And we should add this dependency in our pom.xml in order to use Thymeleaf in our project.
<dependency>
	<groupId>org.springframework.boot</groupId>
	<artifactId>spring-boot-starter-thymeleaf</artifactId>
</dependency>
hello.html looks like that
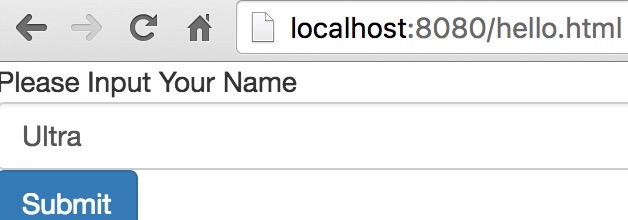
The input form in html page can be seen as the "V" in MVC, and when user input their name and click submit button, a HTTP POST request with filled-in user name contained in greetingForm model will send to the controller, and method editGreetingForm will handle this request, and use user name to generate greeting content, and then return this model to "greeting" page.
greeting.html
<!DOCTYPE html>
<html xmlns="http://www.w3.org/1999/xhtml" xmlns:th="http://www.thymeleaf.org" xmlns:sec="http://www.thymeleaf.org/thymeleaf-extras-springsecurity3">
<head>
<title>Hello</title>
<script type="text/javascript" th:src="@{/jquery-2.1.4/jquery-2.1.4.min.js}"></script>
<script type="text/javascript" th:src="@{/bootstrap-3.3.5/js/bootstrap.min.js}"></script>
<link rel="stylesheet" th:href="@{/bootstrap-3.3.5/css/bootstrap.min.css}"></link>
</head>
<body>
	<div class="show-greeting" th:object="${greetingForm}">
		<span th:text="${greetingForm.content}"></span>
	</div>
</body>
</html>
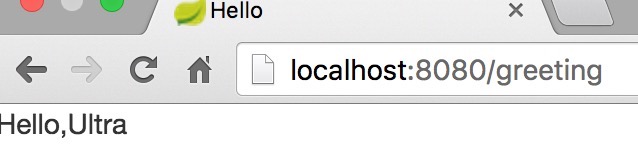
As we can see, we can easilly use the values of a model to generate a view, and sumbit a form to existing model in a view.
This is the end of my application, you can check all the codes in my github repository.
Reference:

