
介绍 https://zh.wikipedia.org/wiki/Cydia
OpenSSH https://cydia.saurik.com/openssh.html
usbmuxd http://bbs.iosre.com/t/usb-ssh-ios/193
scp http://ged.msu.edu/angus/tutorials/using-ssh-scp-terminal-macosx.html
Cycript http://www.cycript.org/
IDA https://www.hex-rays.com/products/ida/support/download_demo.shtml
Hopper https://www.hopperapp.com/
iOS逆向工程之Hopper中的ARM指令 http://www.cnblogs.com/ludashi/p/5740696.html
Theos http://iphonedevwiki.net/index.php/Theos/Setup#For_Mac_OS_X
Logos http://iphonedevwiki.net/index.php/Logos
Tutorial: Install the latest Theos step by step http://bbs.iosre.com/t/tutorial-install-the-latest-theos-step-by-step/2753
Theos:iOS越狱程序开发框架 http://security.ios-wiki.com/issue-3-6/
iOS逆向工程之Theos http://www.cnblogs.com/ludashi/p/5714095.html
iOS逆向入门实践 — 逆向微信,伪装定位(一) http://pandara.xyz/2016/08/13/fake_wechat_location/
iOS逆向入门实践 — 逆向微信,伪装定位(二) http://pandara.xyz/2016/08/14/fake_wechat_location2/ iOSOpenDev
iOSOpenDev http://iosopendev.com/
iOSOpenDev & 应用重签名 & iOSAppHook 等 https://github.com/Urinx/iOSAppHook
iOS App 签名的原理 http://blog.cnbang.net/tech/3386/
iOS安全些许经验和学习笔记 http://bbs.pediy.com/showthread.php?t=209014
移动App入侵与逆向破解技术-iOS篇 https://dev.qq.com/topic/577e0acc896e9ebb6865f321
如何让 Mac 版微信客户端防撤回 http://www.jianshu.com/p/fdb8b42f7614
小试牛刀:iOS去广告入门实战 http://www.freebuf.com/articles/terminal/77386.html
一步一步实现iOS微信自动抢红包(非越狱) http://www.jianshu.com/p/189afbe3b429
APP逆向分析之钉钉抢红包插件的实现-iOS篇 https://yohunl.com/ding-ding-qiang-hong-bao-cha-jian-iospian/
Blog
蒸米的文章 https://github.com/zhengmin1989/MyArticles
念茜(极客学院 Wiki ) http://wiki.jikexueyuan.com/project/ios-security-defense/ 杨君的小黑屋 http://blog.imjun.net/
碳基体 http://danqingdani.blog.163.com/
iPhoneDevWiki http://iphonedevwiki.net/index.php/Main_Page
iOS Security http://security.ios-wiki.com/
iOS端配置: 打开cydia 添加源:https://build.frida.re 安装对应插件 检查是否工作可以可在手机终端运行 frida-ps -U 查看
mac端配置: 安装Homebrew
安装python:
brew install python
安装wget:
brew install wget
安装pip:
wget https://bootstrap.pypa.io/get-pip.py
sudo python get-pip.py
安装usbmuxd:
brew install usbmuxd
清理残留:
rm ~/get-pip.py
Ps: 使用brew install xxx如果一直卡在Updating Homebrew… 可以control + z结束当前进程 再新开一个终端安装 此时可以跳过更新
终端执行:
sudo pip install frida 假如报以下错误:
-Uninstalling a distutils installed project (six) has been deprecated and will be removed in a future version. This is due to the fact that uninstalling a distutils project will only partially uninstall the project.
使用以下命令安装: sudo pip install frida –upgrade –ignore-installed six
建议如下
sudo pip install frida --ignore-installed six
从Github下载工程到opt:
sudo mkdir /opt/dump && cd /opt/dump && sudo git clone https://github.com/AloneMonkey/frida-ios-dump
会报错 sudo pip install -r /opt/dump/frida-ios-dump/requirements.txt --upgrade
建议用如下
sudo pip install -r requirements.txt --ignore-installed six
修改dump.py参数:
vim /opt/dump/frida-ios-dump/dump.py
找到如下几行(32~35):
      User = 'root'
      Password = 'alpine'
      Host = 'localhost'
      Port = 2222
按需修改 如把Password 改成自己的 ps:如果不习惯vim 用文本编辑打开/opt/dump/frida-ios-dump/dump.py手动编辑。
设置别名:
在终端输入:
vim ~/.bash_profile
在末尾新增下面一段:
alias dump.py="/opt/dump/frida-ios-dump/dump.py"
注意:以上的/opt/dump 可以按需更改 。 使别名生效: source ~/.bash_profile
以上使用文本编辑一样实现
打开终端 设置端口转发:
iproxy 2222 22
command + n 新建终端执行一键砸壳(QQ): dump.py + appName
dump.py QQ
- frida-tools 1.2.2 has requirement prompt-toolkit<2.0.0,>=0.57, but you'll have prompt-toolkit 2.0.7 which is incompatible. 这个问题是我在配置frida-iOS-dump的时候遇到的, 问题说的是 frida-tools要求的 prompt-toolkit 在 0.57及以上, 2.0.0以下, 不兼容2.0.7
解决办法: 降低 prompt-toolkit 版本
1.先卸载 prompt-toolkit
sudo pip uninstall prompt-toolkit
再安装指定prompt-toolkit 版本 prompt-toolkit 版本 sudo pip install prompt-toolkit==1.0.6
- Cannot uninstall 'six'. It is a distutils installed project and thus we cannot accurately determine which files belong to it which would lead to only a partial uninstall. 解决办法: 安装pip的时候, 或略安装 six, 不要参考官网sudo pip install -r requirements.txt --upgrade是错误的
sudo pip install -r requirements.txt --ignore-installed six
一、越狱检测
(一)《Hacking and Securing iOS Applications》这本书的第13章介绍了以下方面做越狱检测
1. 沙盒完整性校验
根据fork()的返回值判断创建子进程是否成功
(1)返回-1,表示没有创建新的进程
(2)在子进程中,返回0
(3)在父进程中,返回子进程的PID
沙盒如何被破坏,则fork的返回值为大于等于0.


我在越狱设备上,尝试了一下,创建子进程是失败,说明不能根据这种方法来判断是否越狱。xCon对此种方法有检测。
代码如下:


2. 文件系统检查
(1)检查常见的越狱文件是否存在
以下是最常见的越狱文件。可以使用stat函数来判断以下文件是否存在

/Library/MobileSubstrate/MobileSubstrate.dylib 最重要的越狱文件,几乎所有的越狱机都会安装MobileSubstrate
/Applications/Cydia.app/ /var/lib/cydia/绝大多数越狱机都会安装
/var/cache/apt /var/lib/apt /etc/apt
/bin/bash /bin/sh
/usr/sbin/sshd /usr/libexec/ssh-keysign /etc/ssh/sshd_config
代码如下:


(1)返回0,表示指定的文件存在
(2)返回-1,表示执行失败,错误代码存于errno中
错误代码:
    ENOENT         参数file_name指定的文件不存在
    ENOTDIR        路径中的目录存在但却非真正的目录
    ELOOP          欲打开的文件有过多符号连接问题,上限为16符号连接
    EFAULT         参数buf为无效指针,指向无法存在的内存空间
    EACCESS        存取文件时被拒绝
    ENOMEM         核心内存不足
    ENAMETOOLONG   参数file_name的路径名称太长
struct stat {
    dev_t         st_dev;       //文件的设备编号
    ino_t         st_ino;       //节点
    mode_t        st_mode;      //文件的类型和存取的权限
    nlink_t       st_nlink;     //连到该文件的硬连接数目,刚建立的文件值为1
    uid_t         st_uid;       //用户ID
    gid_t         st_gid;       //组ID
    dev_t         st_rdev;      //(设备类型)若此文件为设备文件,则为其设备编号
    off_t         st_size;      //文件字节数(文件大小)
    unsigned long st_blksize;   //块大小(文件系统的I/O 缓冲区大小)
    unsigned long st_blocks;    //块数
    time_t        st_atime;     //最后一次访问时间
    time_t        st_mtime;     //最后一次修改时间
    time_t        st_ctime;     //最后一次改变时间(指属性)
};
该方法最简单,也是流程最广的,但最容易被破解。在使用该方法的时候,注意使用底层的c函数 stat函数来判断以下路径名,路径名做编码处理(不要使用base64编码),千万不要使用NSFileManager类,会被hook掉

(2) /etc/fstab文件的大小
该文件描述系统在启动时挂载文件系统和存储设备的详细信息,为了使得/root文件系统有读写权限,一般会修改该文件。虽然app不允许查看该文件的内容,但可以使用stat函数获得该文件的大小。在iOS 5上,未越狱的该文件大小未80字节,越狱的一般只有65字节。

在安装了xCon的越狱设备上运行,result的大小为803705776 ;卸载xCon后在越狱设备上运行,result的大小为66
个人觉得该方法不怎么可靠,并且麻烦,特别是在app在多个iOS版本上运行时。xCon对此种方法有检测,不能采用这种办法
(3)检查特定的文件是否是符号链接文件
iOS磁盘通常会划分为两个分区,一个只读,容量较小的系统分区,和一个较大的用户分区。所有的预装app(例如appstore)都安装在系统分区的/Application文件夹下。在越狱设备上,为了使得第三方软件可以安装在该文件夹下同时又避免占用系统分区的空间,会创建一个符号链接到/var/stash/下。因此可以使用lstat函数,检测/Applications的属性,看是目录,还是符号链接。如果是符号链接,则能确定是越狱设备。
以下列出了一般会创建符号链接的几个文件,可以检查以下文件

没有检测过未越狱设备的情况,所以不好判断该方法是否有效
(二)http://theiphonewiki.com/wiki/index.php?title=Bypassing_Jailbreak_Detection 给出了以下6种越狱监测方法
1、检测特定目录或文件是否存在
检测文件系统是否存在越狱后才会有的文件,例如/Applications/Cydia.app, /privte/var/stash
一般采用NSFileManager类的- (BOOL)fileExistsAtPath:(NSString *)path方法(很容易被hook掉)
或者采用底层的C函数,例如fopen(),stat() or access()
与《Hacking and Securing iOS Applications》的方法2文件系统检查相同
xCon对此种方法有检测

2、检测特定目录或文件的文件访问权限
检测文件系统中特定文件或目录的unix文件访问权限(还有大小),越狱设备较之未越狱设备有太多的目录或文件具备写权限
一般采用NSFileManager类的- (BOOL)isWritableFileAtPath:(NSString *)path(很容易被hook掉)
或者采用底层的C函数,例如statfs()
xCon对此种方法有检测
3、检测是否能创建子进程
检测能否创建子进程,在非越狱设备上,由于沙箱保护机制,是不允许进程的
可以调用一些会创建子进程的C函数,例如fork(),popen()
与《Hacking and Securing iOS Applications》的方法1沙盒完整性检查相同
xCon对此种方法有检测
4、检测能否执行ssh本地连接
检测能否执行ssh本地连接,在绝大多数的非越狱设备上,一般会安装OpenSSH(ssh服务端),如果能检测到ssh 127.0.0.1 -p 22连接成功,则说明为越狱机
xCon对此种方法有检测
5、检测system()函数的返回值
检测system()函数的返回值,调用sytem()函数,不要任何参数。在越狱设备上会返回1,在非越狱设备上会返回0
sytem()函数如果不要参数会报错

6、检测dylib(动态链接库)的内容
这种方法是目前最靠谱的方法,调用_dyld_image_count()和_dyld_get_image_name()来看当前有哪些dylib被加载

测试结果:
使用下面代码就可以知道目标iOS设备加载了哪些dylib

#include <string.h>
#import <mach-o/loader.h>
#import <mach-o/dyld.h>
#import <mach-o/arch.h>
void printDYLD()
{
    //Get count of all currently loaded DYLD
    uint32_t count = _dyld_image_count();
    for(uint32_t i = 0; i < count; i++)
    {
        //Name of image (includes full path)
        const char *dyld = _dyld_get_image_name(i);

        //Get name of file
        int slength = strlen(dyld);

        int j;
        for(j = slength - 1; j>= 0; --j)
            if(dyld[j] == '/') break;

        printf("%s\n",  dyld);
    }
    printf("\n");
}
int main(int argc, char *argv[])
{
    printDYLD();

    NSAutoreleasePool *pool = [[NSAutoreleasePool alloc] init];
    int retVal = UIApplicationMain(argc, argv, nil, nil);
    [pool release];
    return retVal;
}
下图显示了我的iOS设备当前加载的dylib的路径,最下面就可以看到xCon
此种方法存在一个问题,是否能通过app store审核呢?
二、越狱检测绕过——xCon 可以从Cydia中安装,是目前为止最强大的越狱检测工具。由n00neimp0rtant与Lunatik共同开发,它据说patch了目前所知的所有越狱检测方法(也有不能patch的应用)。估计是由于影响太大了,目前已不开放源码了。 安装xCon后,会有两个文件xCon.dylib与xCon.plist出现在设备/Library/MobileSubstrate/DynamicLibraries目录下 (1)xCon.plist 该文件为过滤文件,标识在调用com.apple.UIKit时加载xCon.dylib
(2) xCon.dylib 可以使用otool工具将该文件的text section反汇编出来从而了解程序的具体逻辑(在windows下可以使用IDA Pro查看)
DANI-LEE-2:iostools danqingdani$ otool -tV xCon.dylib >xContextsection 可以根据文件中的函数名,同时结合该工具的原理以及越狱检测的一些常用手段(文章第一部分有介绍)来猜其逻辑,例如越狱检测方法中的文件系统检查,会根据特定的文件路径名来匹配,我们可以使用strings查看文件中的内容,看看会有哪些文件路径名。
DANI-LEE-2:IAP tools danqingdani$ strings xCon.dylib >xConReadable 以下是xCon中会匹配的文件名
/usr/bin/sshd
/usr/libexec/sftp-server
/usr/sbin/sshd
/bin/bash
/bin/sh
/bin/sw
/etc/apt
/etc/fstab
/Applications/blackra1n.app
/Applications/Cydia.app
/Applications/Cydia.app/Info.plist
/Applications/Cycorder.app
/Applications/Loader.app
/Applications/FakeCarrier.app
/Applications/Icy.app
/Applications/IntelliScreen.app
/Applications/MxTube.app
/Applications/RockApp.app
/Applications/SBSettings.app
/Applications/WinterBoard.app
/bin/bash/Applications/Cydia.app
/Library/LaunchDaemons/com.openssh.sshd.plist
/Library/Frameworks/CydiaSubstrate.framework
/Library/MobileSubstrate
/Library/MobileSubstrate/
/Library/MobileSubstrate/DynamicLibraries
/Library/MobileSubstrate/DynamicLibraries/
/Library/MobileSubstrate/DynamicLibraries/LiveClock.plist
/Library/MobileSubstrate/DynamicLibraries/Veency.plist
/Library/MobileSubstrate/DynamicLibraries/xCon.plist
/private/var/lib/apt
/private/var/lib/apt/
/private/var/lib/cydia
/private/var/mobile/Library/SBSettings/Themes
/private/var/stash
/private/var/tmp/cydia.log
/System/Library/LaunchDaemons/com.ikey.bbot.plist
/System/Library/LaunchDaemons/com.saurik.Cydia.Startup.plist
NzI0MS9MaWJyYXJ5L01vYmlsZVN1YnN0cmF0ZQ==  (对应7241/Library/MobileSubstrate)
通过分析,xCon会绕过以下越狱检测方法
(1)根据是否存在特定的越狱文件,及特定文件的权限是否发生变化来判断设备是否越狱
fileExistsAtPath:
fileExistsAtPath:isDirectory:
filePermission:
fileSystemIsValid:
checkFileSystemWithPath:forPermissions:
mobileSubstrateWorkaround
detectIllegalApplication:
(2)根据沙箱完整性检测设备是否越狱 (3)根据文件系统的分区是否发生变化来检测设备是否越狱 (4)根据是否安装ssh来判断设备是否越狱
三、总结 总之,要做好越狱检测,建议使用底层的c语言函数进行,用于越狱检测的特征字符也需要做混淆处理,检测函数名也做混淆处理。第一部分介绍的以下三种方法,可以尝试一下 (1)检查常见的越狱文件是否存在,使用stat(),检查以下文件是否存在
/Library/MobileSubstrate/MobileSubstrate.dylib 最重要的越狱文件,几乎所有的越狱机都会安装MobileSubstrate
/Applications/Cydia.app/ /var/lib/cydia/绝大多数越狱机都会安装
/var/cache/apt /var/lib/apt /etc/apt
/bin/bash /bin/sh
/usr/sbin/sshd /usr/libexec/ssh-keysign /etc/ssh/sshd_config
(2)检查特定的文件是否是符号链接文件,使用lstat(),检查以下文件是否为符号链接文件
/Applications
/Library/Ringtones
/Library/Wallpaper
/usr/include
/usr/libexec
/usr/share
(3)检差dylib(动态链接库)的内容,使用_dyld_image_count与_dyld_get_image_name,检查是否包含越狱插件的dylib文件
参考:http://theiphonewiki.com/wiki/index.php?title=Bypassing_Jailbreak_Detection
1.在cydia中添加 源地址 http://cydia.iphonecake.com ,添加成功后,在cydia中搜索CrackerXI+并安装。
2.打开CrackerXI+,在settings中设置CrackerXI Hook为enable
3.设置完CrackerXI+,查看列表中是否有需要被砸壳的目的app,如果有的话,选择它进行砸壳。
4.砸壳步骤根据CrackerXI+提示,一直选择yes即可。
5.CrackerXI+砸壳后,通过ssh连接手机后,即可在/var/mobile/Documents/CrackerXI/ 中看到砸壳后的app。

6.通过scp获取手机中/var/mobile/Documents/CrackerXI 目录中的ipa到电脑中,开始愉快地分析。
破解软件的问题,其实不仅仅是iOS上,几乎所有平台上,无论是pc还是移动终端,都是顽疾。可能在**这块神奇的国度,大家都习惯用盗版了,并不觉得这是个问题,个人是这么想,甚至某些盈利性质的公司也这么想,著名的智能手机门户网站91.com前不久就宣传自己平台上盗版全,不花钱。其实这种把盗版软件当成噱头的网站很多,当然还没出现过91这种义正言辞地去宣传用盗版是白富美,买正版是傻X的公司。大家都是做实诚样,把最新最受欢迎的盗版应用一一挂在首页来吸引用户。同步助手就是这种内有好货,不要错过的代表,并且在盗版圈子里,享有良好的口碑,号称同步在手,江山我有。
其实iOS破解软件的问题,既不起源于**,现阶段也没有发扬光大到称霸的地位,目前属于老二,当然很有希望赶超。据统计,全球范围内,排名前五的破解app分享网站有以下几家:
1. Apptrack 代表软件:Crackulous,clutch 破解界的老大哥,出品了多款易用的破解软件,让人人都会破解,鼓励分享破解软件,破解app共享卡正以恐怖的速度扩充。
2. AppCake代表软件:CrackNShare 新秀,支持三种语言,中文(难得!)、英文、德文,前景很可观
- KulApps 北美 4. iDownloads 俄国 5. iGUI 俄国
以上消息,对于依靠安装包收费的iOS开发来说,无疑是噩耗,其实由不少人也在网上号召支持正版,要求知识产权保护的力度加强。这些愿望或许终有一天会实现,但从技术的角度来分析问题的所在,给出有效的防御方案,无疑比愿望更快。
----破解原理部分---------------------------------------------
Appstore上的应用都采用了DRM(digital rights management)数字版权加密保护技术,直接的表现是A帐号购买的app,除A外的帐号无法使用,其实就是有了数字签名验证,而app的破解过程,实质也是去除数字签名的过程。去除过程包括两部分,如下所示:
条件一,设备越狱,获得root权限,去除掉设备上的签名检查,允许没有合法签名的程序在设备上运行
代表工具:AppSync(作者:Dissident ,Apptrack网站的核心人物) (iOS 3.0 出现,不同的iOS版本,原理都不一样) iOS 3.0后,MobileInstallation将可执行文件的签名校验委托给独立的二进制文件/usrlibexec/installd来处理,而AppSync 就是该执行文件的一个补丁,用来绕过签名校验。
iOS 4.0后,apple留了个后门(app给开发者预留的用于测试的沙盒环境),只要在/var/mobile/下建立tdmtanf目录,就可以绕过installd的签名校验,但该沙盒环境会造成没法进行IAP购买,无法在GameCenter查看游戏排名和加好友,特征是进入Game Center会出现SandBox字样。AppSync for iOS 4.0 +修复了这一问题。
iOS 5.0后,apple增加了新的安全机制来保护二进制文件,例如去掉二进制文件的符号表,给破解带来了难度。新版的AppSync for iOS 5.0+ 使用MobileSubstrate来hook libmis.dylib库的MISValidateSignatureAndCopyInfo函数来绕过签名验证
条件二,解密mach-o可执行文件 一般采用自购破解的方法,即先通过正常流程购买appstore 中的app,然后采用工具或手工的方式解密安装包中的mach-o可执行文件。 之所以要先获得正常的IPA的原因是mach-O文件是有DRM数字签名的,是加密过的,而解密的核心就是解密加密部分,而我们知道,当应用运行时,在内存中是处于解密状态的。所以首要步骤就是让应用先正常运行起来,而只有正常购买的应用才能达到这一目的,所以要先正常购买。
购买后,接着就是破解了。随着iOS设备cpu 的不同(arm 6 还是arm 7),mach-o文件格式的不同(thin binary 还是fat binary),应用是否对破解有防御措施(检测是否越狱,检测应用文件系统的变化),破解步骤也有所不同,但核心步骤如下:
第一步:获得cryptid,cryptoffset,cryptsize cryptid为加密状态,0表示未加密,1表示解密; cryptoffset未加密部分的偏移量,单位bytes cryptsize加密段的大小,单位bytes 第二步:将cryptid修改为0 第三步:gdb导出解密部分 第四步:用第二步中的解密部分替换掉加密部分 第五步:签名 第六步:打包成IPA安装包
整个IPA破解历史上,代表性的工具如下:
代表工具:Crackulous(GUI工具)(来自Hackulous)
crackulous最初版本由SaladFork编写,是基于DecryptApp shell脚本的,后来crackulous的源码泄露,SaladFork放弃维护,由Docmorelli接手,创建了基于Clutch工具的最近版本。
代表工具:Clutch(命令行工具)(来自Hackulous) 由dissident编写,Clutch从发布到现在,是最快的破解工具。Clutch工具支持绕过ASLR(apple在iOS 4.3中加入ASLR机制)保护和支持Fat Binaries,基于icefire的icecrack工具,objective-c编写。
代表工具:PoedCrackMod(命令行工具)(来自Hackulous) 由Rastignac编写,基于poedCrack,是第一个支持破解fat binaries的工具。shell编写
代表工具:CrackTM(命令行工具)(来自Hackulous) 由MadHouse编写,最后版本为3.1.2,据说初版在破解速度上就快过poedCrack。shell编写
(以下是bash脚本工具的发展历史(脚本名(作者)),虽然目前都已废弃,但都是目前好用的ipa 破解工具的基础。 autop(Flox)——>xCrack(SaladFork)——>DecryptApp(uncon)——>Decrypt(FloydianSlip)——>poedCrack(poedgirl)——>CrackTM(MadHouse)
代表工具:CrackNShare (GUI工具)(来自appcake) 基于PoedCrackMod 和 CrackTM
我们可以通过分析这些工具的行为,原理及产生的结果来启发防御的方法。
像AppSync这种去掉设备签名检查的问题还是留给apple公司来解决(属于iOS系统层的安全),对于app开发则需要重点关注,app是如何被解密的(属于iOS应用层的安全)。
我们以PoedCrackMod和Clutch为例
一、PoedCrackMod分析(v2.5) 源码及详细的源码分析见: http://danqingdani.blog.163.com/blog/static/18609419520129261354800/
通过分析源码,我们可以知道,整个破解过程,除去前期检测依赖工具是否存在(例如ldid,plutil,otool,gdb等),伪造特征文件,可以总结为以下几步:
第一步. 将fat binary切分为armv6,armv7部分(采用swap header技巧) 第二步:获得cryptid,cryptoffset,cryptsize 第三步. 将armv6部分的cryptid修改为0,gdb导出对应的armv6解密部分(对经过swap header处理的Mach-O文件进行操作,使其在arm 7设备上,强制运行arm 6部分),替换掉armv6加密部分,签名 第四步. 将armv7部分的cryptid修改为0,gdb导出对应的armv7解密部分(对原Mach-O文件进行操作),替换掉armv7加密部分,签名 第五步.合并解密过的armv6,armv7 第六步.打包成ipa安装包
注明:第三步和第四步是破解的关键,破解是否成功的关键在于导出的解密部分是否正确完整。 由于binary fat格式的mach-o文件在arm 7设备上默认运行arm 7对应代码,当需要导出arm 6对应的解密部分时,要先经过swap header处理,使其在arm 7 设备上按arm 6运行。
二、clutch分析 对于最有效的clutch,由于只找到了clutch 1.0.1的源码(最新版本是1.2.4)。所以从ipa破解前后的区别来观察发生了什么。 使用BeyondCompare进行对比,发现有以下变动。
- 正版的iTunesMetadata.plist被移除 该文件用来记录app的基本信息,例如购买者的appleID,app购买时间、app支持的设备体系结构,app的版本、app标识符
2.正版的SC_Info目录被移除 SC_Info目录包含appname.sinf和appname.supp两个文件。 (1)SINF为metadata文件 (2)SUPP为解密可执行文件的密钥
3.可执行文件发生的变动非常大,但最明显的事是cryptid的值发生了变化 leetekiMac-mini:xxx.app leedani$ otool -l appname | grep "cmd LC_ENCRYPTION_INFO" -A 4 cmd LC_ENCRYPTION_INFO cmdsize 20 cryptoff 8192 cryptsize 6053888 cryptid 0
cmd LC_ENCRYPTION_INFO cmdsize 20 cryptoff 8192 cryptsize 5001216 cryptid 0
iTunesMetadata.plist 与 SC_Info目录的移除只是为了避免泄露正版购买者的一些基本信息,是否去除不影响ipa的正常安装运行。
----破解防御部分--------------------------------------------- 在IPA防御方面,目前没有预防破解的好办法,但可以做事后检测,使得破解IPA无法正常运行以达到防御作用。 而该如何做事后检测呢,最直接的检测方法是将破解前后文件系统的变化作为特征值来检测。
通过分析PoedCrackMod源码,会发现根据破解前后文件时间戳的变化,或文件内容的变化为特征来判断是不可靠的,因为这些特征都可以伪造。如下所示,摘自于PoedCrackMod脚本
1.Info.plist 增加SignerIdentity,(目前主流的MinimumOSVersion版本为3.0,版本3.0之前的需要伪造SignerIdentity) plutil -key 'SignerIdentity' -value 'Apple iPhone OS Application Signing' "$WorkDir/$AppName/Info.plist" 2>&1> /dev/null
伪造Info.plist文件时间戳 touch -r "$AppPath/$AppName/Info.plist" "$WorkDir/$AppName/Info.plist"
2.iTunesMetadata.plist 伪造iTunesMetadata.plist文件 plutil -xml "$WorkDir/iTunesMetadataSource.plist" 2>&1> /dev/null
echo -e "\tappleId" >> "$WorkDir/iTunesMetadata.plist" #伪造AppleID
echo -e "\t[email protected]" >> "$WorkDir/iTunesMetadata.plist"
echo -e "\tpurchaseDate" >> "$WorkDir/iTunesMetadata.plist" #伪造购买时间
echo -e "\t2010-08-08T08:08:08Z" >> "$WorkDir/iTunesMetadata.plist"
伪造iTunesMetadata.plist文件的时间戳
touch -r "$AppPath/$AppName/Info.plist" "$WorkDir/iTunesMetadata.plist"
3.mach-O文件
Lamerpatcher方法中,靠替换mach-O文件中用于检测的特征字符串来绕过检测
(题外话:设备是否越狱也可以通过检测文件系统的变化来判断,例如常见越狱文件,例如/Application/Cydia.app
/Library/MobileSubstrate/MobileSubstrate.dylibd)
sed --in-place=.BCK \
-e 's=/Cydia.app=/Czdjb.bpp=g' \
-e 's=/private/var/lib/apt=/prjvbtf/vbr/ljb/bpt=g' \
-e 's=/Applicat\d0\d0\d0ions/dele\d0\d0\d0teme.txt=/Bppljcbt\d0\d0\d0jpns/dflf\d0\d0\d0tfmf.txt=g' \
-e 's=/Appl\d0\d0\d0ications/C\d0\d0ydi\d0a.app=/Bppl\d0\d0\d0jcbtjpns/C\d0\d0zdj\d0b.bpp=g' \
-e 's=ations/Cy\d0\d0\d0/Applic\d0pp\d0\d0dia.a=btjpns/Cz\d0\d0\d0/Bppljc\d0pp\d0\d0djb.b=g' \
-e 's=ate/va\d0\d0/priv\d0\d0\d0pt/\d0b/a\d0r/li=btf/vb\d0\d0/prjv\d0\d0\d0pt/\d0b/b\d0r/lj=g' \
-e 's=pinchmedia.com=pjnchmfdjb.cpm=g' \
-e 's=admob.com=bdmpb.cpm=g' \
-e 's=doubleclick.net=dpvblfcljck.nft=g' \
-e 's=googlesyndication.com=gppglfszndjcbtjpn.cpm=g' \
-e 's=flurry.com=flvrrz.cpm=g' \
-e 's=qwapi.com=qwbpj.cpm=g' \
-e 's=mobclix.com=mpbcljx.cpm=g' \
-e 's=http://ad\.=http://bd/=g' \
-e 's=http://ads\.=http://bds/=g' \
-e 's=http://ads2\.=http://bds2/=g' \
-e 's=adwhirl.com=bdwhjrl.cpm=g' \
-e 's=vdopia.com=vdppjb.cpm=g' \
"$WorkDir/$AppName/$AppExecCur"
# "/Applications/Icy.app"
# "/Applications/SBSettings.app"
# "/Library/MobileSubstrate"
# "%si %sg %sn %se %sr %sI %sd %st %sy"
# "Sig nerId%@%@ ent ity "
# "Si gne rIde ntity"
伪造Mach-O文件时间戳
touch -r "$AppPath/$AppName/$AppExec" "$WorkDir/$AppName/$AppExec"
所以最可靠的方法是根据cryptid的值来确定,为0便是破解版。当检测出破解版本时注意,为了避免逆向去除检测函数,需要多处做检测。同时检测函数要做加密处理,例如函数名加密,并要在多处进行检测。
而根据特征值来检测破解的方法也不是完全没用的,可以将特征值加密成无意义的字符串,最起码Lamerpatcher方法就无效了。同样,检测函数需要做加密处理,并要在多处进行检测。
看了破解ipa的原理,你会发现,所有的工具和方法都必须运行在越狱机上,因此将安全问题托付给苹果,幻想他可以将iOS系统做得无法越狱,他提供的一切安全措施都能生效(例如安全沙箱,代码签名,加密,ASLR,non executable memory,stack smashing protection)。这是不可能的,漏洞挖掘大牛门也不吃吃素的,自己的应用还是由自己来守护。
https://xlsn0w.github.io/ipas
//                     _0_
//                   _oo0oo_
//                  o8888888o
//                  88" . "88
//                  (| -_- |)
//                  0\  =  /0
//                ___/`---'\___
//              .' \\|     |// '.
//             / \\|||  :  |||// \
//            / _||||| -:- |||||- \
//           |   | \\\  -  /// |   |
//           | \_|  ''\---/''  |_/ |
//           \  .-\__  '-'  ___/-. /
//         ___'. .'  /--.--\  `. .'___
//      ."" '<  `.___\_<|>_/___.' >' "".
//     | | :  `- \`.;`\ _ /`;.`/ - ` : | |
//     \  \ `_.   \_ __\ /__ _/   .-` /  /
// XL---`-.____`.___ \_____/___.-`___.-'---sn0w
//                   `=---='

清单:
iOS 8.4.1 Yalu Open Source Jailbreak Project: https://github.com/kpwn/yalu

OS-X-10.11.6-Exp-via-PEGASUS: https://github.com/zhengmin1989/OS-X-10.11.6-Exp-via-PEGASUS

iOS 9.3.* Trident exp: https://github.com/benjamin-42/Trident

iOS 10.1.1 mach_portal incomplete jailbreak: https://bugs.chromium.org/p/project-zero/issues/detail?id=965#c2

iOS 10.2 jailbreak source code: https://github.com/kpwn/yalu102

Local Privilege Escalation for macOS 10.12.2 and XNU port Feng Shui: https://github.com/zhengmin1989/macOS-10.12.2-Exp-via-mach_voucher

Remotely Compromising iOS via Wi-Fi and Escaping the Sandbox: https://www.youtube.com/watch?v=bP5VP7vLLKo

Pwn2Own 2017 Safari sandbox: https://github.com/maximehip/Safari-iOS10.3.2-macOS-10.12.4-exploit-Bugs

Live kernel introspection on iOS: https://bazad.github.io/2017/09/live-kernel-introspection-ios/

iOS 11.1.2 IOSurfaceRootUserClient double free to tfp0: https://bugs.chromium.org/p/project-zero/issues/detail?id=1417

iOS 11.3.1 MULTIPATH kernel heap overflow to tfp0: https://bugs.chromium.org/p/project-zero/issues/detail?id=1558

iOS 11.3.1 empty_list kernel heap overflow to tfp0: https://bugs.chromium.org/p/project-zero/issues/detail?id=1564
$ touch .gitattributes

添加文件内容为

*.h linguist-language=Logos
*.m linguist-language=Logos

含义即将所有的.m文件识别成Logos,也可添加多行相应的内容从而修改到占比,从而改变GitHub项目识别语言
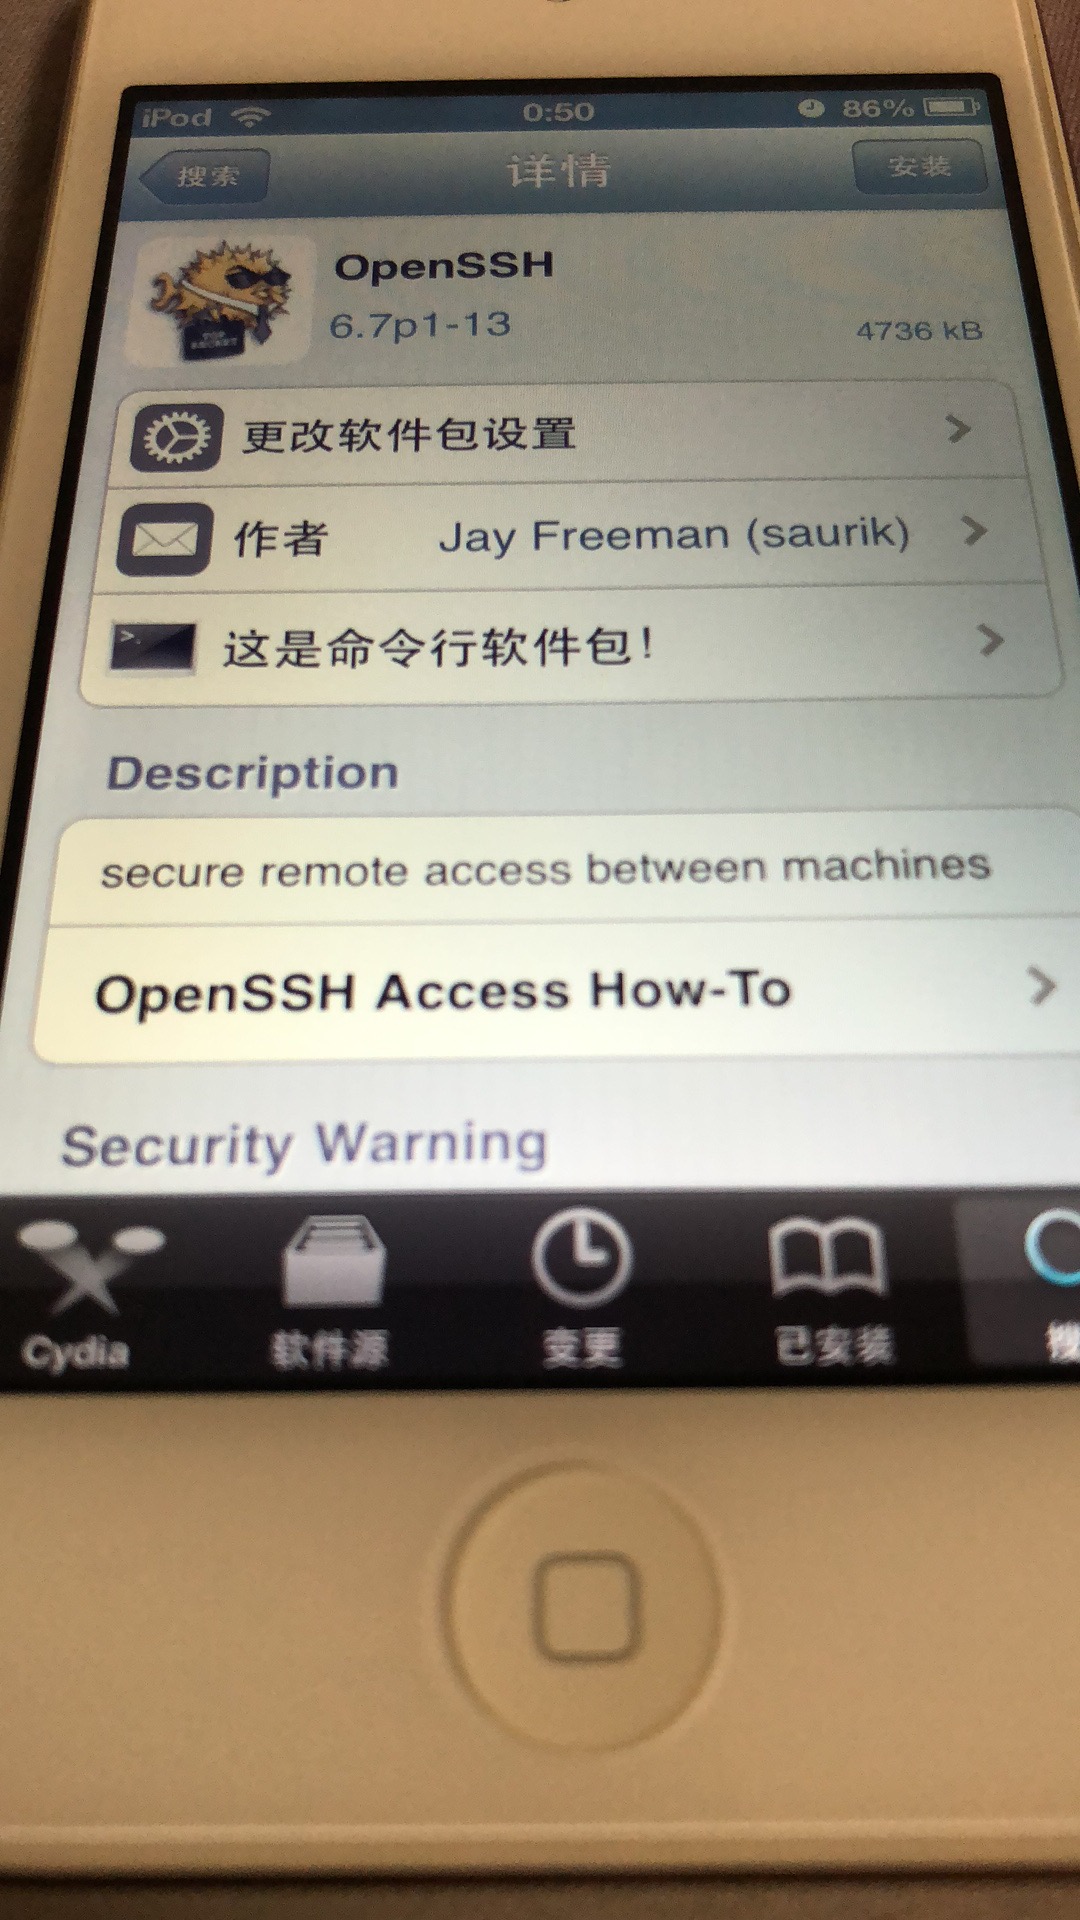
我们经常在Mac的终端上,通过敲一下命令来完成一些操作,iOS 和Mac OSX 都是基于Drawin(苹果的一个基于Unix的开源系统内核), 所以ios中同样支持终端的命令行操作,在逆向工程中,可以使用命令行来操纵iphone。
SSH: Secure Shell的缩写,表示“安全外壳协议”,是一种可以为远程登录提供安全保障的协议, 使用SSH,可以把所有传输的数据进行加密,"中间人"攻击方式就不可能实现,能防止DNS 欺骗和IP欺骗
OpenSSH: 是SSH协议的免费开源实现,可以通过OpenSSH的方式让Mac远程登录到iphone,此时进行访问时,Mac 是客户端 iphone是服务器
使用OpenSSH远程登录步骤如下
在iphone上安装cydia 安装OpenSSH工具(软件源http://apt.saurik.com) OpenSSH的具体使用步骤可以查看Description中的描述 第一种登录方式可以使用WIFI
具体使用步骤
确保Mac和iphone在同一个局域网下(连接同一个WIFI) 在Mac的终端输入ssh账户名@服务器主机地址,比如ssh [email protected](这里服务器是手机) 初始密码 alpine 登录成功后就可以使用终端命令行操作iphone 退出登录 exit ps:ios下2个常用账户 root、moblie
root: 最高权限账户,HOME是 /var/root moblie :普通权限账户,只能操作一些普通文件,不能操作别的文件,HOME是/var/mobile 登录moblie用户:root moblie@服务器主机地址 root和mobli用户的初始登录密码都是alpine 第二种登录方式 通过USB进行SSH登录
22端口
端口就是设备对外提供服务的窗口,每个端口都有个端口号,范围是0--65535,共2^16个
有些端口是保留的,已经规定了用途,比如 21端口提供FTP服务,80端口是提供HTTP服务,22端口提供SSH服务,更多保留端口号课参考 链接
iphone 默认是使用22端口进行SSH通信,采用的是TCP协议
默认情况下,由于SSH走的是TCP协议,Mac是通过网络连接的方式SSH登录到iphone,要求iPhone连接WIFI,为了加快传输速度,也可以通过USB连接的方式进行SSH登录,Mac上有个服务程序usbmuxd(开机自动启动),可以将Mac的数据通过USB传输到iphone,路径是/System/Library/PrivateFrameworks/mobileDevice.framework/Resources/usbmuxd
usbmuxd的使用
下载usbmuxd工具包,下载v1.0.8版本,主要用到里面的一个python脚本: tcprelay.py, 下载链接
将iphone的22端口(SSH端口)映射到Mac本地的10010端口
cd ~/Documents/usbmux-1.08/python-client
python tcprelay.py -t 22:10010
加上 -t 参数是为了能够同时支持多个SSH连接,端口映射完毕后,以后如果想跟iphone的22端口通信,直接跟Mac本地的10010端口通信就可以了,新开一个终端界面,SSH登录到Mac本地的10010端口,usbmuxd会将Mac本地10010端口的TCP协议数据,通过USB连接转发到iphone的22 端口,远程拷贝文件也可以直接跟Mac本地的10010端口通信,如:scp -p 10010 /Desktop/1.txt root@localhost:/test 将Mac上的/Desktop/1.txt文件,拷贝到iphone上的/test路径。
先开一个终端,先完成端口映射
*cd 到usbmuxd文件夹路径
python tcprelay.py -t 22:10010
15237725002208.jpg 再开一个端口 注入手机 ssh root@localhost -p 10010 :~ root# cycript -p SpringBoard
首先来介绍下ipa包。ipa实际上是一个压缩包,我们从App Store下载的应用实际上都是压缩包。压缩包中包含.app的文件,.app文件实际上是一个带后缀的文件夹。在app中,存在如下文件: 1)资源文件 资源文件包括我们常用的内置文件,如图片、plist以及生成的.car文件等。 2)可执行程序 可执行程序是最核心的文件,除了代码和数据外,里面包含code signature和ENCRYPTION。
是code signature和ENCRYPTION在LoadCommad中的索引。展开ENCRYPTION后可以看到ENCRYPTION的偏移地址和大小。Crypt ID标记该Mach-O文件是否被加密,如果加密则Crypt ID = 1,否则为0。
实际上加密的ENCRYPTION就是我们所说的壳,砸壳就是将ENCRYPTION进行解密操作。从上面的截图我们可以看出,ENCRYPTION的起始偏移地址为文件的0x4000位置,而结束位置可以计算出为0x4000+0x424000 = 0x428000。这个范围正好对应着Mach-O的文本段(不是1:1的,起始位置0x4000,而不是0x0)。也就是说加密实际上是对TEXT段进行加密。TEXT内存储的是代码信息,包括函数指令、类名、方法名、字符串信息等。
对TEXT进行加密,加密后的Mach-O文件无法获取到代码信息,也就是说指令信息我们无法直接获取到了。除了指令外,在DATA段中,有些数据存储的是指针信息,指向TEXT段的数据,这样的数据也无法解析出来。
加壳之后的应用,在不解密的情况下,无法暴露指令和文本数据,这能很好地保护应用。这个壳是在上传到App Store由App Store进行加密的,用户下载的应用也是被加壳的应用。存储在手机的文件也是被加密的,只有在应用运行时,iOS才会对文件进行解密,也就是说在用户手机上运行的文件都是解密脱壳后的文件。我们在进行真机调试时,安装到手机上的文件是未加密的,这个时候Crypt ID标记为0。iOS系统在识别Crypt ID为0时不会进行解密处理。 3)code signature
code signature 包含资源文件的签名信息,如果资源文件被更改替换,那么签名是无法验证通过的。因此下载XIB等方式实现UI的动态布局是无法实现的。那么这里的code signature与Mach-O文件里的signature是一样的吗?当然是不一样的。这里的签名验证的是资源文件,而Mach-O文件中的code signature 是验证Mach-O是否被篡改以及是否是apple允许安装的应用。 三、dumpdecrypted砸壳原理简介 砸壳的技术方案可以分为两种,一种是静态砸壳,一种是动态砸壳。静态砸壳的原理是硬破解apple的加密算法,目前是一种使用频率极低的技术方案。动态砸壳是利用iOS将文件解密后加载到内存后,将解密数据拷贝到磁盘的方案。动态砸壳目前成熟的方案很多,在这里介绍下dumpdecrypted的方式。 dumpdecrypted是以动态库的方式,将代码注入到目标进程中。那么如何让一个应用程序在运行时加载我们的动态库呢?目前的方案主要有两种: 1)修改Mach-O文件,在LC中,添加LC_LOAD_DYLIB信息,然后重签名运行。 这需要开发者对Mach-O文件有足够的了解,否则很容易损毁文件。不过已经有相应的工具:https://github.com/Tyilo/insert_dylib
2)通过在手机的终端输入DYLD_INSERT_LIBRARIES="动态库" APP路径 命令(这就要求手机必须是越狱的),指定应用加载动态库,dumpdecrypted采用的就是这种方式。 DYLD_INSERT_LIBRARIES是系统的环境变量。通过在终端输入man dyld 可以查看环境变量及其解释。DYLD_INSERT_LIBRARIES的解释如下:
除了DYLD_INSERT_LIBRARIES变量外,我们可以打印看到还有许多环境变量,
这些变量的解释和用处都在终端中有说明,在此不再一一解释。额外提一句,我们可以在应用中通过getenv函数检测是否存在环境变量,这可以作为安全监测数据。 在动态库被加载后,标记为__attribute__((constructor))的函数会被执行。启动函数执行后,核心步骤只做3件事 1)在加密的原文件中复制从起始位置开始的未加密的数据。 2)从内存中的文件复制解密的数据。 3)在加密原文件中跳过加密部分,拷贝剩余未加密数据。
这3件事做完后,应用程序脱壳就完成了。在阅读代码时,我有两个问题: 1)函数为什么指定成 void dumptofile(int argc, const char **argv, const char **envp, const char **apple, struct ProgramVars *pvars)类型? 后来发现实际上这是__attribute__((constructor))固定的函数类型,5个参数分别代表了(参数个数,参数列表,环境变量,可执行程序路径,文件信息)。 2)如何获取应用在磁盘的路径? argv[0],也就是参数列表的第一个,代表的是可执行文件的路径。这与main函数类似。通过apple也可以获取到文件路径,dumpdecrypted使用的是argv[0]。
在脱壳后,只能保证Mach-O文件变成可读的,即函数指令和字符信息能暴露出来,但是此时的文件并不能运行。这是由于apple除了做代码可读化的加密外,还做了签名验证,从而保证在iOS系统中成功运行的程序都是被苹果校验过的,被篡改的或其他的渠道程序不能被加载。因此需要对砸壳后的文件进行重签名。 1)签名的作用 在应用ipa内,存在多处签名,不同的签名有不同的作用。但是这些签名整体目的只有一个:所有安装和运行的APP必须是苹果允许的。也就是说,在安装时iOS会验证一些文件的签名,在启动时iOS系统也会验证一部分文件的签名。 2)签名文件 从App Store下载的应用验证最简单,只要iOS系统用公钥验证APP 在App Store后台用私钥生成的签名即可。但是我们开发过程中的真机调试是如何进行签名验证呢? 签名的秘钥一共有两对,针对这些步骤我们来一步步解释这些步骤在什么时候操作的,如何操作的以及形式是什么。 首先,两对秘钥中,App Store 的私钥和iOS系统内部的公钥我们接触不到,因此不做解释。但是Mac 中的公钥和私钥我们确实使用过。 MAC 公钥:公钥即是我们在钥匙串中申请的.certSigningRequest文件。 MAC 私钥:在申请certSigningRequest文件文件时生成的配对的私钥,保存在本地电脑中。 证书生成:证书生成对应图中步骤3,我们将MAC的公钥上传到苹果后台通过苹果的私钥进行签名,签名后生成的文件即是开发者证书。 描述文件:由于苹果要限制安装的设备、安装的APP以及所具备的权限(如推送),苹果将这些信息连同证书合并再签名得到的文件就是描述文件。描述文件在开发阶段存放在APP包内,文件名为embedded.mobileprovision。至此,我们可以知道已经存在两处签名了,1是苹果对本地公钥的签名,2是对证书描述文件的签名,这两处签名都是App Store的私钥进行签名的。 在通过Xcode打包时,Xcode会通过本地私钥对APP进行签名,这个签名上图中表现出一部分,实际上签名有两处:一处是对资源进行签名,也就是说ipa内所有的资源文件包括xib、png等都需要进行签名,签名存放在code signature中。另一处签名是针对代码的签名(这个签名不是加密壳),ipa内的Mach-O文件的code signature存放着打包时的签名信息。 3、验证流程 有了这么多的签名,那么这些签名是在什么时候进行验证的呢?验证分两个步骤进行,分别是安装时验证和启动时验证。 1)安装时验证 在安装时,iOS系统会取出code signature验证各个资源文件的签名。如果资源文件都验证通过,那么取出embedded.mobileprovision,验证设备ID,如果该设备在设备列表中并且相符,那么安装成功。但是INHOUSE 版本和 App Store版的APP不需要验证embedded.mobileprovision。(因为不存在这个文件,这是由于发布市场不需要放开验证权限,与你的Mac和iPhone无关,所以也就不需要你的公钥) 2)启动时验证 验证bundle id 与embedded.mobileprovision中的APPID是否一致,验证entitlements与embedded.mobileprovision的entitlements是否一致。如果一致则尝试将执行可执行程序。在iOS内核执行execve函数调用Mach-O可执行文件之前,会先获取Mach-O的code signature。那么code signature里到底存的啥?可以通过codesign -dvvvvv 查看Mach-O的code signature,里面存的都是签名信息。
五、iOS应用包扫描 在我们ipa包提交到苹果审核后,苹果会通过代码扫描我们应用程序所使用到的API。那么苹果根据我们提交的应用包,能扫描到什么内容呢? 1、示例 符号信息在打包时存储在两个Mach-O文件中:1、可执行程序。2、DSYM文件。可执行程序中存在类相关信息及动态链接相关符号。DSYM是在打包时从可执行文件中剥离出来的Mach-O文件,包含静态链接相关符号、代码路径等完备信息。如果打包时不选用苹果自带的崩溃统计工具,DSYM只上传给buggly使用。苹果所能扫描的只有资源文件以及可执行程序。但是除了可执行程序除了符号信息外,还包含其他信息。 1)扫描类信息 类关键信息包括类名、方法名、方法描述(参数、返回值类型等)、类是否被使用、方法是否被使用。
可以知道函数的返回值类型是什么,参数类型是什么,参数有多少,但是参数的命名获取不到(NSString*) name,这个name获取不到。
还能知道有哪些类被使用过,包括系统的类已经自己的声明的类。但是通过XIB 绑定的类不会被加入到classref。字符串动态调用的类也不被加入。 2)扫描动态链接符号 动态链接符号包括动态库的函数、变量、私有函数。
扫描符号可以通过nm 命令快速扫描输出到文件
U代表是未定义符号(动态库中的函数),而T表示的是符号定义在Text段(自己写的函数)。
3)扫描字符串 字符串包括:OC字符串和C字符串
使用到的@"%.2f",@“backgroundStar”等
Mach-O文件的作用其实跟打孔纸带的作用是一样的,只不过Mach-O文件描述的内容更加丰富。 除了代码和数据外,Mach-O还包含了加密、验证这样的机制,使得代码更加安全。
( Logos is a component of the Theos development suite that allows method hooking code to be written easily and clearly, using a set of special preprocessor directives. ) Logos是Theos开发套件的一个组件,该套件允许使用一组特殊的预处理程序指令轻松而清晰地编写方法挂钩代码。
This is an Logos 语法介绍.
// 使用-switch选项可将系统上的Xcode更改为另一个版本: $ sudo xcode-select --switch /Applications/Xcode.app $ sudo xcode-select -switch /Applications/Xcode.app
安装命令
$ export THEOS=/opt/theos
$ sudo git clone git://github.com/DHowett/theos.git $THEOS
安装ldid 签名工具
http://joedj.net/ldid  然后复制到/opt/theos/bin
然后sudo chmod 777 /opt/theos/bin/ldid
配置CydiaSubstrate 用iTools,将iOS上
/Library/Frameworks/CydiaSubstrate.framework/CydiaSubstrate
拷贝到电脑上, 然后改名为libsubstrate.dylib , 然后拷贝到/opt/theos/lib 中.
安装神器dkpg
$ sudo port install dpkg
//不需要再下载那个dpkg-deb了
增加nic-templates(可选)
从 https://github.com/DHowett/theos-nic-templates 下载
然后将解压后的5个.tar放到/opt/theos/templates/ios/下即可
/opt/theos/bin/nic.pl
NIC 1.0 - New Instance Creator
——————————
  [1.] iphone/application
  [2.] iphone/library
  [3.] iphone/preference_bundle
  [4.] iphone/tool
  [5.] iphone/tweak
Choose a Template (required): 1
Project Name (required): firstdemo
Package Name [com.yourcompany.firstdemo]:
Author/Maintainer Name [Author Name]:
Instantiating iphone/application in firstdemo/…
Done.
选择 [5.] iphone/tweak
Project Name (required): Test
Package Name [com.yourcompany.test]: com.test.firstTest
Author/Maintainer Name [小伍]: xiaowu
[iphone/tweak] MobileSubstrate Bundle filter [com.apple.springboard]: com.apple.springboard
[iphone/tweak] List of applications to terminate upon installation (space-separated, '-' for none) [SpringBoard]: SpringBoard
第一个相当于工程文件夹的名字 第二个相当于bundle id 第三个就是作者 第四个是作用对象的bundle identifier 第五个是要重启的应用 b.修改Makefile
TWEAK_NAME = iOSRE
iOSRE_FILES = Tweak.xm
include $(THEOS_MAKE_PATH)/tweak.mk
THEOS_DEVICE_IP = 192.168.1.34
iOSRE_FRAMEWORKS=UIKit Foundation
ARCHS = arm64
上面的ip必须写, 当然写你测试机的ip , 然后archs 写你想生成对应机型的型号
c.便携Tweak.xm
#import <UIKit/UIKit.h>
#import <SpringBoard/SpringBoard.h>

%hook SpringBoard

-(void)applicationDidFinishLaunching:(id)application {

UIAlertView *alert = [[UIAlertView alloc] initWithTitle:@"Welcome"
message:@"Welcome to your iPhone!"
delegate:nil
cancelButtonTitle:@"Thanks"
otherButtonTitles:nil];
[alert show];
[alert release];
%orig;

}

%end
你默认的Tweak.xm里面的代码都是被注销的
d.设置环境变量 打开terminal输入
export THEOS=/opt/theos/
export THEOS_DEVICE_IP=xxx.xxx.xxx.xxx(手机的ip地址)
3.构建工程
第一个命令:make
$ make
Making all for application firstdemo…
 Compiling main.m…
 Compiling firstdemoApplication.mm…
 Compiling RootViewController.mm…
 Linking application firstdemo…
 Stripping firstdemo…
 Signing firstdemo…
第二个命令:make package
make package
Making all for application firstdemo…
make[2]: Nothing to be done for ‘internal-application-compile’.
Making stage for application firstdemo…
 Copying resource directories into the application wrapper…
dpkg-deb: building package ‘com.yourcompany.firstdemo’ in ‘/Users/author/Desktop/firstdemo/com.yourcompany.firstdemo_0.0.1-1_iphoneos-arm.deb’.
第三个命令: make package install
$ make package install
Making all for application firstdemo…
make[2]: Nothing to be done for `internal-application-compile’.
Making stage for application firstdemo…
 Copying resource directories into the application wrapper…
dpkg-deb: building package ‘com.yourcompany.firstdemo’ in ‘/Users/author/Desktop/firstdemo/com.yourcompany.firstdemo_0.0.1-1_iphoneos-arm.deb’.
...
root@ip’s password:
...
** 当然你也可以直接 make package install 一步到位, 直接编译, 打包, 安装一气呵成**
1.在 环境安装 的第二步骤 下载theos , 下载好的theos有可能是有问题的
/opt/theos/vendor/ 里面的文件是否是空的? 仔细检查 否则在make编译的时候回报一个 什么vendor 的错误 2.如果在make成功之后还想make 发现报了Nothing to be done for `internal-library-compile’错误
那就把你刚才创建出来的obj删掉和packages删掉 , 然后显示隐藏文件, 你就会发现和obj同一个目录有一个.theos , 吧.theos里面的东西删掉就好了 3.简单总结下
基本问题就一下几点: 1.代码%hook ClassName 没有修改 2.代码没调用头文件 3.代码注释没有解开(代码写错) 4.makefile里面东西写错 5.makefile里面没有写ip地址 6.没有配置环境地址 7.遇到路径的问题你就 export THEOS_DEVICE_IP=192.168.1.34 8.遇到路径问题你就THEOS=/opt/theos
dpkg -i package.deb #安装包 dpkg -r package #删除包 dpkg -P package #删除包(包括配置文件) dpkg -L package #列出与该包关联的文件 dpkg -l package #显示该包的版本 dpkg --unpack package.deb #解开deb包的内容 dpkg -S keyword #搜索所属的包内容 dpkg -l #列出当前已安装的包 dpkg -c package.deb #列出deb包的内容 dpkg --configure package #配置包
其中包括:DEBIAN目录 和 软件具体安装目录(模拟安装目录)(如etc, usr, opt, tmp等)。 在DEBIAN目录中至少有control文件,还可能有postinst(postinstallation)、postrm(postremove)、preinst(preinstallation)、prerm(preremove)、copyright (版权)、changlog (修订记录)和conffiles等。
postinst文件:包含了软件在进行正常目录文件拷贝到系统后,所需要执行的配置工作。 prerm文件:软件卸载前需要执行的脚本。 postrm文件:软件卸载后需要执行的脚本。 control文件:这个文件比较重要,它是描述软件包的名称(Package),版本(Version),描述(Description)等,是deb包必须剧本的描述性文件,以便于软件的安装管理和索引。 其中可能会有下面的字段: -- Package 包名 -- Version 版本 -- Architecture:软件包结构,如基于i386, amd64,m68k, sparc, alpha, powerpc等 -- Priority:申明软件对于系统的重要程度,如required, standard, optional, extra等 -- Essential:申明是否是系统最基本的软件包(选项为yes/no),如果是的话,这就表明该软件是维持系统稳定和正常运行的软件包,不允许任何形式的卸载(除非进行强制性的卸载) -- Section:申明软件的类别,常见的有utils, net, mail, text, devel 等 -- Depends:软件所依赖的其他软件包和库文件。如果是依赖多个软件包和库文件,彼此之间采用逗号隔开 -- Pre-Depends:软件安装前必须安装、配置依赖性的软件包和库文件,它常常用于必须的预运行脚本需求 -- Recommends:这个字段表明推荐的安装的其他软件包和库文件 -- Suggests:建议安装的其他软件包和库文件 -- Description:对包的描述 -- Installed-Size:安装的包大小 -- Maintainer:包的制作者,联系方式等 我的测试包的control:
Package: kellan-test Version: 1.0 Architecture: all Maintainer: Kellan Fan Installed-Size: 128 Recommends: Suggests: Section: devel Priority: optional Multi-Arch: foreign Description: just for test 三 制作包 制作包其实很简单,就一条命令 dpkg -b <包目录> <包名称>.deb
四 其他命令 安装 dpkg -i xxx.deb 卸载 dpkg -r xxx.deb 解压缩包 dpkg -X xxx.deb [dirname]
$ dpkg -b /Users/mac/Desktop/debPath debName.deb
dpkg-deb: 正在 'x.deb' 中构建软件包 'com.gtx.gtx'。
#import <UIKit/UIKit.h>
#import <objc/runtime.h>
#define kBundlePath @"/Library/Application Support/Neptune"
BOOL isFluidInterfaceEnabled;
long _homeButtonType = 1;
BOOL isHomeIndicatorEnabled;
BOOL isButtonCombinationOverrideDisabled;
BOOL isTallKeyboardEnabled;
BOOL isPIPEnabled;
int statusBarStyle;
BOOL isWalletEnabled;
BOOL isNewsIconEnabled;
BOOL prototypingEnabled = NO;
@interface CALayer (CornerAddition)
-(bool)continuousCorners;
@property (assign) bool continuousCorners;
-(void)setContinuousCorners:(bool)arg1;
@end
/// MARK: - Group: Button remap
%group ButtonRemap
// Siri remap
%hook SBLockHardwareButtonActions
- (id)initWithHomeButtonType:(long long)arg1 proximitySensorManager:(id)arg2 {
return %orig(_homeButtonType, arg2);
}
%end
%hook SBHomeHardwareButtonActions
- (id)initWitHomeButtonType:(long long)arg1 {
return %orig(_homeButtonType);
}
%end
// Screenshot remap
int applicationDidFinishLaunching;
%hook SpringBoard
-(void)applicationDidFinishLaunching:(id)application {
applicationDidFinishLaunching = 2;
%orig;
}
%end
%hook SBPressGestureRecognizer
- (void)setAllowedPressTypes:(NSArray *)arg1 {
NSArray * lockHome = @[@104, @101];
NSArray * lockVol = @[@104, @102, @103];
if ([arg1 isEqual:lockVol] && applicationDidFinishLaunching == 2) {
%orig(lockHome);
applicationDidFinishLaunching--;
return;
}
%orig;
}
%end
%hook SBClickGestureRecognizer
- (void)addShortcutWithPressTypes:(id)arg1 {
if (applicationDidFinishLaunching == 1) {
applicationDidFinishLaunching--;
return;
}
%orig;
}
%end
%hook SBHomeHardwareButton
- (id)initWithScreenshotGestureRecognizer:(id)arg1 homeButtonType:(long long)arg2 buttonActions:(id)arg3 gestureRecognizerConfiguration:(id)arg4 {
return %orig(arg1,_homeButtonType,arg3,arg4);
}
- (id)initWithScreenshotGestureRecognizer:(id)arg1 homeButtonType:(long long)arg2 {
return %orig(arg1,_homeButtonType);
}
%end
%hook SBLockHardwareButton
- (id)initWithScreenshotGestureRecognizer:(id)arg1 shutdownGestureRecognizer:(id)arg2 proximitySensorManager:(id)arg3 homeHardwareButton:(id)arg4 volumeHardwareButton:(id)arg5 buttonActions:(id)arg6 homeButtonType:(long long)arg7 createGestures:(_Bool)arg8 {
return %orig(arg1,arg2,arg3,arg4,arg5,arg6,_homeButtonType,arg8);
}
- (id)initWithScreenshotGestureRecognizer:(id)arg1 shutdownGestureRecognizer:(id)arg2 proximitySensorManager:(id)arg3 homeHardwareButton:(id)arg4 volumeHardwareButton:(id)arg5 homeButtonType:(long long)arg6 {
return %orig(arg1,arg2,arg3,arg4,arg5,_homeButtonType);
}
%end
%hook SBVolumeHardwareButton
- (id)initWithScreenshotGestureRecognizer:(id)arg1 shutdownGestureRecognizer:(id)arg2 homeButtonType:(long long)arg3 {
return %orig(arg1,arg2,_homeButtonType);
}
%end
%end
%group ControlCenter122UI
// MARK: Control Center media controls transition (from iOS 12.2 beta)
@interface MediaControlsRoutingButtonView : UIView
- (long long)currentMode;
@end
long currentCachedMode = 99;
static CALayer* playbackIcon;
static CALayer* AirPlayIcon;
static CALayer* platterLayer;
%hook MediaControlsRoutingButtonView
- (void)_updateGlyph {
if (self.currentMode == currentCachedMode) { return; }
currentCachedMode = self.currentMode;
if (self.layer.sublayers.count >= 1) {
if (self.layer.sublayers[0].sublayers.count >= 1) {
if (self.layer.sublayers[0].sublayers[0].sublayers.count == 2) {
playbackIcon = self.layer.sublayers[0].sublayers[0].sublayers[1].sublayers[0];
AirPlayIcon = self.layer.sublayers[0].sublayers[0].sublayers[1].sublayers[1];
platterLayer = self.layer.sublayers[0].sublayers[0].sublayers[1];
if (self.currentMode == 2) { // Play/Pause Mode
// Play/Pause Icon
playbackIcon.speed = 0.5;
UIViewPropertyAnimator *animator = [[UIViewPropertyAnimator alloc] initWithDuration:1 dampingRatio:1 animations:^{
playbackIcon.transform = CATransform3DMakeScale(-1, -1, 1);
playbackIcon.opacity = 0.75;
}];
[animator startAnimation];
// AirPlay Icon
AirPlayIcon.speed = 0.75;
UIViewPropertyAnimator *animator2 = [[UIViewPropertyAnimator alloc] initWithDuration:1 dampingRatio:1 animations:^{
AirPlayIcon.transform = CATransform3DMakeScale(0.85, 0.85, 1);
AirPlayIcon.opacity = -0.75;
}];
[animator2 startAnimation];
platterLayer.backgroundColor = [[UIColor colorWithRed:0 green:0.478 blue:1.0 alpha:0.0] CGColor];
} else if (self.currentMode == 0 || self.currentMode == 1) { // AirPlay Mode
// Play/Pause Icon
playbackIcon.speed = 0.75;
UIViewPropertyAnimator *animator = [[UIViewPropertyAnimator alloc] initWithDuration:1 dampingRatio:1 animations:^{
playbackIcon.transform = CATransform3DMakeScale(-0.85, -0.85, 1);
playbackIcon.opacity = -0.75;
}];
[animator startAnimation];
// AirPlay Icon
AirPlayIcon.speed = 0.5;
UIViewPropertyAnimator *animator2 = [[UIViewPropertyAnimator alloc] initWithDuration:1 dampingRatio:1 animations:^{
AirPlayIcon.transform = CATransform3DMakeScale(1, 1, 1);
if (self.currentMode == 0) {
AirPlayIcon.opacity = 0.75;
platterLayer.backgroundColor = [[UIColor colorWithRed:0 green:0.478 blue:1.0 alpha:0.0] CGColor];
} else if (self.currentMode == 1) {
AirPlayIcon.opacity = 1;
platterLayer.backgroundColor = [[UIColor colorWithRed:0 green:0.478 blue:1.0 alpha:1.0] CGColor];
platterLayer.cornerRadius = 18;
}
}];
[animator2 startAnimation];
}
}
}
}
}
%end
%end
%group SBButtonRefinements
// MARK: App icon selection override
long _iconHighlightInitiationSkipper = 0;
@interface SBIconView : UIView
- (void)setHighlighted:(bool)arg1;
@property(nonatomic, getter=isHighlighted) _Bool highlighted;
@end
%hook SBIconView
- (void)setHighlighted:(bool)arg1 {
if (_iconHighlightInitiationSkipper) {
%orig;
return;
}
if (arg1 == YES) {
if (!self.highlighted) {
_iconHighlightInitiationSkipper = 1;
%orig;
%orig(NO);
_iconHighlightInitiationSkipper = 0;
}
UIViewPropertyAnimator *animator = [[UIViewPropertyAnimator alloc] initWithDuration:0.125 dampingRatio:1 animations:^{
%orig;
}];
[animator startAnimation];
} else {
UIViewPropertyAnimator *animator = [[UIViewPropertyAnimator alloc] initWithDuration:0.3 dampingRatio:1 animations:^{
%orig;
}];
[animator startAnimation];
}
return;
}
%end
@interface NCToggleControl : UIView
- (void)setHighlighted:(bool)arg1;
@end
%hook NCToggleControl
- (void)setHighlighted:(bool)arg1 {
if (arg1 == YES) {
UIViewPropertyAnimator *animator = [[UIViewPropertyAnimator alloc] initWithDuration:0.125 curve:UIViewAnimationCurveEaseOut animations:^{
%orig;
}];
[animator startAnimation];
} else {
UIViewPropertyAnimator *animator = [[UIViewPropertyAnimator alloc] initWithDuration:0.5 dampingRatio:1 animations:^{
%orig;
}];
[animator startAnimation];
}
return;
}
%end
@interface SBEditingDoneButton : UIView
- (void)setHighlighted:(bool)arg1;
@end
%hook SBEditingDoneButton
-(void)layoutSubviews {
%orig;
if (!self.layer.masksToBounds) {
self.layer.continuousCorners = YES;
self.layer.masksToBounds = YES;
self.layer.cornerRadius = 13;
}
/*
CGRect _frame = self.frame;
if (_frame.origin.y != 16) {
_frame.origin.y = 16;
self.frame = _frame;
}*/
}
- (void)setHighlighted:(bool)arg1 {
if (arg1 == YES) {
UIViewPropertyAnimator *animator = [[UIViewPropertyAnimator alloc] initWithDuration:0.1 curve:UIViewAnimationCurveEaseOut animations:^{
%orig;
}];
[animator startAnimation];
} else {
UIViewPropertyAnimator *animator = [[UIViewPropertyAnimator alloc] initWithDuration:0.5 dampingRatio:1 animations:^{
%orig;
}];
[animator startAnimation];
}
return;
}
%end
@interface SBFolderIconBackgroundView : UIView
@end
%hook SBFolderIconBackgroundView
- (void)layoutSubviews {
%orig;
self.layer.continuousCorners = YES;
}
%end
/*
@interface SBFolderIconImageView : UIView
@end
%hook SBFolderIconImageView
- (void)layoutSubviews {
if (!self.layer.masksToBounds) {
self.layer.continuousCorners = YES;
self.layer.masksToBounds = YES;
self.layer.cornerRadius = 13.5;
}
return %orig;
}
%end
*/
// MARK: Widgets screen button highlight
@interface WGShortLookStyleButton : UIView
- (void)setHighlighted:(bool)arg1;
@end
%hook WGShortLookStyleButton
- (void)setHighlighted:(bool)arg1 {
if (arg1 == YES) {
UIViewPropertyAnimator *animator = [[UIViewPropertyAnimator alloc] initWithDuration:0.25 dampingRatio:1 animations:^{
self.alpha = 0.6;
}];
[animator startAnimation];
} else {
UIViewPropertyAnimator *animator = [[UIViewPropertyAnimator alloc] initWithDuration:0.6 dampingRatio:1 animations:^{
self.alpha = 1;
}];
[animator startAnimation];
}
return;
}
%end
%end
/// MARK: - Group: Springboard modifications
%group FluidInterface
// MARK: Enable fluid switcher
%hook BSPlatform
- (NSInteger)homeButtonType {
return 2;
}
%end
// MARK: Lock screen quick action toggle implementation
// Define custom springboard method to remove all subviews.
@interface UIView (SpringBoardAdditions)
- (void)sb_removeAllSubviews;
@end
@interface SBDashBoardQuickActionsView : UIView
@end
// Reinitialize quick action toggles
%hook SBDashBoardQuickActionsView
- (void)_layoutQuickActionButtons {
%orig;
for (UIView *subview in self.subviews) {
if (subview.frame.size.width < 50) {
if (subview.frame.origin.x < 50) {
CGRect _frame = subview.frame;
_frame = CGRectMake(46, _frame.origin.y - 90, 50, 50);
subview.frame = _frame;
[subview sb_removeAllSubviews];
#pragma clang diagnostic push
#pragma clang diagnostic ignored "-Wunused-value"
[subview init];
#pragma clang diagnostic pop
} else if (subview.frame.origin.x > 100) {
CGFloat _screenWidth = subview.frame.origin.x + subview.frame.size.width / 2;
CGRect _frame = subview.frame;
_frame = CGRectMake(_screenWidth - 96, _frame.origin.y - 90, 50, 50);
subview.frame = _frame;
[subview sb_removeAllSubviews];
#pragma clang diagnostic push
#pragma clang diagnostic ignored "-Wunused-value"
[subview init];
#pragma clang diagnostic pop
}
}
}
}
%end
// MARK: Cover sheet control centre grabber initialization
typedef enum {
Tall=0,
Regular=1
} NEPStatusBarHeightStyle;
NEPStatusBarHeightStyle _statusBarHeightStyle = Tall;
@interface SBDashBoardTeachableMomentsContainerView : UIView
@property(retain, nonatomic) UIView *controlCenterGrabberView;
@property(retain, nonatomic) UIView *controlCenterGrabberEffectContainerView;
@end
%hook SBDashBoardTeachableMomentsContainerView
- (void)layoutSubviews {
%orig;
if (_statusBarHeightStyle == Tall) {
self.controlCenterGrabberEffectContainerView.frame = CGRectMake(self.frame.size.width - 73,36,46,2.5);
self.controlCenterGrabberView.frame = CGRectMake(0,0,46,2.5);
} else if (@available(iOS 12.1, *)) {
// Rounded status bar visual provider
self.controlCenterGrabberEffectContainerView.frame = CGRectMake(self.frame.size.width - 85.5,26,60.5,2.5);
self.controlCenterGrabberView.frame = CGRectMake(0,0,60.5,2.5);
} else {
// Non-rounded status bar visual provider
self.controlCenterGrabberEffectContainerView.frame = CGRectMake(self.frame.size.width - 75.5,24,60.5,2.5);
self.controlCenterGrabberView.frame = CGRectMake(0,0,60.5,2.5);
}
}
%end
// MARK: Corner radius implementation
@interface _UIRootWindow : UIView
@property (setter=_setContinuousCornerRadius:, nonatomic) double _continuousCornerRadius;
- (double)_continuousCornerRadius;
- (void)_setContinuousCornerRadius:(double)arg1;
@end
// Implement system wide continuousCorners.
%hook _UIRootWindow
- (void)layoutSubviews {
%orig;
self._continuousCornerRadius = 5;
self.clipsToBounds = YES;
return;
}
%end
// Implement corner radius adjustment for when in the app switcher scroll view.
/*%hook SBDeckSwitcherPersonality
- (double)_cardCornerRadiusInAppSwitcher {
return 17.5;
}
%end*/
// Implement round screenshot preview edge insets.
%hook UITraitCollection
+ (id)traitCollectionWithDisplayCornerRadius:(CGFloat)arg1 {
return %orig(17);
}
%end
@interface SBAppSwitcherPageView : UIView
@property(nonatomic, assign) double cornerRadius;
@property(nonatomic) _Bool blocksTouches;
- (void)_updateCornerRadius;
@end
BOOL blockerPropagatedEvent = false;
double currentCachedCornerRadius = 0;
/// IMPORTANT: DO NOT MESS WITH THIS LOGIC. EVERYTHING HERE IS DONE FOR A REASON.
// Override rendered corner radius in app switcher page, (for anytime the fluid switcher gestures are running).
%hook SBAppSwitcherPageView
-(void)setBlocksTouches:(BOOL)arg1 {
if (!arg1 && (self.cornerRadius == 17 || self.cornerRadius == 5 || self.cornerRadius == 3.5)) {
blockerPropagatedEvent = true;
self.cornerRadius = 5;
[self _updateCornerRadius];
blockerPropagatedEvent = false;
} else if (self.cornerRadius == 17 || self.cornerRadius == 5 || self.cornerRadius == 3.5) {
blockerPropagatedEvent = true;
self.cornerRadius = 17;
[self _updateCornerRadius];
blockerPropagatedEvent = false;
}
%orig(arg1);
}
- (void)setCornerRadius:(CGFloat)arg1 {
currentCachedCornerRadius = MSHookIvar<double>(self, "_cornerRadius");
CGFloat arg1_overwrite = arg1;
if ((arg1 != 17 || arg1 != 5 || arg1 != 0) && self.blocksTouches) {
return %orig(arg1);
}
if (blockerPropagatedEvent && arg1 != 17) {
return %orig(arg1);
}
if (arg1 == 0 && !self.blocksTouches) {
%orig(0);
return;
}
if (self.blocksTouches) {
arg1_overwrite = 17;
} else if (arg1 == 17) {
// THIS IS THE ONLY BLOCK YOU CAN CHANGE
arg1_overwrite = 5;
// Todo: detect when, in this case, the app is being pulled up from the bottom, and activate the rounded corners.
}
UIView* _overlayClippingView = MSHookIvar<UIView*>(self, "_overlayClippingView");
if (!_overlayClippingView.layer.allowsEdgeAntialiasing) {
_overlayClippingView.layer.allowsEdgeAntialiasing = true;
}
%orig(arg1_overwrite);
}
- (void)_updateCornerRadius {
/// CAREFUL HERE, WATCH OUT FOR THE ICON MORPH ANIMATION ON APPLICATION LAUNCH
if ((self.cornerRadius == 5 && currentCachedCornerRadius == 17.0)) {
UIViewPropertyAnimator *animator = [[UIViewPropertyAnimator alloc] initWithDuration:0.35 dampingRatio:1 animations:^{
%orig;
}];
[animator startAnimation];
} else {
%orig;
}
}
%end
// Override Reachability corner radius.
%hook SBReachabilityBackgroundView
- (double)_displayCornerRadius {
return 5;
}
%end
// MARK: Reachability settings override
%hook SBReachabilitySettings
- (void)setSystemWideSwipeDownHeight:(double) systemWideSwipeDownHeight {
return %orig(100);
}
%end
// High Resolution Wallpaper
@interface SBFStaticWallpaperImageView : UIImageView
@end
%hook SBFStaticWallpaperImageView
- (void)setImage:(id)arg1 {
if (!prototypingEnabled) {
return %orig;
}
NSBundle *bundle = [[NSBundle alloc] initWithPath:kBundlePath];
NSString *imagePath = [bundle pathForResource:@"DoubleBubble_Red" ofType:@"png"];
UIImage *myImage = [UIImage imageWithContentsOfFile:imagePath];
UIImage *originalDownscaledImage = arg1;
if (originalDownscaledImage.size.width == 375) {
return %orig(myImage);
}
return %orig(arg1);
}
%end
%end
%group KeyboardDock
%hook UIRemoteKeyboardWindowHosted
- (UIEdgeInsets)safeAreaInsets {
UIEdgeInsets orig = %orig;
orig.bottom = 44;
return orig;
}
%end
%hook UIKeyboardImpl
+(UIEdgeInsets)deviceSpecificPaddingForInterfaceOrientation:(NSInteger)orientation inputMode:(id)mode {
UIEdgeInsets orig = %orig;
orig.bottom = 44;
return orig;
}
%end
@interface UIKeyboardDockView : UIView
@end
%hook UIKeyboardDockView
- (CGRect)bounds {
CGRect bounds = %orig;
if (bounds.origin.y == 0) {
bounds.origin.y -=13;
}
return bounds;
}
- (void)layoutSubviews {
%orig;
}
%end
%hook UIInputWindowController
- (UIEdgeInsets)_viewSafeAreaInsetsFromScene {
return UIEdgeInsetsMake(0,0,44,0);
}
%end
%end
int _controlCenterStatusBarInset = -10;
// MARK: - Group: Springboard modifications (Control Center Status Bar inset)
%group ControlCenterModificationsStatusBar
@interface CCUIHeaderPocketView : UIView
@end
%hook CCUIHeaderPocketView
- (void)layoutSubviews {
%orig;
CGRect _frame = self.frame;
_frame.origin.y = _controlCenterStatusBarInset;
self.frame = _frame;
}
%end
%end
%group StatusBarProvider
// MARK: - Variable modern status bar implementation
%hook _UIStatusBarVisualProvider_iOS
+ (Class)class {
if (statusBarStyle == 0) {
return NSClassFromString(@"_UIStatusBarVisualProvider_Split58");
} else if (@available(iOS 12.1, *)) {
return NSClassFromString(@"_UIStatusBarVisualProvider_RoundedPad_ForcedCellular");
}
return NSClassFromString(@"_UIStatusBarVisualProvider_Pad_ForcedCellular");
}
%end
%hook _UIStatusBar
+ (double)heightForOrientation:(long long)arg1 {
if (arg1 == 1 || arg1 == 2) {
if (statusBarStyle == 0) {
return %orig - 10;
} else if (statusBarStyle == 1) {
return %orig - 4;
}
}
return %orig;
}
%end
%end
%group StatusBarModern
%hook UIStatusBarWindow
+ (void)setStatusBar:(Class)arg1 {
return %orig(NSClassFromString(@"UIStatusBar_Modern"));
}
%end
%hook UIStatusBar_Base
+ (Class)_implementationClass {
return NSClassFromString(@"UIStatusBar_Modern");
}
+ (void)_setImplementationClass:(Class)arg1 {
return %orig(NSClassFromString(@"UIStatusBar_Modern"));
}
%end
%hook _UIStatusBarData
- (void)setBackNavigationEntry:(id)arg1 {
return;
}
%end
%end
float _bottomInset = 21;
%group TabBarSizing
// MARK: - Inset behavior modifications
%hook UITabBar
- (void)layoutSubviews {
%orig;
CGRect _frame = self.frame;
if (_frame.size.height == 49) {
_frame.size.height = 70;
_frame.origin.y = [[UIScreen mainScreen] bounds].size.height - 70;
}
self.frame = _frame;
}
%end
%hook UIApplicationSceneSettings
- (UIEdgeInsets)safeAreaInsetsLandscapeLeft {
UIEdgeInsets _insets = %orig;
_insets.bottom = _bottomInset;
return _insets;
}
- (UIEdgeInsets)safeAreaInsetsLandscapeRight {
UIEdgeInsets _insets = %orig;
_insets.bottom = _bottomInset;
return _insets;
}
- (UIEdgeInsets)safeAreaInsetsPortrait {
UIEdgeInsets _insets = %orig;
_insets.bottom = _bottomInset;
return _insets;
}
- (UIEdgeInsets)safeAreaInsetsPortraitUpsideDown {
UIEdgeInsets _insets = %orig;
_insets.bottom = _bottomInset;
return _insets;
}
%end
%end
// MARK: - Toolbar resizing implementation
%group ToolbarSizing
/*
@interface UIToolbar (modification)
@property (setter=_setBackgroundView:, nonatomic, retain) UIView *_backgroundView;
@end
%hook UIToolbar
- (void)layoutSubviews {
%orig;
CGRect _frame = self.frame;
if (_frame.size.height == 44) {
_frame.origin.y = [[UIScreen mainScreen] bounds].size.height - 54;
}
self.frame = _frame;
_frame = self._backgroundView.frame;
_frame.size.height = 54;
self._backgroundView.frame = _frame;
}
%end
*/
%end
%group HideLuma
// Hide Home Indicator
%hook UIViewController
- (BOOL)prefersHomeIndicatorAutoHidden {
return YES;
}
%end
%end
%group CompletelyHideLuma
// Hide HomeBar
@interface MTLumaDodgePillView : UIView
@end
%hook MTLumaDodgePillView
- (id)initWithFrame:(struct CGRect)arg1 {
return NULL;
}
%end
%end
// MARK: - Shortcuts
%group Shortcuts
@interface WFFloatingLayer : CALayer
@end
%hook WFFloatingLayer
-(BOOL)continuousCorners {
return YES;
}
%end
%end
// MARK: - Twitter
%group Twitter
@interface TFNCustomTabBar : UIView
@end
%hook TFNCustomTabBar
- (void)layoutSubviews {
%orig;
CGRect _frame = self.frame;
if (_frame.origin.y != [[UIScreen mainScreen] bounds].size.height - _frame.size.height) {
_frame.origin.y -= 3.5;
}
self.frame = _frame;
}
%end
%end
// MARK: - Calendar
%group Calendar
@interface CompactMonthDividedListSwitchButton : UIView
@end
%hook CompactMonthDividedListSwitchButton
- (void)layoutSubviews {
%orig;
self.layer.cornerRadius = 3;
self.layer.continuousCorners = YES;
self.clipsToBounds = YES;
}
%end;
%end
// MARK: - Picture in Picture
%group PIPOverride
// Override MobileGestalt to always return true for PIP key - Acknowledgements: Andrew Wiik (LittleX)
extern "C" Boolean MGGetBoolAnswer(CFStringRef);
%hookf(Boolean, MGGetBoolAnswer, CFStringRef key) {
#define k(key_) CFEqual(key, CFSTR(key_))
if (k("nVh/gwNpy7Jv1NOk00CMrw"))
return YES;
return %orig;
}
%end
@interface _UITableViewCellSeparatorView : UIView
- (id)_viewControllerForAncestor;
@end
@interface UITableViewHeaderFooterView (WalletAdditions)
- (id)_viewControllerForAncestor;
@end
@interface UITableViewCell (WalletAdditions)
- (id)_viewControllerForAncestor;
@end
@interface UISegmentedControl (WalletAdditions)
@property (nonatomic, retain) UIColor *tintColor;
- (id)_viewControllerForAncestor;
@end
@interface UITextView (WalletAdditions)
- (id)_viewControllerForAncestor;
@end
@interface PKContinuousButton : UIView
@end
%group NEPThemeEngine
@interface SBApplicationIcon : NSObject
@end
%hook SBApplicationIcon
- (id)getCachedIconImage:(int)arg1 {
NSString *_applicationBundleID = MSHookIvar<NSString*>(self, "_applicationBundleID");
if (/*[_applicationBundleID isEqualToString:@"com.atebits.Tweetie2"] || */[_applicationBundleID isEqualToString:@"com.apple.news"]) {
NSBundle *bundle = [[NSBundle alloc] initWithPath:kBundlePath];
NSString *imagePath = [bundle pathForResource:_applicationBundleID ofType:@"png"];
UIImage *myImage = [UIImage imageWithContentsOfFile:imagePath];
return myImage;
}
return %orig;
}
- (id)getUnmaskedIconImage:(int)arg1 {
NSString *_applicationBundleID = MSHookIvar<NSString*>(self, "_applicationBundleID");
if (/*[_applicationBundleID isEqualToString:@"com.atebits.Tweetie2"] || */[_applicationBundleID isEqualToString:@"com.apple.news"]) {
NSBundle *bundle = [[NSBundle alloc] initWithPath:kBundlePath];
NSString *imagePath = [bundle pathForResource:[NSString stringWithFormat:@"%@_unmasked", _applicationBundleID] ofType:@"png"];
UIImage *myImage = [UIImage imageWithContentsOfFile:imagePath];
return myImage;
}
return %orig;
}
- (id)generateIconImage:(int)arg1 {
NSString *_applicationBundleID = MSHookIvar<NSString*>(self, "_applicationBundleID");
if (/*[_applicationBundleID isEqualToString:@"com.atebits.Tweetie2"] || */[_applicationBundleID isEqualToString:@"com.apple.news"]) {
NSBundle *bundle = [[NSBundle alloc] initWithPath:kBundlePath];
NSString *imagePath = [bundle pathForResource:_applicationBundleID ofType:@"png"];
UIImage *myImage = [UIImage imageWithContentsOfFile:imagePath];
return myImage;
}
return %orig;
}
%end
%end
// MARK: - Wallet
%group Wallet122UI
%hook _UITableViewCellSeparatorView
- (void)layoutSubviews {
if ([[NSString stringWithFormat:@"%@", self._viewControllerForAncestor] containsString:@"PassDetailViewController"] || [[NSString stringWithFormat:@"%@", self._viewControllerForAncestor] containsString:@"PKPaymentPreferencesViewController"]) {
if (self.frame.origin.x == 0) {
self.hidden = YES;
}
}
}
%end
%hook UISegmentedControl
- (void)layoutSubviews {
%orig;
if ([[NSString stringWithFormat:@"%@", self._viewControllerForAncestor] containsString:@"PassDetailViewController"]) {
self.tintColor = [UIColor blackColor];
}
}
%end
%hook UITextView
- (void)layoutSubviews {
%orig;
CGRect _frame = self.frame;
if ([[NSString stringWithFormat:@"%@", self._viewControllerForAncestor] containsString:@"PKBarcodePassDetailViewController"] && _frame.origin.x == 16) {
_frame.origin.x += 10;
self.frame = _frame;
}
}
%end
%hook PKContinuousButton
- (void)updateTitleColorWithColor:(id)arg1 {
//if (self.frame.size.width < 90) {
//%orig([UIColor blackColor]);
//} else {
%orig;
//}
}
%end
%hook UITableViewCell
- (void)layoutSubviews {
%orig;
if ([[NSString stringWithFormat:@"%@", self._viewControllerForAncestor] containsString:@"PassDetailViewController"] || [[NSString stringWithFormat:@"%@", self._viewControllerForAncestor] containsString:@"PKPaymentPreferencesViewController"]) {
CGRect _frame = self.frame;
if (_frame.origin.x == 0) {
self.layer.cornerRadius = 10;
self.clipsToBounds = YES;
typedef enum {
Lone=0,
Bottom=1,
Top=2,
Middle=3
} NEPCellPosition;
NEPCellPosition _cellPosition = Middle;
for (UIView *subview in self.subviews) {
if ([[NSString stringWithFormat:@"%@", subview] containsString:@"_UITableViewCellSeparatorView"] && subview.frame.origin.x == 0 && subview.frame.origin.y == 0 && subview.frame.size.height == 0.5) {
_cellPosition = Top;
}
}
for (UIView *subview in self.subviews) {
if ([[NSString stringWithFormat:@"%@", subview] containsString:@"_UITableViewCellSeparatorView"] && subview.frame.origin.x == 0 && subview.frame.origin.y > 0 && subview.frame.size.height == 0.5) {
if (_cellPosition == Top) {
_cellPosition = Lone;
} else {
_cellPosition = Bottom;
}
}
}
#pragma clang diagnostic push
#pragma clang diagnostic ignored "-Wunguarded-availability"
if (_cellPosition == Top) {
self.layer.maskedCorners = kCALayerMinXMinYCorner | kCALayerMaxXMinYCorner;
} else if (_cellPosition == Bottom) {
self.layer.maskedCorners = kCALayerMinXMaxYCorner | kCALayerMaxXMaxYCorner;
} else if (_cellPosition == Middle) {
self.layer.cornerRadius = 0;
self.clipsToBounds = NO;
}
#pragma clang diagnostic pop
_frame.size.width -= 32;
_frame.origin.x = 16;
self.frame = _frame;
}
}
}
%end
%hook UITableViewHeaderFooterView
- (void)layoutSubviews {
if ([[NSString stringWithFormat:@"%@", self._viewControllerForAncestor] containsString:@"PassDetailViewController"]) {
if (self.frame.origin.x == 0) {
CGRect _frame = self.frame;
//if (_frame.size.width > 200) {
_frame.size.width -= 10;
//}
_frame.origin.x += 5;
self.frame = _frame;
}
}
%orig;
}
%end
%end
%group Maps
@interface MapsProgressButton : UIView
@end
%hook MapsProgressButton
- (void)layoutSubviews {
%orig;
self.layer.continuousCorners = true;
}
%end
%end
%group Castro
@interface SUPTabsCardViewController : UIViewController
@end
%hook SUPTabsCardViewController
- (void)viewDidLoad {
%orig;
self.view.layer.mask = NULL;
self.view.layer.continuousCorners = YES;
self.view.layer.masksToBounds = YES;
self.view.layer.cornerRadius = 10;
}
%end
@interface SUPDimExternalImageViewButton : UIView
- (void)setHighlighted:(bool)arg1;
@end
%hook SUPDimExternalImageViewButton
- (void)setHighlighted:(bool)arg1 {
if (arg1 == YES) {
UIViewPropertyAnimator *animator = [[UIViewPropertyAnimator alloc] initWithDuration:0.1 curve:UIViewAnimationCurveEaseOut animations:^{
%orig;
}];
[animator startAnimation];
} else {
UIViewPropertyAnimator *animator = [[UIViewPropertyAnimator alloc] initWithDuration:0.4 dampingRatio:1 animations:^{
%orig;
}];
[animator startAnimation];
}
return;
}
%end
%end
%ctor {
NSString *bundleIdentifier = [NSBundle mainBundle].bundleIdentifier;
// Gather current preference keys.
NSString *settingsPath = @"/var/mobile/Library/Preferences/com.duraidabdul.neptune.plist";
NSFileManager *fileManager = [NSFileManager defaultManager];
NSMutableDictionary *currentSettings;
BOOL shouldReadAndWriteDefaults = false;
if ([fileManager fileExistsAtPath:settingsPath]){
currentSettings = [[NSMutableDictionary alloc] initWithContentsOfFile:settingsPath];
if ([[currentSettings objectForKey:@"preferencesVersionID"] intValue] != 100) {
shouldReadAndWriteDefaults = true;
}
} else {
shouldReadAndWriteDefaults = true;
}
if (shouldReadAndWriteDefaults) {
NSBundle *bundle = [[NSBundle alloc] initWithPath:kBundlePath];
NSString *defaultsPath = [bundle pathForResource:@"defaults" ofType:@"plist"];
currentSettings = [[NSMutableDictionary alloc] initWithContentsOfFile:defaultsPath];
[currentSettings writeToFile: settingsPath atomically:YES];
}
isFluidInterfaceEnabled = [[currentSettings objectForKey:@"isFluidInterfaceEnabled"] boolValue];
isHomeIndicatorEnabled = [[currentSettings objectForKey:@"isHomeIndicatorEnabled"] boolValue];
isButtonCombinationOverrideDisabled = [[currentSettings objectForKey:@"isButtonCombinationOverrideDisabled"] boolValue];
isTallKeyboardEnabled = [[currentSettings objectForKey:@"isTallKeyboardEnabled"] boolValue];
isPIPEnabled = [[currentSettings objectForKey:@"isPIPEnabled"] boolValue];
statusBarStyle = [[currentSettings objectForKey:@"statusBarStyle"] intValue];
isWalletEnabled = [[currentSettings objectForKey:@"isWalletEnabled"] boolValue];
isNewsIconEnabled = [[currentSettings objectForKey:@"isNewsIconEnabled"] boolValue];
prototypingEnabled = [[currentSettings objectForKey:@"prototypingEnabled"] boolValue];
// Conditional status bar initialization
NSArray *acceptedStatusBarIdentifiers = @[@"com.apple",
@"com.culturedcode.ThingsiPhone",
@"com.christianselig.Apollo",
@"co.supertop.Castro-2",
@"com.facebook.Messenger",
@"com.saurik.Cydia",
@"is.workflow.my.app"
];
%init(StatusBarProvider);
for (NSString *identifier in acceptedStatusBarIdentifiers) {
if ((statusBarStyle == 0 && [bundleIdentifier containsString:identifier]) || statusBarStyle == 1) {
%init(StatusBarModern);
}
}
// Conditional inset adjustment initialization
NSArray *acceptedInsetAdjustmentIdentifiers = @[@"com.apple",
@"com.culturedcode.ThingsiPhone",
@"com.christianselig.Apollo",
@"co.supertop.Castro-2",
@"com.chromanoir.Zeit",
@"com.chromanoir.spectre",
@"com.saurik.Cydia",
@"is.workflow.my.app"
];
NSArray *acceptedInsetAdjustmentIdentifiers_NoTabBarLabels = @[@"com.facebook.Facebook",
@"com.facebook.Messenger",
@"com.burbn.instagram",
@"com.medium.reader",
@"com.pcalc.mobile"
];
BOOL isInsetAdjustmentEnabled = false;
if (![bundleIdentifier containsString:@"mobilesafari"]) {
for (NSString *identifier in acceptedInsetAdjustmentIdentifiers) {
if ([bundleIdentifier containsString:identifier]) {
isInsetAdjustmentEnabled = true;
break;
}
}
if (!isInsetAdjustmentEnabled) {
for (NSString *identifier in acceptedInsetAdjustmentIdentifiers_NoTabBarLabels) {
if ([bundleIdentifier containsString:identifier]) {
_bottomInset = 16;
isInsetAdjustmentEnabled = true;
}
}
}
}
if (isHomeIndicatorEnabled && isFluidInterfaceEnabled) {
if (isInsetAdjustmentEnabled) {
%init(TabBarSizing);
%init(ToolbarSizing);
} else {
%init(HideLuma);
}
} else {
%init(CompletelyHideLuma);
}
// SpringBoard
if ([bundleIdentifier isEqualToString:@"com.apple.springboard"]) {
if (statusBarStyle != 0) {
_statusBarHeightStyle = Regular;
_controlCenterStatusBarInset = -24;
}
if (isFluidInterfaceEnabled) {
%init(FluidInterface)
%init(ButtonRemap)
}
%init(ControlCenter122UI)
if (isFluidInterfaceEnabled) {
%init(ControlCenterModificationsStatusBar)
}
%init(SBButtonRefinements)
}
// Wallet
if ([bundleIdentifier containsString:@"Passbook"] && isWalletEnabled) {
%init(Wallet122UI);
}
// Shortcuts
if ([bundleIdentifier containsString:@"workflow"]) {
%init(Shortcuts);
}
// Calendar
if ([bundleIdentifier containsString:@"com.apple.mobilecal"]) {
%init(Calendar);
}
// Maps
if ([bundleIdentifier containsString:@"com.apple.Maps"]) {
%init(Maps);
}
// Twitter
if ([bundleIdentifier containsString:@"com.atebits.Tweetie2"] && prototypingEnabled) {
%init(Twitter);
}
if ([bundleIdentifier containsString:@"supertop"]) {
%init(Castro);
}
// Picture in picture
if (isPIPEnabled) {
%init(PIPOverride);
}
if (isNewsIconEnabled && [bundleIdentifier containsString:@"com.apple.springboard"]) {
%init(NEPThemeEngine);
}
// Keyboard height adjustment
if (isTallKeyboardEnabled) {
%init(KeyboardDock);
}
// Any ungrouped hooks
%init(_ungrouped);
}
Aspects是一个开源的的库,面向切面编程,它能允许你在每一个类和每一个实例中存在的方法里面加入任何代码。可以在方法执行之前或者之后执行,也可以替换掉原有的方法。通过Runtime消息转发实现Hook。Aspects会自动处理超类,比常规方法调用更容易使用,github上Star已经超过6000多,已经比较稳定了;
先从源码入手,最后再进行总结,如果对源码不感兴趣的可以直接跳到文章末尾去查看具体流程
二:Aspects是Hook前的准备工作
- (id)aspect_hookSelector:(SEL)selector withOptions:(AspectOptions)options usingBlock:(id)block error:(NSError **)error { return aspect_add((id)self, selector, options, block, error); }
- (id)aspect_hookSelector:(SEL)selector withOptions:(AspectOptions)options usingBlock:(id)block error:(NSError **)error { return aspect_add(self, selector, options, block, error); } 通过上面的方法添加Hook,传入SEL(要Hook的方法), options(远方法调用调用之前或之后调用或者是替换),block(要执行的代码),error(错误信息)
static id aspect_add(id self, SEL selector, AspectOptions options, id block, NSError **error) { NSCParameterAssert(self); NSCParameterAssert(selector); NSCParameterAssert(block);
__block AspectIdentifier *identifier = nil;
aspect_performLocked(^{
    //先判断参数的合法性,如果不合法直接返回nil
    if (aspect_isSelectorAllowedAndTrack(self, selector, options, error)) {
        //参数合法
        //创建容器
        AspectsContainer *aspectContainer = aspect_getContainerForObject(self, selector);
        //创建一个AspectIdentifier对象(保存hook内容)
        identifier = [AspectIdentifier identifierWithSelector:selector object:self options:options block:block error:error];
        if (identifier) {
            //把identifier添加到容器中(根据options,添加到不同集合中)
            [aspectContainer addAspect:identifier withOptions:options];

            // Modify the class to allow message interception.
            aspect_prepareClassAndHookSelector(self, selector, error);
        }
    }
});
return identifier;
} 上面的方法主要是分为以下几步:
判断上面传入的方法的合法性 如果合法就创建AspectsContainer容器类,这个容器会根据传入的切片时机进行分类,添加到对应的集合中去 创建AspectIdentifier对象保存hook内容 如果AspectIdentifier对象创建成功,就把AspectIdentifier根据options添加到对应的数组中 最终调用aspect_prepareClassAndHookSelector(self, selector, error);开始进行hook 接下来就对上面的步骤一一解读
一:判断传入方法的合法性 /* 判断参数的合法性: 1.先将retain,release,autorelease,forwardInvocation添加到数组中,如果SEL是数组中的某一个,报错 并返回NO,这几个全是不能进行Swizzle的方法 2.传入的时机是否正确,判断SEL是否是dealloc,如果是dealloc,选择的调用时机必须是AspectPositionBefore 3.判断类或者类对象是否响应传入的sel 4.如果替换的是类方法,则进行是否重复替换的检查 */ static BOOL aspect_isSelectorAllowedAndTrack(NSObject *self, SEL selector, AspectOptions options, NSError **error) { static NSSet *disallowedSelectorList; static dispatch_once_t pred; dispatch_once(&pred, ^{ disallowedSelectorList = [NSSet setWithObjects:@"retain", @"release", @"autorelease", @"forwardInvocation:", nil]; });
// Check against the blacklist.
NSString *selectorName = NSStringFromSelector(selector);
if ([disallowedSelectorList containsObject:selectorName]) {
    NSString *errorDescription = [NSString stringWithFormat:@"Selector %@ is blacklisted.", selectorName];
    AspectError(AspectErrorSelectorBlacklisted, errorDescription);
    return NO;
}

// Additional checks.
AspectOptions position = options&AspectPositionFilter;
//如果是dealloc必须是AspectPositionBefore,不然报错
if ([selectorName isEqualToString:@"dealloc"] && position != AspectPositionBefore) {
    NSString *errorDesc = @"AspectPositionBefore is the only valid position when hooking dealloc.";
    AspectError(AspectErrorSelectorDeallocPosition, errorDesc);
    return NO;
}
//判断是否可以响应方法,respondsToSelector(判断对象是否响应某个方法),instancesRespondToSelector(判断类能否响应某个方法)
if (![self respondsToSelector:selector] && ![self.class instancesRespondToSelector:selector]) {
    NSString *errorDesc = [NSString stringWithFormat:@"Unable to find selector -[%@ %@].", NSStringFromClass(self.class), selectorName];
    AspectError(AspectErrorDoesNotRespondToSelector, errorDesc);
    return NO;
}

// Search for the current class and the class hierarchy IF we are modifying a class object
//判断是不是元类,
if (class_isMetaClass(object_getClass(self))) {
    Class klass = [self class];
    //创建字典
    NSMutableDictionary *swizzledClassesDict = aspect_getSwizzledClassesDict();
    Class currentClass = [self class];
    do {
        AspectTracker *tracker = swizzledClassesDict[currentClass];
        if ([tracker.selectorNames containsObject:selectorName]) {

            // Find the topmost class for the log.
            if (tracker.parentEntry) {
                AspectTracker *topmostEntry = tracker.parentEntry;
                while (topmostEntry.parentEntry) {
                    topmostEntry = topmostEntry.parentEntry;
                }
                NSString *errorDescription = [NSString stringWithFormat:@"Error: %@ already hooked in %@. A method can only be hooked once per class hierarchy.", selectorName, NSStringFromClass(topmostEntry.trackedClass)];
                AspectError(AspectErrorSelectorAlreadyHookedInClassHierarchy, errorDescription);
                return NO;
            }else if (klass == currentClass) {
                // Already modified and topmost!
                return YES;
            }
        }
    }while ((currentClass = class_getSuperclass(currentClass)));

    // Add the selector as being modified.
//到此就表示传入的参数合法,并且没有被hook过,就可以把信息保存起来了 currentClass = klass; AspectTracker *parentTracker = nil; do { AspectTracker *tracker = swizzledClassesDict[currentClass]; if (!tracker) { tracker = [[AspectTracker alloc] initWithTrackedClass:currentClass parent:parentTracker]; swizzledClassesDict[(id)currentClass] = tracker; } [tracker.selectorNames addObject:selectorName]; // All superclasses get marked as having a subclass that is modified. parentTracker = tracker; }while ((currentClass = class_getSuperclass(currentClass))); }
return YES;
} 上面代码主要干了一下几件事:
把"retain", "release", "autorelease", "forwardInvocation:这几个加入集合中,判断集合中是否包含传入的selector,如果包含返回NO,这也说明Aspects不能对这几个函数进行hook操作; 判断selector是不是dealloc方法,如果是切面时机必须是AspectPositionBefore,要不然就会报错并返回NO,dealloc之后对象就销毁,所以切片时机只能是在原方法调用之前调用 判断类和实例对象是否可以响应传入的selector,不能就返回NO 判断是不是元类,如果是元类,判断方法有没有被hook过,如果没有就保存数据,一个方法在一个类的层级里面只能hook一次 2.创建AspectsContainer容器类 // Loads or creates the aspect container. static AspectsContainer *aspect_getContainerForObject(NSObject *self, SEL selector) { NSCParameterAssert(self); //拼接字符串aspects__viewDidAppear: SEL aliasSelector = aspect_aliasForSelector(selector); //获取aspectContainer对象 AspectsContainer *aspectContainer = objc_getAssociatedObject(self, aliasSelector); //如果上面没有获取到就创建 if (!aspectContainer) { aspectContainer = [AspectsContainer new]; objc_setAssociatedObject(self, aliasSelector, aspectContainer, OBJC_ASSOCIATION_RETAIN); } return aspectContainer; } 获得其对应的AssociatedObject关联对象,如果获取不到,就创建一个关联对象。最终得到selector有"aspects_"前缀,对应的aspectContainer。
3.创建AspectIdentifier对象保存hook内容
-
(instancetype)identifierWithSelector:(SEL)selector object:(id)object options:(AspectOptions)options block:(id)block error:(NSError **)error { NSCParameterAssert(block); NSCParameterAssert(selector); // /把blcok转换成方法签名 NSMethodSignature *blockSignature = aspect_blockMethodSignature(block, error); // TODO: check signature compatibility, etc. //aspect_isCompatibleBlockSignature 对比要替换方法的block和原方法,如果不一样,不继续进行 //如果一样,把所有的参数赋值给AspectIdentifier对象 if (!aspect_isCompatibleBlockSignature(blockSignature, object, selector, error)) { return nil; }
AspectIdentifier *identifier = nil;
if (blockSignature) { identifier = [AspectIdentifier new]; identifier.selector = selector; identifier.block = block; identifier.blockSignature = blockSignature; identifier.options = options; identifier.object = object; // weak } return identifier; } /* 1.把原方法转换成方法签名 2.然后比较两个方法签名的参数数量,如果不相等,说明不一样 3.如果参数个数相同,再比较blockSignature的第一个参数 */ static BOOL aspect_isCompatibleBlockSignature(NSMethodSignature *blockSignature, id object, SEL selector, NSError **error) { NSCParameterAssert(blockSignature); NSCParameterAssert(object); NSCParameterAssert(selector);
BOOL signaturesMatch = YES; //把原方法转化成方法签名 NSMethodSignature *methodSignature = [[object class] instanceMethodSignatureForSelector:selector]; //判断两个方法编号的参数数量 if (blockSignature.numberOfArguments > methodSignature.numberOfArguments) { signaturesMatch = NO; }else { //取出blockSignature的第一个参数是不是_cmd,对应的type就是'@',如果不等于'@',也不匹配 if (blockSignature.numberOfArguments > 1) { const char *blockType = [blockSignature getArgumentTypeAtIndex:1]; if (blockType[0] != '@') { signaturesMatch = NO; } } // Argument 0 is self/block, argument 1 is SEL or id. We start comparing at argument 2. // The block can have less arguments than the method, that's ok. //如果signaturesMatch = yes,下面才是比较严格的比较 if (signaturesMatch) { for (NSUInteger idx = 2; idx < blockSignature.numberOfArguments; idx++) { const char *methodType = [methodSignature getArgumentTypeAtIndex:idx]; const char *blockType = [blockSignature getArgumentTypeAtIndex:idx]; // Only compare parameter, not the optional type data. if (!methodType || !blockType || methodType[0] != blockType[0]) { signaturesMatch = NO; break; } } } } //如果经过上面的对比signaturesMatch都为NO,抛出异常 if (!signaturesMatch) { NSString *description = [NSString stringWithFormat:@"Blog signature %@ doesn't match %@.", blockSignature, methodSignature]; AspectError(AspectErrorIncompatibleBlockSignature, description); return NO; } return YES; } //把blcok转换成方法签名 #pragma mark 把blcok转换成方法签名 static NSMethodSignature *aspect_blockMethodSignature(id block, NSError **error) { AspectBlockRef layout = (__bridge void *)block; //判断是否有AspectBlockFlagsHasSignature标志位,没有报不包含方法签名的error if (!(layout->flags & AspectBlockFlagsHasSignature)) { NSString *description = [NSString stringWithFormat:@"The block %@ doesn't contain a type signature.", block]; AspectError(AspectErrorMissingBlockSignature, description); return nil; } void *desc = layout->descriptor; desc += 2 * sizeof(unsigned long int); if (layout->flags & AspectBlockFlagsHasCopyDisposeHelpers) { desc += 2 * sizeof(void *); } if (!desc) { NSString *description = [NSString stringWithFormat:@"The block %@ doesn't has a type signature.", block]; AspectError(AspectErrorMissingBlockSignature, description); return nil; } const char signature = ((const char **)desc); return [NSMethodSignature signatureWithObjCTypes:signature]; } 这个方法先把block转换成方法签名,然后和原来的方法签名进行对比,如果不一样返回NO,一样就进行赋值操作
4.把AspectIdentifier根据options添加到对应的数组中
- (void)addAspect:(AspectIdentifier *)aspect withOptions:(AspectOptions)options { NSParameterAssert(aspect); NSUInteger position = options&AspectPositionFilter; switch (position) { case AspectPositionBefore: self.beforeAspects = [(self.beforeAspects ?:@[]) arrayByAddingObject:aspect]; break; case AspectPositionInstead: self.insteadAspects = [(self.insteadAspects?:@[]) arrayByAddingObject:aspect]; break; case AspectPositionAfter: self.afterAspects = [(self.afterAspects ?:@[]) arrayByAddingObject:aspect]; break; } } 根据传入的切面时机,进行对应数组的存储;
5.开始进行hook aspect_prepareClassAndHookSelector(self, selector, error); 小节一下:Aspects在hook之前会对传入的参数的合法性进行校验,然后把传入的block(就是在原方法调用之前,之后调用,或者替换原方法的代码块)和原方法都转换成方法签名进行对比,如果一致就把所有信息保存到AspectIdentifier这个类里面(后期调用这个block的时候会用到这些信息),然后会根据传进来的切面时机保存到AspectsContainer这个类里对应的数组中(最后通过遍历,获取到其中的一个AspectIdentifier对象,调用invokeWithInfo方法),准备工作做完以后开始对类和方法进行Hook操作了
二:Aspects是怎么对类和方法进行Hook的? 先对class进行hook再对selector进行hook
1.Hook Class static Class aspect_hookClass(NSObject *self, NSError **error) { NSCParameterAssert(self); //获取类 Class statedClass = self.class; //获取类的isa指针 Class baseClass = object_getClass(self);
NSString *className = NSStringFromClass(baseClass);

// Already subclassed
//判断是否包含_Aspects_,如果包含,就说明被hook过了,
//如果不包含_Aspects_,再判断是不是元类,如果是元类调用aspect_swizzleClassInPlace
//如果不包含_Aspects_,也不是元类,再判断statedClass和baseClass是否相等,如果不相等,说明是被kvo过的对象因为kvo对象的isa指针指向了另一个中间类,调用aspect_swizzleClassInPlace

if ([className hasSuffix:AspectsSubclassSuffix]) {
    return baseClass;

    // We swizzle a class object, not a single object.
}else if (class_isMetaClass(baseClass)) {
    return aspect_swizzleClassInPlace((Class)self);
    // Probably a KVO'ed class. Swizzle in place. Also swizzle meta classes in place.
}else if (statedClass != baseClass) {
    return aspect_swizzleClassInPlace(baseClass);
}

// Default case. Create dynamic subclass.
//如果不是元类,也不是被kvo过的类,也没有被hook过,就继续往下执行,创建一个子类,
//拼接类名为XXX_Aspects_
const char *subclassName = [className stringByAppendingString:AspectsSubclassSuffix].UTF8String;
//根据拼接的类名获取类
Class subclass = objc_getClass(subclassName);
//如果上面获取到的了为nil
if (subclass == nil) {
    //baseClass = MainViewController,创建一个子类MainViewController_Aspects_
    subclass = objc_allocateClassPair(baseClass, subclassName, 0);
    //如果子类创建失败,报错
    if (subclass == nil) {
        NSString *errrorDesc = [NSString stringWithFormat:@"objc_allocateClassPair failed to allocate class %s.", subclassName];
        AspectError(AspectErrorFailedToAllocateClassPair, errrorDesc);
        return nil;
    }

    aspect_swizzleForwardInvocation(subclass);
    //把subclass的isa指向了statedClass
    aspect_hookedGetClass(subclass, statedClass);
    //subclass的元类的isa,也指向了statedClass。
    aspect_hookedGetClass(object_getClass(subclass), statedClass);
    //注册刚刚新建的子类subclass,再调用object_setClass(self, subclass);把当前self的isa指向子类subclass
    objc_registerClassPair(subclass);
}

object_setClass(self, subclass);
return subclass;
} 判断className中是否包含_Aspects_,如果包含就说明这个类已经被Hook过了直接返回这个类的isa指针 如果不包含判断在判断是不是元类,如果是就调用aspect_swizzleClassInPlace() 如果不包含也不是元类,再判断baseClass和statedClass是否相等,如果不相等,说明是被KVO过的对象 如果不是元类也不是被kvo过的类就继续向下执行,创建一个子类,类名为原来类名+Aspects,创建成功调用aspect_swizzleForwardInvocation()交换IMP,把新建类的forwardInvocationIMP替换为__ASPECTS_ARE_BEING_CALLED__,然后把subClass的isa指针指向statedCass,subclass的元类的isa指针也指向statedClass,然后注册新创建的子类subClass,再调用object_setClass(self, subclass);把当前self的isa指针指向子类subClass aspect_swizzleClassInPlace() static Class aspect_swizzleClassInPlace(Class klass) { NSCParameterAssert(klass); NSString *className = NSStringFromClass(klass); //创建无序集合 aspect_modifySwizzledClasses(^(NSMutableSet *swizzledClasses) { //如果集合中不包含className,添加到集合中 if (![swizzledClasses containsObject:className]) { aspect_swizzleForwardInvocation(klass); [swizzledClasses addObject:className]; } }); return klass; } 这个函数主要是:通过调用aspect_swizzleForwardInvocation ()函数把类的forwardInvocationIMP替换为__ASPECTS_ARE_BEING_CALLED_,然后把类名添加到集合中(这个集合后期删除Hook的时候会用到的)
aspect_swizzleForwardInvocation(Class klass) static void aspect_swizzleForwardInvocation(Class klass) { NSCParameterAssert(klass); // If there is no method, replace will act like class_addMethod. //把forwardInvocation的IMP替换成__ASPECTS_ARE_BEING_CALLED__ //class_replaceMethod返回的是原方法的IMP IMP originalImplementation = class_replaceMethod(klass, @selector(forwardInvocation:), (IMP)ASPECTS_ARE_BEING_CALLED, "v@:@"); // originalImplementation不为空的话说明原方法有实现,添加一个新方法__aspects_forwardInvocation:指向了原来的originalImplementation,在__ASPECTS_ARE_BEING_CALLED__那里如果不能处理,判断是否有实现__aspects_forwardInvocation,有的话就转发。
if (originalImplementation) {
    class_addMethod(klass, NSSelectorFromString(AspectsForwardInvocationSelectorName), originalImplementation, "v@:@");
}
AspectLog(@"Aspects: %@ is now aspect aware.", NSStringFromClass(klass));
} 交换方法实现IMP,把forwardInvocation:的IMP替换成__ASPECTS_ARE_BEING_CALLED__,这样做的目的是:在把selector进行hook以后会把原来的方法的IMP指向objc_forward,然后就会调用forwardInvocation :,因为forwardInvocation :的IMP指向的是__ASPECTS_ARE_BEING_CALLED__函数,最终就会调用到这里来,在这里面执行hook代码和原方法,如果原来的类有实现forwardInvocation :这个方法,就把这个方法的IMP指向__aspects_forwardInvocation:
aspect_hookedGetClass static void aspect_hookedGetClass(Class class, Class statedClass) { NSCParameterAssert(class); NSCParameterAssert(statedClass); Method method = class_getInstanceMethod(class, @selector(class)); IMP newIMP = imp_implementationWithBlock(^(id self) { return statedClass; }); class_replaceMethod(class, @selector(class), newIMP, method_getTypeEncoding(method)); } 根据传递的参数,把新创建的类和该类的元类的class方法的IMP指向原来的类(以后新建的类再调用class方法,返回的都是statedClass)
object_setClass(self, subclass); 把原来类的isa指针指向新创建的类
接下来再说说是怎么对method进行hook的
static void aspect_prepareClassAndHookSelector(NSObject *self, SEL selector, NSError **error) { NSCParameterAssert(selector); Class klass = aspect_hookClass(self, error); Method targetMethod = class_getInstanceMethod(klass, selector); IMP targetMethodIMP = method_getImplementation(targetMethod); if (!aspect_isMsgForwardIMP(targetMethodIMP)) { // Make a method alias for the existing method implementation, it not already copied. const char *typeEncoding = method_getTypeEncoding(targetMethod); SEL aliasSelector = aspect_aliasForSelector(selector); //子类里面不能响应aspects_xxxx,就为klass添加aspects_xxxx方法,方法的实现为原生方法的实现 if (![klass instancesRespondToSelector:aliasSelector]) { __unused BOOL addedAlias = class_addMethod(klass, aliasSelector, method_getImplementation(targetMethod), typeEncoding); NSCAssert(addedAlias, @"Original implementation for %@ is already copied to %@ on %@", NSStringFromSelector(selector), NSStringFromSelector(aliasSelector), klass); }
    // We use forwardInvocation to hook in.
    class_replaceMethod(klass, selector, aspect_getMsgForwardIMP(self, selector), typeEncoding);
    AspectLog(@"Aspects: Installed hook for -[%@ %@].", klass, NSStringFromSelector(selector));
}
} 上面的代码主要是对selector进行hook,首先获取到原来的方法,然后判断判断是不是指向了_objc_msgForward,没有的话,就获取原来方法的方法编码,为新建的子类添加一个方法aspects__xxxxx,并将新建方法的IMP指向原来方法,再把原来类的方法的IMP指向_objc_msgForward,hook完毕
三:ASPECTS_ARE_BEING_CALLED static void ASPECTS_ARE_BEING_CALLED(__unsafe_unretained NSObject *self, SEL selector, NSInvocation *invocation) { NSCParameterAssert(self); NSCParameterAssert(invocation); //获取原始的selector SEL originalSelector = invocation.selector; //获取带有aspects_xxxx前缀的方法 SEL aliasSelector = aspect_aliasForSelector(invocation.selector); //替换selector invocation.selector = aliasSelector; //获取实例对象的容器objectContainer,这里是之前aspect_add关联过的对象 AspectsContainer *objectContainer = objc_getAssociatedObject(self, aliasSelector); //获取获得类对象容器classContainer AspectsContainer *classContainer = aspect_getContainerForClass(object_getClass(self), aliasSelector); //初始化AspectInfo,传入self、invocation参数 AspectInfo *info = [[AspectInfo alloc] initWithInstance:self invocation:invocation]; NSArray *aspectsToRemove = nil;
// Before hooks.
//调用宏定义执行Aspects切片功能
//宏定义里面就做了两件事情,一个是执行了[aspect invokeWithInfo:info]方法,一个是把需要remove的Aspects加入等待被移除的数组中。
aspect_invoke(classContainer.beforeAspects, info);
aspect_invoke(objectContainer.beforeAspects, info);

// Instead hooks.
BOOL respondsToAlias = YES;
if (objectContainer.insteadAspects.count || classContainer.insteadAspects.count) {
    aspect_invoke(classContainer.insteadAspects, info);
    aspect_invoke(objectContainer.insteadAspects, info);
}else {
    Class klass = object_getClass(invocation.target);
    do {
        if ((respondsToAlias = [klass instancesRespondToSelector:aliasSelector])) {
            [invocation invoke];
            break;
        }
    }while (!respondsToAlias && (klass = class_getSuperclass(klass)));
}

// After hooks.
aspect_invoke(classContainer.afterAspects, info);
aspect_invoke(objectContainer.afterAspects, info);

// If no hooks are installed, call original implementation (usually to throw an exception)
if (!respondsToAlias) {
    invocation.selector = originalSelector;
    SEL originalForwardInvocationSEL = NSSelectorFromString(AspectsForwardInvocationSelectorName);
    if ([self respondsToSelector:originalForwardInvocationSEL]) {
        ((void( *)(id, SEL, NSInvocation *))objc_msgSend)(self, originalForwardInvocationSEL, invocation);
    }else {
        [self doesNotRecognizeSelector:invocation.selector];
    }
}

// Remove any hooks that are queued for deregistration.
[aspectsToRemove makeObjectsPerformSelector:@selector(remove)];
}
#define aspect_invoke(aspects, info)
for (AspectIdentifier *aspect in aspects) {
[aspect invokeWithInfo:info];
if (aspect.options & AspectOptionAutomaticRemoval) {
aspectsToRemove = [aspectsToRemove?:@[] arrayByAddingObject:aspect];
}
}
-
(BOOL)invokeWithInfo:(id)info { NSInvocation *blockInvocation = [NSInvocation invocationWithMethodSignature:self.blockSignature]; NSInvocation *originalInvocation = info.originalInvocation; NSUInteger numberOfArguments = self.blockSignature.numberOfArguments;
// Be extra paranoid. We already check that on hook registration. if (numberOfArguments > originalInvocation.methodSignature.numberOfArguments) { AspectLogError(@"Block has too many arguments. Not calling %@", info); return NO; }
// The
selfof the block will be the AspectInfo. Optional. if (numberOfArguments > 1) { [blockInvocation setArgument:&info atIndex:1]; }void *argBuf = NULL; //把originalInvocation中的参数 for (NSUInteger idx = 2; idx < numberOfArguments; idx++) { const char *type = [originalInvocation.methodSignature getArgumentTypeAtIndex:idx]; NSUInteger argSize; NSGetSizeAndAlignment(type, &argSize, NULL);
  if (!(argBuf = reallocf(argBuf, argSize))) {
      AspectLogError(@"Failed to allocate memory for block invocation.");
      return NO;
  }

  [originalInvocation getArgument:argBuf atIndex:idx];
  [blockInvocation setArgument:argBuf atIndex:idx];
}
[blockInvocation invokeWithTarget:self.block];
if (argBuf != NULL) { free(argBuf); } return YES; } 获取数据传递到aspect_invoke里面,调用invokeWithInfo,执行切面代码块,执行完代码块以后,获取到新创建的类,判断是否可以响应aspects__xxxx方法,现在aspects__xxxx方法指向的是原来方法实现的IMP,如果可以响应,就通过[invocation invoke];调用这个方法,如果不能响应就调用__aspects_forwardInvocation:这个方法,这个方法在hookClass的时候提到了,它的IMP指针指向了原来类中的forwardInvocation:实现,可以响应就去执行,不能响应就抛出异常doesNotRecognizeSelector; 整个流程差不多就这些,最后还有一个移除的操作
四:移除Aspects
-
(BOOL)remove { return aspect_remove(self, NULL); } static BOOL aspect_remove(AspectIdentifier *aspect, NSError **error) { NSCAssert([aspect isKindOfClass:AspectIdentifier.class], @"Must have correct type.");
__block BOOL success = NO; aspect_performLocked(^{ id self = aspect.object; // strongify if (self) { AspectsContainer *aspectContainer = aspect_getContainerForObject(self, aspect.selector); success = [aspectContainer removeAspect:aspect];
      aspect_cleanupHookedClassAndSelector(self, aspect.selector);
      // destroy token
      aspect.object = nil;
      aspect.block = nil;
      aspect.selector = NULL;
  }else {
      NSString *errrorDesc = [NSString stringWithFormat:@"Unable to deregister hook. Object already deallocated: %@", aspect];
      AspectError(AspectErrorRemoveObjectAlreadyDeallocated, errrorDesc);
  }
}); return success; } 调用remove方法,然后清空AspectsContainer里面的数据,调用aspect_cleanupHookedClassAndSelector清除更多的数据
// Will undo the runtime changes made. static void aspect_cleanupHookedClassAndSelector(NSObject *self, SEL selector) { NSCParameterAssert(self); NSCParameterAssert(selector);
Class klass = object_getClass(self);
BOOL isMetaClass = class_isMetaClass(klass);
if (isMetaClass) {
    klass = (Class)self;
}

// Check if the method is marked as forwarded and undo that.
Method targetMethod = class_getInstanceMethod(klass, selector);
IMP targetMethodIMP = method_getImplementation(targetMethod);
//判断selector是不是指向了_objc_msgForward
if (aspect_isMsgForwardIMP(targetMethodIMP)) {
    // Restore the original method implementation.
    //获取到方法编码
    const char *typeEncoding = method_getTypeEncoding(targetMethod);
    //拼接selector
    SEL aliasSelector = aspect_aliasForSelector(selector);
    Method originalMethod = class_getInstanceMethod(klass, aliasSelector);
    //获取新添加类中aspects__xxxx方法的IMP
    IMP originalIMP = method_getImplementation(originalMethod);
    NSCAssert(originalMethod, @"Original implementation for %@ not found %@ on %@", NSStringFromSelector(selector), NSStringFromSelector(aliasSelector), klass);
    //把aspects__xxxx方法的IMP指回元类类的方法
    class_replaceMethod(klass, selector, originalIMP, typeEncoding);
    AspectLog(@"Aspects: Removed hook for -[%@ %@].", klass, NSStringFromSelector(selector));
}

// Deregister global tracked selector
aspect_deregisterTrackedSelector(self, selector);

// Get the aspect container and check if there are any hooks remaining. Clean up if there are not.
AspectsContainer *container = aspect_getContainerForObject(self, selector);
if (!container.hasAspects) {
    // Destroy the container
    aspect_destroyContainerForObject(self, selector);

    // Figure out how the class was modified to undo the changes.
    NSString *className = NSStringFromClass(klass);
    if ([className hasSuffix:AspectsSubclassSuffix]) {
        Class originalClass = NSClassFromString([className stringByReplacingOccurrencesOfString:AspectsSubclassSuffix withString:@""]);
        NSCAssert(originalClass != nil, @"Original class must exist");
        object_setClass(self, originalClass);
        AspectLog(@"Aspects: %@ has been restored.", NSStringFromClass(originalClass));

        // We can only dispose the class pair if we can ensure that no instances exist using our subclass.
        // Since we don't globally track this, we can't ensure this - but there's also not much overhead in keeping it around.
        //objc_disposeClassPair(object.class);
    }else {
        // Class is most likely swizzled in place. Undo that.
        if (isMetaClass) {
            aspect_undoSwizzleClassInPlace((Class)self);
        }
    }
}
} 上述代码主要做以下几件事:
- 获取原来类的方法的IMP是不是指向了_objc_msgForward,如果是就把该方法的IMP再指回去
- 如果是元类就删除swizzledClasses里面的数据
- 把新建类的isa指针指向原来类, 其实就是把hook的时候做的处理,又还原了
Hexo 是一个快速、简洁且高效的博客框架。Hexo 使用 Markdown(或其他渲染引擎)解析文章,在几秒内,即可利用靓丽的主题生成静态网页。
官方文档:https://hexo.io/zh-cn/docs/ 1.安装Hexo 安装 Hexo 相当简单。然而在安装前,您必须检查电脑中是否已安装下列应用程序:
Node.js Git 如果您的电脑中已经安装上述必备程序,那么恭喜您!接下来只需要使用 npm 即可完成 Hexo 的安装。 终端输入:(一定要加上sudo,否则会因为权限问题报错)
$ sudo npm install -g hexo-cli
终端输入:查看安装的版本,检查是否已安装成功!
$ hexo -v // 显示 Hexo 版本
2.建站 安装 Hexo 完成后,请执行下列命令,Hexo 将会在指定文件夹中新建所需要的文件。
// 新建空文件夹
$ cd /Users/renbo/Workspaces/BlogProject
// 初始化
$ hexo init
$ npm install
新建完成后,指定文件夹的目录如下:
目录结构图
_config.yml:网站的 配置 信息,您可以在此配置大部分的参数。 scaffolds:模版 文件夹。当您新建文章(即新建markdown文件)时,Hexo 会根据 scaffold 来建立文件。 source:资源文件夹是存放用户资源(即markdown文件)的地方。 themes:主题 文件夹。Hexo 会根据主题来生成静态页面。
3.新建博客文章 新建一篇文章(即新建markdown文件)指令:
$ hexo new "文章标题"
4.生成静态文件 将文章markdown文件按指定格式生成静态网页文件
$ hexo g // g 表示 generate ,是简写
5.部署网站 即将生成的网页文件上传到网站服务器(这里是上传到Github)。
上传之前可以先启动本地服务器(指令:hexo s ),在本地预览生成的网站。
默认本地预览网址:http://localhost:4000/
$ hexo s // s 表示 server,是简写
部署网站指令:
$ hexo d // d 表示 deploy,是简写
注意,如果报错: ERROR Deployer not found: git
需要我们再安装一个插件:
$ sudo npm install hexo-deployer-git --save
安装完插件之后再执行一下【hexo d】,它就会开始将public文件夹下的文件全部上传到你的gitHub仓库中。
6.清除文件 清除缓存文件 (db.json) 和已生成的静态文件 (public目录下的所有文件)。
清除指令:(一般是更改不生效时使用)
$ hexo clean
用dpkg命令制作deb包方法总结
如何制作Deb包和相应的软件仓库,其实这个很简单。这里推荐使用dpkg来进行deb包的创建、编辑和制作。

首先了解一下deb包的文件结构:

deb 软件包里面的结构:它具有DEBIAN和软件具体安装目录(如etc, usr, opt, tmp等)。在DEBIAN目录中起码具有control文件,其次还可能具有postinst(postinstallation)、postrm(postremove)、preinst(preinstallation)、prerm(preremove)、copyright (版权)、changlog (修订记录)和conffiles等。

control: 这个文件主要描述软件包的名称(Package),版本(Version)以及描述(Description)等,是deb包必须具备的描述性文件,以便于软件的安装管理和索引。同时为了能将软件包进行充分的管理,可能还具有以下字段:

Section: 这个字段申明软件的类别,常见的有`utils’, `net’, `mail’, `text’, `x11′ 等;

Priority: 这个字段申明软件对于系统的重要程度,如`required’, `standard’, `optional’, `extra’ 等;

Essential: 这个字段申明是否是系统最基本的软件包(选项为yes/no),如果是的话,这就表明该软件是维持系统稳定和正常运行的软件包,不允许任何形式的卸载(除非进行强制性的卸载)

Architecture:申明软件包结构,如基于`i386′, ‘amd64’,`m68k’, `sparc’, `alpha’, `powerpc’ 等;

Source: 软件包的源代码名称;

Depends: 软件所依赖的其他软件包和库文件。如果是依赖多个软件包和库文件,彼此之间采用逗号隔开;

Pre-Depends: 软件安装前必须安装、配置依赖性的软件包和库文件,它常常用于必须的预运行脚本需求;

Recommends: 这个字段表明推荐的安装的其他软件包和库文件;

Suggests: 建议安装的其他软件包和库文件。


对于control,这里有一个完整的例子:

Package: bioinfoserv-arb
Version: 2007_14_08
Section: BioInfoServ
Priority: optional
Depends: bioinfoserv-base-directories (>= 1.0-1), xviewg (>= 3.2p1.4), xfig (>= 1:3), libstdc++2.10-glibc2.2
Suggests: fig2ps
Architecture: i386
Installed-Size: 26104
Maintainer: Mingwei Liu <>
Provides: bioinfoserv-arb
Description: The ARB software is a graphically oriented package comprising various tools for sequence database handling and data analysis.
If you want to print your graphs you probably need to install the suggested fig2ps package.preinst: 这个文件是软件安装前所要进行的工作,工作执行会依据其中脚本进行;
postinst这个文件包含了软件在进行正常目录文件拷贝到系统后,所需要执行的配置工作。
prerm :软件卸载前需要执行的脚本
postrm: 软件卸载后需要执行的脚本现在来看看如何修订一个已有的deb包软件

=================================================================
debian制作DEB包(在root权限下),打包位置随意。
#建立要打包软件文件夹,如
mkdir Cydia
cd   Cydia

#依据程序的安装路径建立文件夹,并将相应程序添加到文件夹。如
mkdir Applications
mkdir var/mobile/Documents (游戏类需要这个目录,其他也有可能需要)
mkdir *** (要依据程序要求来添加)

#建立DEBIAN文件夹
mkdir DEBIAN


#在DEBIAN目录下创建一个control文件,并加入相关内容。
touch DEBIAN/control(也可以直接使用vi DEBIAN/control编辑保存)
#编辑control
vi DEBIAN/control

#相关内容(注意结尾必须空一行):
Package: soft (程序名称)
Version: 1.0.1 (版本)
Section: utils (程序类别)
Architecture: iphoneos-arm   (程序格式)
Installed-Size: 512   (大小)
Maintainer: your <[email protected]>   (打包人和联系方式)
Description: soft package (程序说明)
                                       (此处必须空一行再结束)
注:此文件也可以先在电脑上编辑(使用文本编辑就可以,完成后去掉.txt),再传到打包目录里。

#在DEBIAN里还可以根据需要设置脚本文件
preinst
在Deb包文件解包之前,将会运行该脚本。许多“preinst”脚本的任务是停止作用于待升级软件包的服务,直到软件包安装或升级完成。

postinst
该脚本的主要任务是完成安装包时的配置工作。许多“postinst”脚本负责执行有关命令为新安装或升级的软件重启服务。

prerm
该脚本负责停止与软件包相关联的daemon服务。它在删除软件包关联文件之前执行。

postrm
该脚本负责修改软件包链接或文件关联,或删除由它创建的文件。

#postinst 如:
#!/bin/sh
if [ "$1" = "configure" ]; then
/Applications/MobileLog.app/MobileLog -install
/bin/launchctl load -wF /System/Library/LaunchDaemons/com.iXtension.MobileLogDaemon.plist
fi

#prerm 如:
#!/bin/sh
if [[ $1 == remove ]]; then
/Applications/MobileLog.app/MobileLog -uninstall
/bin/launchctl unload -wF /System/Library/LaunchDaemons/com.iXtension.MobileLogDaemon.plist
fi

#如果DEBIAN目录中含有postinst 、prerm等执行文件
chmod -R 755 DEBIAN

#退出打包软件文件夹,生成DEB
dpkg-deb --build Cydia
=====================================================================
有时候安装自己打包的deb包时报如下错误:
Selecting previously deselected package initrd-deb.
(Reading database ... 71153 files and directories currently installed.)
Unpacking initrd-deb (from initrd-vstools_1.0_amd64.deb) ...
dpkg: error processing initrd-vstools_1.0_amd64.deb (--install):
trying to overwrite `/boot/initrd-vstools.img', which is also in package initrd-deb-2
dpkg-deb: subprocess paste killed by signal (Broken pipe)
Errors were encountered while processing:
initrd-vstools_1.0_amd64.deb
主要意思是说,已经有一个deb已经安装了相同的文件,所以默认退出安装,只要把原来安装的文件给卸载掉,再次进行安装就可以了。

下面为实践内容:

所有的目录以及文件:

mydeb

|----DEBIAN

       |-------control
               |-------postinst

       |-------postrm

|----boot

       |----- initrd-vstools.img

在任意目录下创建如上所示的目录以及文件
# mkdir   -p /root/mydeb                          # 在该目录下存放生成deb包的文件以及目录
# mkdir -p /root/mydeb/DEBIAN           #目录名必须大写
# mkdir -p /root/mydeb/boot                   # 将文件安装到/boot目录下
# touch /root/mydeb/DEBIAN/control    # 必须要有该文件
# touch /root/mydeb/DEBIAN/postinst # 软件安装完后,执行该Shell脚本
# touch /root/mydeb/DEBIAN/postrm    # 软件卸载后,执行该Shell脚本
# touch /root/mydeb/boot/initrd-vstools.img    # 所谓的“软件”程序,这里就只是一个空文件


control文件内容:
Package: my-deb   (软件名称,中间不能有空格)
Version: 1                  (软件版本)
Section: utils            (软件类别)
Priority: optional        (软件对于系统的重要程度)
Architecture: amd64   (软件所支持的平台架构)
Maintainer: xxxxxx <> (打包人和联系方式)
Description: my first deb (对软件所的描述)

postinst文件内容( 软件安装完后,执行该Shell脚本,一般用来配置软件执行环境,必须以“#!/bin/sh”为首行,然后给该脚本赋予可执行权限:chmod +x postinst):
#!/bin/sh
echo "my deb" > /root/mydeb.log

postrm文件内容( 软件卸载后,执行该Shell脚本,一般作为清理收尾工作,必须以“#!/bin/sh”为首行,然后给该脚本赋予可执行权限:chmod +x postrm):
#!/bin/sh
rm -rf /root/mydeb.log

给mydeb目录打包:
# dpkg -b   mydeb   mydeb-1.deb      # 第一个参数为将要打包的目录名,
                                                            # 第二个参数为生成包的名称。

安装deb包:
# dpkg -i   mydeb-1.deb      # 将initrd-vstools.img复制到/boot目录下后,执行postinst,
                                            # postinst脚本在/root目录下生成一个含有"my deb"字符的mydeb.log文件

卸载deb包:
# dpkg -r   my-deb      # 这里要卸载的包名为control文件Package字段所定义的 my-deb 。
                                    # 将/boot目录下initrd-vstools.img删除后,执行posrm,
                                    # postrm脚本将/root目录下的mydeb.log文件删除

查看deb包是否安装:
# dpkg -s   my-deb      # 这里要卸载的包名为control文件Package字段所定义的 my-deb

查看deb包文件内容:
# dpkg   -c   mydeb-1.deb

查看当前目录某个deb包的信息:
# dpkg --info mydeb-1.deb

解压deb包中所要安装的文件
# dpkg -x   mydeb-1.deb   mydeb-1    # 第一个参数为所要解压的deb包,这里为 mydeb-1.deb
                                                             # 第二个参数为将deb包解压到指定的目录,这里为 mydeb-1

解压deb包中DEBIAN目录下的文件(至少包含control文件)
# dpkg -e   mydeb-1.deb   mydeb-1/DEBIAN    # 第一个参数为所要解压的deb包,
                                                                           # 这里为 mydeb-1.deb
                                                                          # 第二个参数为将deb包解压到指定的目录,
                                                                           # 这里为 mydeb-1/DEBIAN
https://www.macports.org/install.php
sudo port -f install dpkg
1、准备工作:
    mkdir -p extract/DEBIAN
    mkdir build

2、解包命令为:
    #解压出包中的文件到extract目录下
    dpkg -X ../openssh-xxx.deb extract/
    #解压出包的控制信息extract/DEBIAN/下:
    dpkg -e ../openssh-xxx.deb extract/DEBIAN/
3、修改文件:
    sed -i 's/PermitRootLogin yes/PermitRootLogin no/g' extract/etc/ssh/sshd_config
4、对修改后的内容重新进行打包生成deb包
    dpkg-deb -b extract/ build/
fishhook is a very simple library that enables dynamically rebinding symbols in Mach-O binaries running on iOS in the simulator and on device. This provides functionality that is similar to using DYLD_INTERPOSE on OS X. At Facebook, we've found it useful as a way to hook calls in libSystem for debugging/tracing purposes (for example, auditing for double-close issues with file descriptors).
Once you add fishhook.h/fishhook.c to your project, you can rebind symbols as follows:
#import <dlfcn.h>

#import <UIKit/UIKit.h>

#import "AppDelegate.h"
#import "fishhook.h"

static int (*orig_close)(int);
static int (*orig_open)(const char *, int, ...);

int my_close(int fd) {
  printf("Calling real close(%d)\n", fd);
  return orig_close(fd);
}

int my_open(const char *path, int oflag, ...) {
  va_list ap = {0};
  mode_t mode = 0;

  if ((oflag & O_CREAT) != 0) {
    // mode only applies to O_CREAT
    va_start(ap, oflag);
    mode = va_arg(ap, int);
    va_end(ap);
    printf("Calling real open('%s', %d, %d)\n", path, oflag, mode);
    return orig_open(path, oflag, mode);
  } else {
    printf("Calling real open('%s', %d)\n", path, oflag);
    return orig_open(path, oflag, mode);
  }
}

int main(int argc, char * argv[])
{
  @autoreleasepool {
    rebind_symbols((struct rebinding[2]){{"close", my_close, (void *)&orig_close}, {"open", my_open, (void *)&orig_open}}, 2);

    // Open our own binary and print out first 4 bytes (which is the same
    // for all Mach-O binaries on a given architecture)
    int fd = open(argv[0], O_RDONLY);
    uint32_t magic_number = 0;
    read(fd, &magic_number, 4);
    printf("Mach-O Magic Number: %x \n", magic_number);
    close(fd);

    return UIApplicationMain(argc, argv, nil, NSStringFromClass([AppDelegate class]));
  }
}Calling real open('/var/mobile/Applications/161DA598-5B83-41F5-8A44-675491AF6A2C/Test.app/Test', 0)
Mach-O Magic Number: feedface
Calling real close(3)
...
dyld binds lazy and non-lazy symbols by updating pointers in particular sections of the __DATA segment of a Mach-O binary. fishhook re-binds these symbols by determining the locations to update for each of the symbol names passed to rebind_symbols and then writing out the corresponding replacements.
For a given image, the __DATA segment may contain two sections that are relevant for dynamic symbol bindings: __nl_symbol_ptr and __la_symbol_ptr. __nl_symbol_ptr is an array of pointers to non-lazily bound data (these are bound at the time a library is loaded) and __la_symbol_ptr is an array of pointers to imported functions that is generally filled by a routine called dyld_stub_binder during the first call to that symbol (it's also possible to tell dyld to bind these at launch). In order to find the name of the symbol that corresponds to a particular location in one of these sections, we have to jump through several layers of indirection. For the two relevant sections, the section headers (struct sections from <mach-o/loader.h>) provide an offset (in the reserved1 field) into what is known as the indirect symbol table. The indirect symbol table, which is located in the __LINKEDIT segment of the binary, is just an array of indexes into the symbol table (also in __LINKEDIT) whose order is identical to that of the pointers in the non-lazy and lazy symbol sections. So, given struct section nl_symbol_ptr, the corresponding index in the symbol table of the first address in that section is indirect_symbol_table[nl_symbol_ptr->reserved1]. The symbol table itself is an array of struct nlists (see <mach-o/nlist.h>), and each nlist contains an index into the string table in __LINKEDIT which where the actual symbol names are stored. So, for each pointer __nl_symbol_ptr and __la_symbol_ptr, we are able to find the corresponding symbol and then the corresponding string to compare against the requested symbol names, and if there is a match, we replace the pointer in the section with the replacement.
The process of looking up the name of a given entry in the lazy or non-lazy pointer tables looks like this:

源码地址:https://github.com/gdbinit/MachOView
Mach-O格式全称为Mach Object文件格式的缩写,是mac上可执行文件的格式,类似于windows上的PE格式 (Portable Executable ), linux上的elf格式 (Executable and Linking Format)。
mach-o文件类型分为:
1、Executable:应用的主要二进制

2、Dylib Library:动态链接库(又称DSO或DLL)

3、Static Library:静态链接库

4、Bundle:不能被链接的Dylib,只能在运行时使用dlopen( )加载,可当做macOS的插件

5、Relocatable Object File :可重定向文件类型
简单来说,就是一个由不同的编译架构后的Mach-O产物所合成的集合体。一个架构的mach-O只能在相同架构的机器或者模拟器上用,为了支持不同架构需要一个集合体。
一、使用方式 1、MachOView工具概述
MachOView工具可Mac平台中可查看MachO文件格式信息,IOS系统中可执行程序属于Mach-O文件格式,有必要介绍如何利用工具快速查看Mach-O文件格式。
点击“MachOView”之后,便在Mac系统左上角出现MachOView工具的操作菜单
将“MachOView”拖到Application文件夹,就可以像其他程序一样启动了
下面介绍MachOView文件功能使用。
2、加载Mach-O文件 点击MachOView工具的主菜单“File”中的“Open”选项便可加载IOS平台可执行文件,对应功能接入如下所示:
例如加载文件名为“libLDCPCircle.a”的静态库文件,
3、文件头信息 MachOView工具成功加载Mach-O文件之后,每个.o文件对应一个类编译后的文件
在左边窗口点击“Mach Header”选项,可以看到每个类的cpu架构信息、load commands数量 、load commandssize 、file type等信息。
4、查看Fat文件 我们打开一个Fat文件可以看到:
可以看到,fat文件只是对各种架构文件的组装,点开 “Fat Header”可以看到支持的架构,显示的支持ARM_V7 、ARM_V7S 、ARM_64 、i386 、 X86_64。
点开每一个Static Library 可以看到,和每一个单独的Static Library的信息一样。
命令:
lipo LoginSDK.a -thin armv7 -output arm/LoginSDK.a  将fat文件拆分得到armv7类型

lipo  -create    ibSyncSDKA.i386.a    libSyncSDK.arm7.a  -output  libSyncSDK.a  合成一个i386和armV7架构的fat文件
这个工具是通过命令行工具访问苹果手机,执行命令行脚本。在Cydia中搜索openssh,安装。具体用法如下: 1、打开mac下的terminal,输入命令ssh [email protected](越狱设备ip地址) 2、接下来会提示输入超级管理员账号密码,默认是alpine 3、回车确认,即可root登录设备 你也可以将你mac的公钥导入设备的/var/root/.ssh/authorized_keys文件,这样就可以免密登录root了。

Cycript是大神saurik开发的一个非常强大的工具,可以让开发者在命令行下和应用交互,在运行时查看和修改应用。它可以帮助你HOOK一个App。Cycript最为贴心和实用的功能是它可以帮助我们轻松测试函数效果,整个过程安全无副作用,效果十分显著,实乃业界良心! 安装方式:在Cydia中搜索Cycript安装 使用方法: 1、root登录越狱设备 2、cycript-p 你想要测试的进程名 3、随便玩,完全兼容OC语法比如cy# [#0x235b4fb1 hidden] Cycript有几条非常有用的命令: choose:如果知道一个类对象存在于当前的进程中,却不知道它的地址,不能通过“#”操作符来获取它,此时可以使用choose命令获取到该类的所有对象的内存地址 打印一个对象的所有属性 [obj _ivarDescription].toString() 打印一个对象的所有方法[obj _methodDescription].toString() 动态添加属性 objc_setAssociatedObject(obj,@”isAdd”, [NSNumbernumberWithBool:YES], 0); 获取动态添加的属性 objc_getAssociatedObject(self, @”isAdd”)
Reveal是由ITTY BITTY出品的UI分析工具,可以直观地查看App的UI布局,我们可以用来研究别人的App界面是怎么做的,有哪些元素。更重要的是,可以直接找到你要HOOK的那个ViewController,贼方便不用瞎猫抓耗子一样到处去找是哪个ViewController了。 安装方法: 1、下载安装Mac版的Reveal 2、iOS安装Reveal Loader,在Cydia中搜索并安装Reveal Loader 在安装Reveal Loader的时候,它会自动从Reveal的官网下载一个必须的文件libReveal.dylib。如果网络状况不太好,不一定能够成功下载这个dylib文件,所以在下载完Reveal Loader后,检查iOS上的“/Library/RHRevealLoader/”目录下有没有一个名为“libReveal.dylib”的文件。如果没有就打开mac Reveal,在它标题栏的“Help”选项下,选中其中的“Show Reveal Library in Finder”,找到libReveal.dylib文件,使用scp拷贝到 iOS的/Library/RHRevealLoader/目录下。至此Reveal安装完毕!
Dumpdecrypted就是著名的砸壳工具,所谓砸壳,就是对 ipa 文件进行解密。因为在上传到 AppStore 之后,AppStore自动给所有的 ipa 进行了加密处理。而对于加密后的文件,直接使用 class-dump 是得不到什么东西的,或者是空文件,或者是一堆加密后的方法/类名。 使用步骤如下: 1、设备中打开需要砸壳的APP。 2、SSH连接到手机,找到ipa包的位置并记录下来。 3、Cycript到该ipa的进程,找到App的Documents文件夹位置并记录下来。 4、拷贝dumpdecrypted.dylib到App的Documents 的目录。 5、执行砸壳后,并拷贝出砸壳后的二进制文件。 具体执行命令: 1、ssh [email protected] (iP地址为越狱设备的iP地址) 2、 ps -e (查看进程,把进程对应的二进制文件地址记下来) 3、cycript -p 进程名 4、 [[NSFileManager defaultManager] URLsForDirectory:NSDocumentDirectory inDomains:NSUserDomainMask][0] (找到程序的documents目录) 5、scp ~/dumpdecrypted.dylib [email protected]:/var/mobile/Containers/Data/Application/XXXXXX/Documents 6、DYLD_INSERT_LIBRARIES=dumpdecrypted.dylib /var/mobile/Containers/Bundle/ Application/XXXXXX/xxx.app/xxx 然后就会生成.decrypted的文件,这个就是砸壳后的文件。接下来各种工具都随便上了class-dump、IDA、Hopper Disassembler
dump demo
$ class-dump -H /Users/xlsn0w/Desktop/Payload/JYLIM.app -o /Users/xlsn0w/Desktop/Header
class-dump就是用来dump二进制运行文件里面的class信息的工具。它利用Objective-C语言的runtime特性,将存储在Mach-O文件中的头文件信息提取出来,并生成对应的.h文件,这个工具非常有用,有了这个工具我们就像四维世界里面看三维物体,一切架构尽收眼底。 class-dump用法: class-dump –arch armv7 -s -S -H 二进制文件路径 -o 头文件保存路径
IDA是大名鼎鼎的反编译工具,它乃逆向工程中最负盛名的神器之一。支持Windows、Linux和Mac OS X的多平台反汇编器/调试器,它的功能非常强大。class-dump可以帮我们罗列出要分析的头文件,IDA能够深入各个函数的具体实现,无论的C,C++,OC的函数都可以反编译出来。不过反编译出来的是汇编代码,你需要有一定的汇编基础才能读的懂。 IDA很吃机器性能(我的机器经常卡住不动),还有另外一个反编译工具Hopper,对机器性能要求没那么高,也很好用,杀人越货的利器。

LLDB是由苹果出品,内置于Xcode中的动态调试工具,可以调试C、C++、Objective-C,还全盘支持OSX、iOS,以及iOS模拟器。LLDB要配合debugserver来使用。常见的LLDB命令有: p命令:首先p是打印非对象的值。如果使用它打印对象的话,那么它会打印出对象的地址,如果打印非对象它一般会打印出基本变量类型的值。当然用它也可以申明一个变量譬如 p int a=10;(注lldb使用a = 10; (注lldb使用在变量前来声明为lldb内的命名空间的) po 命令:po 命令是我们最常用的命令因为在ios开发中,我们时刻面临着对象,所以我们在绝大部分时候都会使用po。首先po这个命令会打印出对象的description描述。 bt [all] 打印调用堆栈,是thread backtrace的简写,加all可打印所有thread的堆栈。
正向开发与逆向都经常会用到LLDB调试,而熟悉LLDB调试对正向、逆向开发都有很大的帮助,尤其是动态调试三方App,此笔记主要记录一些常用的调试命令
二、常用的LLDB调试命令
命令 效果
breakpoint set -n 某函数名	给某函数下断点
breakpoint set -n "[类名 SEL]" -n "[类名 SEL]" ...	给多个方法下断点,形成断点组
breakpoint list	查看当前断点列表
breakpoint disable(enable) 组号(编号)	禁用(启用)某一组(某一个)断点
breakpoint delete 编号	禁用某一个断点
breakpoint delete 组号	删除某一组断点
breakpoint delete	删除所有断点
breakpoint set --selectore 方法名	全局方法断点,工程所有该方法都会下断点
brepoint set --file 文件名.m --selector 方法名	给.m实现文件某个方法下断点
breakpoint set -r 字符串	遍历整个工程,含该字串的方法、函数都会下断点
breakpoint command add 标号	某标号断点过后执行相应命令,以Done结束,类似于Xcode界面Edit breakpoint
breakpoint command list 标号	列出断点过后执行的命令
breakpoint command delete	删除断点过后执行的命令
b 内存地址	对内存地址下断点
命令 效果
p 语句	动态执行语句(expression的缩写),内存操作(下同)
expression 语句	同上,可缩写成exp
po 语句	print object 常用于查看对象信息
c	程序继续执行
process interrput	暂停程序
image list	列出所有加载的模块 缩写im li
image list -o -f 模块名	只列出输入模块名信息,常用于主模块
bt	查看当前调用栈
up	查看上一个调用函数
down	查看下一个调用函数
frame variable	查看函数参数
frame select 标号	查看指定调用函数
dis -a $pc	反汇编指定地址,此处为pc寄存器对应地址
thread info	输出当前线程信息
b trace -c xxx	满足某个条件后中断
target stop-hook add -o "frame variable"	断点进入后默认做的操作,这里是打印参数
help 指令	查看指令信息
命令 效果
n	将子函数整体一步执行,源码级别
s	跳进子函数一步一步执行,源码级别
ni	跳到下一条指令,汇编级别
si	跳到当前指令内部,汇编级别
finish	返回上层调用栈
thread return	不再执行往下代码,直接从当前调用栈返回一个值
register read	读取所有寄存器值
register read $x0	读取x0寄存器值
register write $x1 10	修改x1寄存器的值为10
p/x	以十六进制形式读取值,读取的对象可以很多
watchpoint set variable p->_name	给属性添加内存断点,属性改变时会触发断点,可以看到属性的新旧值,类似KVO效果
watchpoint set expression 变量内存地址	效果同上
大部分命令可以缩写,这里列出部分几个,可以多尝试缩写,用多了就自然记住了:
breakpoint :br、b
list:li
delete:del
disable:dis
enable:ena
image lookup –name,简写为image lookup -n。 当我们想查找一个方法或者符号的信息,比如所在文件位置等。 image lookup –name,可以非常有效的定位由于导入某些第三方SDK或者静态库,出现了同名category方法(如果实现一样,此时问题不大。但是一旦两个行为不一致,会导致一些奇怪的bug)。顺便说下,如果某个类多个扩展,有相同方法的,app在启动的时候,会选择某个实现,一旦选择运行的过程中会一直都运行这个选择的实现。
(一)、使用Python脚本
两个开源库:
chisel :Facebook开源LLDB命令工具 LLDB:Derek Selander开源的工具
(二)、安装
LLDB默认会从~/.lldbinit(没有的话可以创建)加载自定义脚本,因此可以在里面添加一些脚本,先使用brew install chisel安装chisel,再分别git clone 两个开源工具代码,然后将以下命令写入.lldbinit文件,重启Xcode即生效(注意开源工具代码路径替换成自己的):
command script import /Users/kinken_yuen/chisel/fblldb.py
command script import /Users/kinken_yuen/LLDB/LLDB/lldb_commands/dslldb.py
(三)、一些常用命令用法
以下参数address均为对象内存地址
命令 效果
pviews	打印当前界面结构和View,如果出错,先导入UIKit
pvc	打印主窗口所有ViewController
methods address	打印类的所有方法以及对应的IMP地址
ivars address	打印类所有的成员变量
presponder address	打印控件的响应链
pactions address	打印控件的action
pblock address	打印block的信息,IMP地址、签名,参数为block地址
search UIButton	搜索当前界面下的所有UIButton类及其子类,其他控件同理
flicker address	快速显示和隐藏视图,以快速帮助可视化它的位置
dismiss <viewController>	dismiss一个正在显示的控制器
visualize address	预览UIImage,CGImageRef, UIView, CALayer, NSData (of an image), UIColor, CIColor, or CGColorRef类型的对象
fv classNameRegex	匹配给出的类名正则表达式,在当前界面结构View的继承层次上查找视图
fvc classNameRegex	匹配给出的类名正则表达式,在当前界面结构ViewController的继承层次上查找VC
show/hide address 、tv address	显示或隐藏某个view或者layer,无须继续程序执行,即时性。经测试,show的时候不用,hide的时候需要resuming
mask/unmask address	在某个view/layer上覆盖一层view,主要是定位目标视图、层的范围
border/unborder address	在某个view/layer上添加边框,查找目标的位置
caflush	强制核心动画刷新,将重新绘制UI,可能会打乱正在进行的动画
bmessage <expressign>	在类的方法或实例的方法上设置符号断点,不必担心层次结构中的哪个类实际实现了该方法,eg:bmessage -[0x1063e0290 continueButtonClicked]
wivar <object> <ivarName>	给某对象实例变量设置一个watchpoint
sbt	打印还原符号表的函数调用栈
1、找到对应的应用打包生成的appName.dYSM 文件,在终端中使用cd命令进入该目录
2、用atos命令来符号化某个特定的模块加载地址:
xcrun atos -o appName.app.dSYM/Contents/Resources/DWARF/appName -l 0x1000d0000 -arch arm64
输入完这个命令后如果没有报错,会进入到一个带输入状态,然后再输入另外的地址0x00352aee,按回车,之后便会得到应用代码中报错位置
