In this workshop we'll build a subgraph for querying NTF data from the Cryptocoven smart contract, implementing queries for fetching NFTs as well as their owners, building relationships between them, full text search, sorting, and filtering.
The codebase for this project is located here
To be successful in this tutorial, you should have Node.js installed on your machine. These days, I recommend using either nvm or fnm to manage Node.js versions.
To get started, open The Graph Hosted Service and either sign in or create a new account.
Next, go to the dashboard and click on Add Subgraph to create a new subgraph.
Configure your subgraph with the following properties:
- Subgraph Name - Cryptocovenapi
- Subtitle - A subgraph for querying Cryptocoven NFTs
- Optional - Fill the description and GITHUB URL properties
Once the subgraph is created, we will initialize the subgraph locally using the Graph CLI.
Next, install the Graph CLI:
$ npm install -g @graphprotocol/graph-cli

# or

$ yarn global add @graphprotocol/graph-cli
Once the Graph CLI has been installed you can initialize a new subgraph with the Graph CLI init command.
There are two ways to initialize a new subgraph:
1 - From an example subgraph
$ graph init --from-example <GITHUB_USERNAME>/<SUBGRAPH_NAME> [<DIRECTORY>]2 - From an existing smart contract
If you already have a smart contract deployed to Ethereum mainnet or one of the testnets, initializing a new subgraph from this contract is an easy way to get up and running.
$ graph init --from-contract <CONTRACT_ADDRESS> \
  [--network <ETHEREUM_NETWORK>] \
  [--abi <FILE>] \
  <GITHUB_USER>/<SUBGRAPH_NAME> [<DIRECTORY>]
In our case we'll be starting with the Cryptocoven NFT contract so we can initialize from that contract address by passing in the contract address using the --from-contract flag:
$ graph init --from-contract 0x5180db8F5c931aaE63c74266b211F580155ecac8 --protocol ethereum \
--network mainnet --contract-name Token --index-events

? Product for which to initialize › hosted-service
? Subgraph name › your-username/cryptocovenapi
? Directory to create the subgraph in › cryptocovenapi
? Ethereum network › Mainnet
? Contract address › 0x5180db8F5c931aaE63c74266b211F580155ecac8
? Contract Name · Token
This command will generate a basic subgraph based off of the contract address passed in as the argument to --from-contract. By using this contract address, the CLI will initialize a few things in your project to get you started (including fetching the abis and saving them in the abis directory).
By passing in
--index-eventsthe CLI will automatically populate some code for us both in schema.graphql as well as src/mapping.ts based on the events emitted from the contract.
The main configuration and definition for the subgraph lives in the subgraph.yaml file. The subgraph codebase consists of a few files:
- subgraph.yaml: a YAML file containing the subgraph manifest
- schema.graphql: a GraphQL schema that defines what data is stored for your subgraph, and how to query it via GraphQL
- AssemblyScript Mappings: AssemblyScript code that translates from the event data in Ethereum to the entities defined in your schema (e.g. mapping.ts in this tutorial)
The entries in subgraph.yaml that we will be working with are:
description(optional): a human-readable description of what the subgraph is. This description is displayed by the Graph Explorer when the subgraph is deployed to the Hosted Service.repository(optional): the URL of the repository where the subgraph manifest can be found. This is also displayed by the Graph Explorer.dataSources.source: the address of the smart contract the subgraph sources, and the abi of the smart contract to use. The address is optional; omitting it allows to index matching events from all contracts.dataSources.source.startBlock(optional): the number of the block that the data source starts indexing from. In most cases we suggest using the block in which the contract was created.dataSources.mapping.entities: the entities that the data source writes to the store. The schema for each entity is defined in the the schema.graphql file.dataSources.mapping.abis: one or more named ABI files for the source contract as well as any other smart contracts that you interact with from within the mappings.dataSources.mapping.eventHandlers: lists the smart contract events this subgraph reacts to and the handlers in the mapping — ./src/mapping.ts in the example — that transform these events into entities in the store.
With The Graph, you define entity types in schema.graphql, and Graph Node will generate top level fields for querying single instances and collections of that entity type. Each type that should be an entity is required to be annotated with an @entity directive.
The entities / data we will be indexing are the Token and User.
To populate the entities, we'll be fetching metadata from IPFS using the token ID to get information like the token name, image, and description.
For example, the base URI for cryptocoven is:
ipfs://QmSr3vdMuP2fSxWD7S26KzzBWcAN1eNhm4hk1qaR3x3vmj
Therefore, we can visit a URI like:
https://ipfs.io/ipfs/QmSr3vdMuP2fSxWD7S26KzzBWcAN1eNhm4hk1qaR3x3vmj/234.json
and see all of the metadata for the token.
Using this IPFS URI, we'll be able to call out to IPFS to retreive this data based on the token ID.
Update schema.graphql with the following code:
type Token @entity {
  id: ID!
  tokenID: BigInt!
  tokenURI: String!
  externalURL: String!
  ipfsURI: String!
  image: String!
  name: String!
  description: String!
  type: String!
  sun: String!
  moon: String!
  rising: String!
  updatedAtTimestamp: BigInt!
  owner: User!
}

type User @entity {
  id: ID!
  tokens: [Token!]! @derivedFrom(field: "owner")
}

type _Schema_
  @fulltext(
    name: "covenSearch"
    language: en
    algorithm: rank
    include: [{entity: "Token", fields:
      [{ name: "name" }, { name: "description" }, { name: "type" }, { name: "sun" }, { name: "moon" }, { name: "rising" }
    ] }]
)Reverse lookups can be defined on an entity through the @derivedFrom field. This creates a virtual field on the entity that may be queried but cannot be set manually through the mappings API. Rather, it is derived from the relationship defined on the other entity. For such relationships, it rarely makes sense to store both sides of the relationship, and both indexing and query performance will be better when only one side is stored and the other is derived.
For one-to-many relationships, the relationship should always be stored on the 'one' side, and the 'many' side should always be derived. Storing the relationship this way, rather than storing an array of entities on the 'many' side, will result in dramatically better performance for both indexing and querying the subgraph. In general, storing arrays of entities should be avoided as much as is practical.
Now that we have created the GraphQL schema for our app, we can generate the entities locally to start using in the mappings created by the CLI:
graph codegenIn order to make working smart contracts, events and entities easy and type-safe, the Graph CLI generates AssemblyScript types from a combination of the subgraph's GraphQL schema and the contract ABIs included in the data sources.
Now we can configure the subgraph.yaml to use the entities that we have just created and configure their mappings.
To do so, first update the dataSources.mapping.entities field with the User and Token entities:
entities:
  - Token
  - User
Next, update the dataSources.mapping.eventHandlers to include only the following three event handlers:
- event: Transfer(indexed address,indexed address,indexed uint256)
  handler: handleTransfer
Finally, update the configuration to add the startBlock:
source:
  address: "0x5180db8F5c931aaE63c74266b211F580155ecac8"
  abi: Token
startBlock: 13547115Next, open src/mappings.ts to write the mappings that we defined in our subgraph subgraph eventHandlers.
The hosted service supports an IPFS API that allows you to interact with data stored on the IPFS network.
This is especially useful for NFT metadata where you might have additional information about the NFT stored in JSON format which is the case with our API.
Update the file with the following code:
import { ipfs, json } from '@graphprotocol/graph-ts'
import {
  Transfer as TransferEvent,
  Token as TokenContract
} from '../generated/Token/Token'
import {
Token, User
} from '../generated/schema'

const ipfshash = "QmSr3vdMuP2fSxWD7S26KzzBWcAN1eNhm4hk1qaR3x3vmj"

export function handleTransfer(event: TransferEvent): void {
  /* load the token from the existing Graph Node */
  let token = Token.load(event.params.tokenId.toString())
  if (!token) {
    /* if the token does not yet exist, create it */
    token = new Token(event.params.tokenId.toString())
    token.tokenID = event.params.tokenId

    token.tokenURI = "/" + event.params.tokenId.toString() + ".json"

    /* combine the ipfs hash and the token ID to fetch the token metadata from IPFS */
    let metadata = ipfs.cat(ipfshash + token.tokenURI)
    if (metadata) {
      const value = json.fromBytes(metadata).toObject()
      if (value) {
        /* using the metatadata from IPFS, update the token object with the values  */
        const image = value.get('image')
        const name = value.get('name')
        const description = value.get('description')
        const externalURL = value.get('external_url')

        if (name && image && description && externalURL) {
          token.name = name.toString()
          token.image = image.toString()
          token.externalURL = externalURL.toString()
          token.description = description.toString()
          token.ipfsURI = 'ipfs.io/ipfs/' + ipfshash + token.tokenURI
        }

        const coven = value.get('coven')
        if (coven) {
          let covenData = coven.toObject()
          const type = covenData.get('type')
          if (type) {
            token.type = type.toString()
          }

          const birthChart = covenData.get('birthChart')
          if (birthChart) {
            const birthChartData = birthChart.toObject()
            const sun = birthChartData.get('sun')
            const moon = birthChartData.get('moon')
            const rising = birthChartData.get('rising')
            if (sun && moon && rising) {
              token.sun = sun.toString()
              token.moon = moon.toString()
              token.rising = rising.toString()
            }
          }
        }

      }
    }
  }
  token.updatedAtTimestamp = event.block.timestamp

  /* set or update the owner field and save the token to the Graph Node */
  token.owner = event.params.to.toHexString()
  token.save()

  /* if the user does not yet exist, create them */
  let user = User.load(event.params.to.toHexString())
  if (!user) {
    user = new User(event.params.to.toHexString())
    user.save()
  }
 }
These mappings will handle events for when a new token is created or transferred. When this event fires, the mappings will save the data into the subgraph.
Next, let's run a build to make sure that everything is configured properly. To do so, run the build command:
$ graph buildIf the build is successful, you should see a new build folder generated in your root directory.
To deploy, we can run the deploy command using the Graph CLI. To deploy, you will first need to copy the Access token for your account, available in The Graph dashboard:

Next, run the following command:
$ graph auth
✔ Product for which to initialize · hosted-service
✔ Deploy key · ********************************

$ yarn deploy
Once the subgraph is deployed, you should see it show up in your dashboard:

When you click on the subgraph, it should open the Graph explorer:
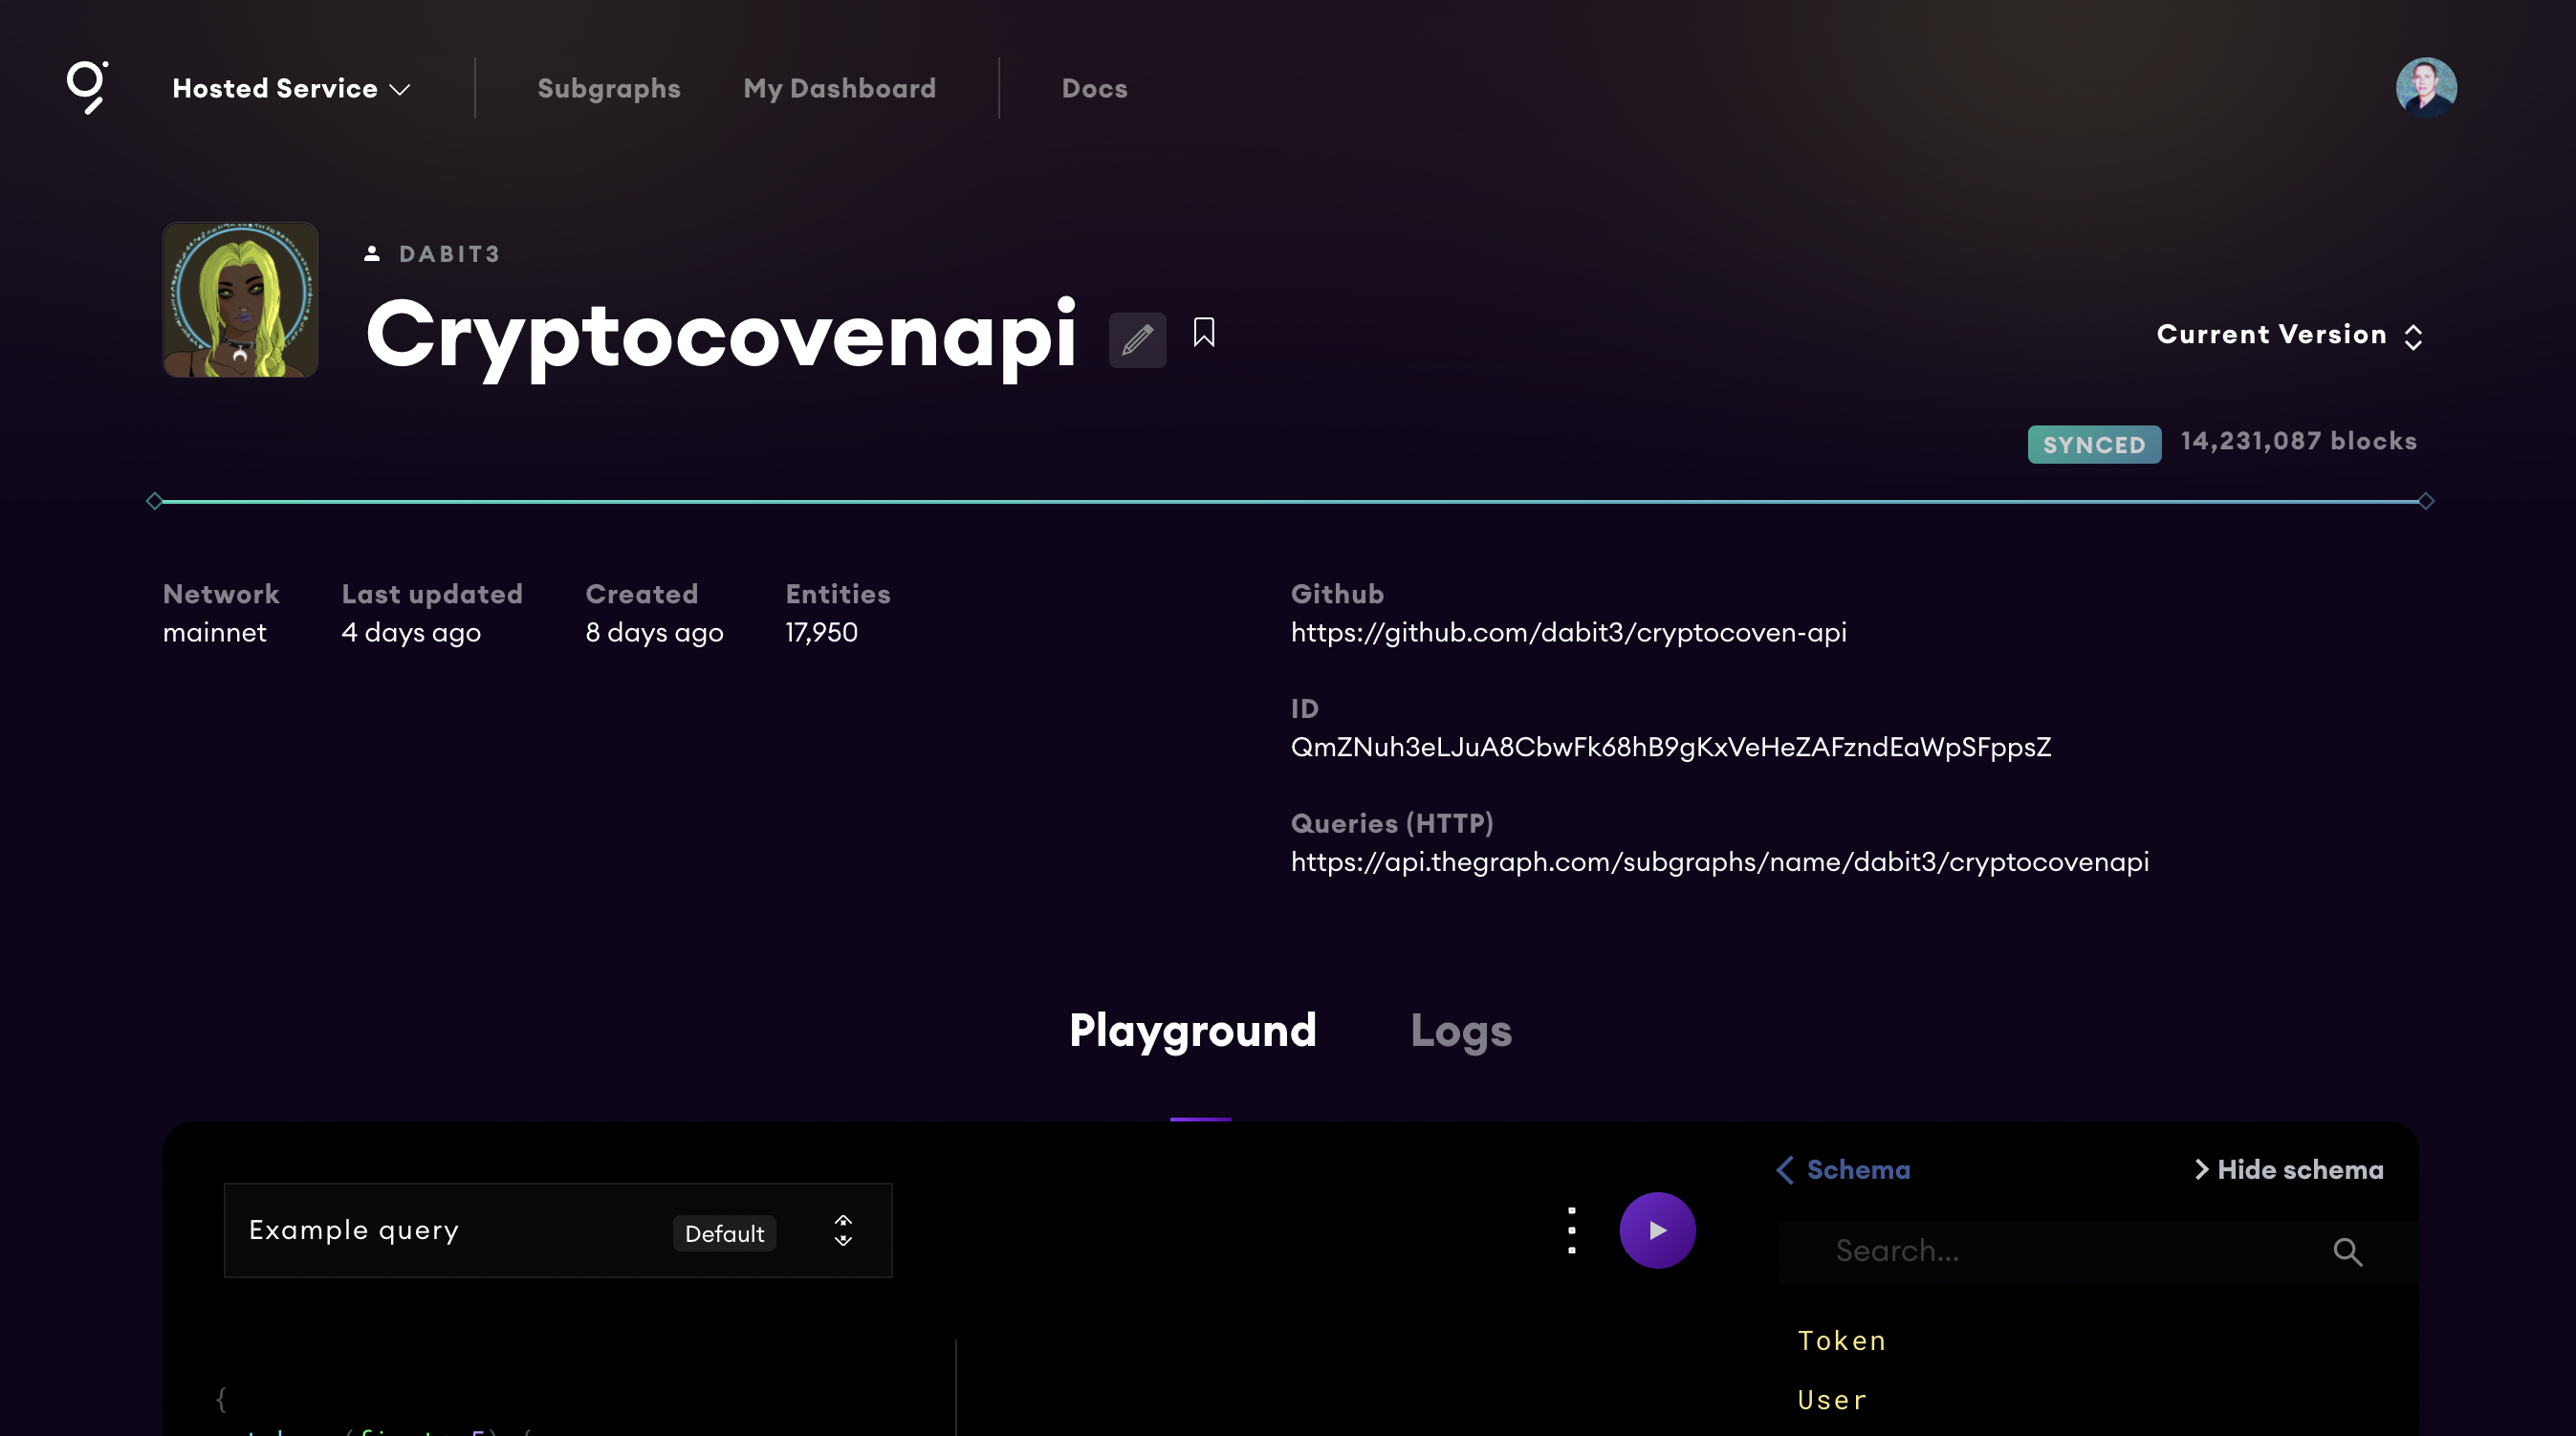
Now that we are in the dashboard, we should be able to start querying for data. Run the following query to get a list of tokens and their metadata:
{
  tokens(first: 5) {
    id
    tokenID
    tokenURI
    externalURL
    image
    name
    description
    type
    sun
    moon
    rising
    updatedAtTimestamp
    owner {
      id
    }
  }
}
We can also configure the order direction:
{
  tokens(
    first: 5
    orderDirection: desc
    orderBy: updatedAtTimestamp
  ) {
    id
    tokenID
    tokenURI
    externalURL
    image
    name
    description
    type
    sun
    moon
    rising
    updatedAtTimestamp
    owner {
      id
    }
  }
}
Or choose to skip forward a certain number of results to implement some basic pagination:
{
  tokens(
    skip: 100
    orderDirection: desc
    orderBy: updatedAtTimestamp
  ) {
    id
    tokenID
    tokenURI
    externalURL
    image
    name
    description
    type
    sun
    moon
    rising
    updatedAtTimestamp
    owner {
      id
    }
  }
}
Or query with filtering:
{
  tokens(
    where: {
      sun_contains: "capricorn"
    }
  ) {
    sun
    name
  }
}
And full text search
{
  covenSearch(
    text: "'CRUSH PEARLS IN YOUR FISTS'"
  ) {
    id
    name
    description
  }
}
The codebase for this project is located here
If you are interested in learning more about Web3, building Dapps, or building subgraphs, check out the following resources:
The Graph on Twitter - @graphprotocol
The Complete Guide to Full Stack Web3 Development
Ethereum Developer Documentation
Austin Griffith on Twitter @austingriffith & Scaffold Eth


