abellai / what-i-will-say Goto Github PK
View Code? Open in Web Editor NEWPersonal blog.
Personal blog.


Rails是一个很好的Web框架,在其官网就有一很长的篇幅去说明如何进行测试/单元测试(默认使用MiniTest)。
之前做了些Rails项目的开发,但由于项目的紧迫,只顾着完成功能的开发,而忽略单元测试。最近的项目里,还是觉得有必要把单元测试给加进来。自然地要去了解一下相关的东西了。同时,google了一轮,发现Ruby社区现在基本都推荐使用RSpec进行单元测试。所以,这里讲的东西就是关于自己目前对RSpec的认识。
这里的内容,主要是根据这几篇网上的资料(资料1, 资料2, 资料3)而来。
更新你项目里面的Gemfile:
# 在很多资料里,rspec-rails的版本是3.4.0。
# 但目前,由于其他一些更新导致使用这个版本会使得rask命令用不了。
# 所以,这里我用的是3.5.0的beta4版。
group :development, :test do
  gem 'rspec-rails', '~> 3.5.0.beta4'
end更新了Gemfile,毫无疑问,你要bundle install。同时,对于RSpec,你还多了一步:
rails generate rspec:install这时候,在你的项目里面,多了以下内容:
/...
/spec
  /rails_helper.rb
  /spec_helper.rb
/...
另外,以下这一步有些教程有讲到,有些没有。对于执行rspec来说,区别不大。但对于结合Spring,则是需要的。
bundle binstubs rspec-core执行完之后,你的/bin目录下,则多了一个rspec文件。
这个主要是提供fixtures,用于mock对象。更新Gemfile:
group :development, :test do
  gem 'factory_girl_rails'
end执行bundle install,并修改/spec/rails_helper.rb文件:
# 添加多这一句:
config.include FactoryGirl::Syntax::Methods
之后,修改Rails的config,让它的test framework指定到RSpec:
# /config/application.rb
config.generators do |g|
  g.test_framework :rspec, fixtures: true, view_specs: false, helper_specs: false, routing_specs: false, request_specs: false

  g.fixture_replacement :factory_girl, dir: 'spec/factories'
endDatabaseCleaner,一个自动清除数据库数据的工具,每次运行完测试用例它就会自动清除数据库。
更新Gemfile:
group :test do
  gem 'database_cleaner'
end再次修改/spec/rails_helper.rb:
# 原来下面这句是这样的:config.use_transactional_fixtures = true
# 现在改成false
config.use_transactional_fixtures = false

# 然后添加多以下内容
  config.before(:suite) do
    DatabaseCleaner.strategy = :transaction
    DatabaseCleaner.clean_with(:truncation)
  end
  config.around(:each) do |example|
    DatabaseCleaner.cleaning do
      example.run
    end
endOK,以上安装/配置了那么多。现在,让我们来写个例子跑跑吧。(注:这里,我根据资料里面的例子进行了些修改。)
这里,我们创建以后User model来作为例子:
rails g model User username email password执行完之后,你会发现,Rails已经帮我们创建了两个spec文件:/spec/factories/users.rb 和 /spec/models/user_spec.rb。(上面提到的资料里面,基本都是自己先创建这两个文件的。但最后你发现,创建controller或者model的时候,同时在你配置好Rails和RSpec的关系之后,Rails就会自动帮我们创建了。这样,我们不用在再来创建model的时候Rails提示我们是否要覆盖这两个spec文件。)
接着,确保数据库更新了(rake db:xxx之类的)。
好吧,来看看FactoryGirl是干嘛的吧,修改/spec/factories/users.rb:
FactoryGirl.define do
  factory :user do
    email                    '[email protected]'
    username                 'abel'
    password                 '12345678'
  end
end
可以看到的是,这里就是相当于mock一个默认的User对象出来。
接着,修改/spec/models/user_spec.rb:
require 'rails_helper'

RSpec.describe User, type: :model do
  let(:user) { create :user }

  describe '#email' do
    context '有效的邮箱' do
      %w( [email protected] [email protected] [email protected] [email protected] ).each do |address|
        let(:user) { build(:user, email: address) }
        it { expect(user.valid?).to eq true }
      end
    end
  end
end

=begin
看看这里的代码,上面create和build就是FactoryGirl里面的方法。还记得在rails_helper.rb里面include了FactoryGirl的方法吗?
=end然后,执行rspec /spec/models/user_spec.rb 你就会看到结果了。
这个例子就不多说了,直接看代码即可。
# /app/controllers/users_controller.rb
class UsersController < ApplicationController
    def create
        @user = User.new user_params
        @user.save
        render :json => { data: @user }
    end

    private
    def user_params
        params.require(:user).permit(:email, :username, :password)
    end
end
# /spec/controllers/users_controller_spec.rb
require 'rails_helper'
RSpec.describe UsersController, type: :controller do
describe "Post #create" do
context "with valid user" do
it "create new user" do
post :create, user: attributes_for(:user)
expect(User.count).to eq(1)
end
end
end
end
# attributes_for也是FactoryGirl里面的一个方法,返回一个user的hash对象同样,直接跑rspec spec/controllers/users_controller_spec.rb就可以看到结果了。
有时候觉得运行RSpec比较慢,那么就可以把Spring和RSpec结合起来。在默认上,Rails就包括了Spring。这里只需要再引入多一个gem:
group :development do
  gem 'spring-commands-rspec
end执行bundle install,然后执行bundle exec spring binstub rspec。自此,就可以运行bundle exec spring rspec来加快RSpec的执行了。目前,我对这个没有什么感受,可能因为目前逻辑没那么复杂,以至于加和没加,速度上都没什么区别。所以,这里只是按照资料里面的步骤加进这里了。
Capybara,这里就先不加进来了。目前,对这部分没太多想法。
Devise,Ruby社区最流行的用户认证模块。那如果Rails的项目使用了Devise,那unit test又要怎么做呢?根据前文资料的内容,这里说说。
先把Devise加到Gemfile,自然还要bundle install。然后,配置Devise和RSpec。
(1)新建一个helper/spec/support/controller_helpers.rb。
module ControllerHelpers
    def login_with(user = double('user'), scope = :user)
        current_user = "current_#{scope}".to_sym

        if user.nil?
            allow(request.env['warden']).to(receive(:authenticate!).and_throw(:warden, { :scope => scope }))
            allow(controller).to(receive(current_user).and_return(nil))
        else
            allow(request.env['warden']).to(receive(:authenticate!).and_return(user))
            allow(controller).to(receive(current_user).and_return(user))
        end
    end
end(2)配置rails_helper.rb。(资料里面说明是配置到spec_helper.rb和rails_helper.rb,但我觉得麻烦,这里就全部放置到一个文件里面去,集中一点。)
# /spec/rails_helper.rb
# 在文件require gem包的地方添加如下代码
require 'devise'
require_relative 'support/controller_helpers'
# /spec/rails_helper.rb
# 更新config
config.include ControllerHelpers
config.include Devise::TestHelpers, type: :controller
config.include Warden::Test::Helpers
Warden.test_mode!
config.after do
Warden.test_reset!
end从这里,可以看到,Devise和Warden(Devise是基于Warden这个gem包的)里面已经提供了一些unit test的helper。到这里,Devise相关的配置已经弄好。
下面跑个例子(偷懒,直接用资料里面的例子)。
(1)先把前面第一个User相关的例子的代码给清理掉。再利用Devise这个gem来创建一个User模型出来:
//执行以下这三步
rails g devise:install
rails g devise User
rake db:migrate
(2)创建一个Post的controller、model、view。
rails g scaffold post name:string(3)给post_controller.rb添加用户认证。
before_action :authenticate_user!(4)更新user的fixture (/spec/factories/users.rb)。
FactoryGirl.define do
  sequence :email do |n|
    "person#{n}@example.com"
  end
end

FactoryGirl.define do
  factory :user, :class => 'User' do
    email
    password '12345678'
    password_confirmation '12345678'
  end
end(5)用以下代码替换自动生成的/spec/controllers/post_controller_spec.rb。
require 'rails_helper'

RSpec.describe PostsController, :type => :controller do
  describe "anonymous user" do
    before :each do
      # This simulates an anonymous user
      login_with nil
    end

    it "should be redirected to signin" do
      get :index
      expect( response ).to redirect_to( new_user_session_path )
    end

    it "should let a user see all the posts" do
      login_with create( :user )
      get :index
      expect( response ).to render_template( :index )
    end
  end
end
到这里,试着跑跑这个spec看看吧。
暂略。
Resources:
这部分就留着以后更新吧!
END~
目前,Golang并没有一个官方的包管理器。而是把这种方式留给了用户。目前,社区有几个关注度比较高的包管理器。同时,Golang也在其官方网站里面把它们列了出来,推荐用户根据自己的喜好选择。
在那些实现里面,我个人比较喜欢gom。在我看来,gom像是Ruby的Rubygem和Node.js的NPM的结合体。
gom,操作起来也蛮方便的。
go get github.com/mattn/gomgom gen gomfile。gom 'github.com/abellai/gmvc'。gom install便会把那些依赖包下载下来了。跟原来官方默认的配置方式有点不一样的是,gom会在项目目录下创建一个_vendor的文件来存放pkg和src。这种方式就像Node.js的NPM会在项目目录下创建一个node_modules一样。
所以,gom这种方式还是挺方便简单的。这样,我们不用创建多个GOPATH了。
If you have experience on Node.js/Ruby, or any other dynamic program language, you can easily launch a interpreter to test your code based on terminal, such as irb for Ruby, node for Node.js. But there are less such things for static program language.
igo or go-eval, it can start up a interpreter on terminal. It's helpful.
END~
在带团队这方面,已经有那么一段时间了。在刚开始的时候,会每天与团队花几分钟的时间开个早会。项目进行当中也会与QA一起早会,从而项目推进方面,做得还行。
随后,随着公司的不断扩大,各种项目进来,以至于资源紧张,加上个人的惰性,每天的早会便越来越少。这样的结果自然而然的是内部的效率相比之前是下降的,加班的机率也在加大。针对这样的情况,昨天内部进行了讨论,明确目前的问题。同时明确接下来要进行的事情以及继续目前仍在坚持的事情:
总而言之,团队高效,需要各成员之间的充分沟通与协作。
今天在自己的一个虚拟机上跑了个ubuntu,然后各种环境弄好之后,想在另一个台电脑远程连结上虚拟机,也就是ssh远程登录。结果发现默认上ubuntu是没有ssh server的相关东西,需要自己安装一下:
sudo apt-get install openssh-server 我这里,只跑了这句命令,然后重启terminal就ok了。在网上看的教程有看到以下两步(不知道以后在弄其他环境需不需要,这里先记录一下):
#启动sshd
sudo net start sshd

#检查防火墙设置,关闭防火墙
sudo ufw disable
END~
最近遇到在Ruby代码里面,使用Pry断点之后,不能准确跑到断点那里的问题。问了小伙伴,刚好有解决过的,步骤如下:
gem list pry # 查看一下相关包
gem uninstall pry-byebug
gem uninstall pry-rails昨天去面试Go开发岗位,遇到了一道关于锁的题目。一看题目,我大概知道要考的内容是什么。当时一想到需要在纸上写那么多代码,便留空白了。后来与面试官聊的时候,我说了这道题空白的原因。然后他问你知道要考什么么。我说要加锁实现。最后,他说你只要写上要加锁这道对我来说都算过了。
这题目网上也能找到,如Csdn上这哥们的就说到这道题,不过他的实现还是有问题。下面我实现的一个,跟那哥们的做法差不多,只不过我个人偏向于把Mutex嵌入到Struct里面去。
在一个高并发的web服务器中,要限制IP的频繁访问。现模拟100个IP同时并发访问服务器,每个IP要重复访问1000次。每个IP三分钟之内只能访问一次。修改以下代码完成该过程,要求能成功输出 success: 100。
代码:
package main

import (
	"fmt"
	"time"
)

type Ban struct {
	visitIPs map[string]time.Time
}

func NewBan() *Ban {
	return &Ban{visitIPs: make(map[string]time.Time)}
}

func (o *Ban) visit(ip string) bool {
	if _, ok := o.visitIPs[ip]; ok {
		return true
	}
	o.visitIPs[ip] = time.Now()
	return false
}

func main() {
	success := 0
	ban := NewBan()
	for i := 0; i < 1000; i++ {
		for j := 0; j < 100; j++ {
			go func() {
				ip := fmt.Sprintf("192.168.1.%d", j)
				if !ban.visit(ip) {
					success++
				}
			}()
		}
	}
	fmt.Println("success: ", success)
}j,需要通过函数参数传递的方式。明确了考点,那实现的代码如下。
package main

import (
	"fmt"
	"sync"
	"sync/atomic"
	"time"
)

type Ban struct {
	visitIPs map[string]time.Time
	lock     sync.Mutex
}

func NewBan() *Ban {
	return &Ban{visitIPs: make(map[string]time.Time)}
}

func (o *Ban) visit(ip string) bool {
	o.lock.Lock() //加锁
	defer o.lock.Unlock()

	if _, ok := o.visitIPs[ip]; ok {
		return true
	}

	o.visitIPs[ip] = time.Now()
	o.timeAllow(ip)
	return false
}

func (o *Ban) timeAllow(ip string) {
	go func() {
		time.Sleep(time.Minute * 3)

		o.lock.Lock()
		defer o.lock.Unlock()

		delete(o.visitIPs, ip)
	}()
}

func main() {
	var wg sync.WaitGroup
	var success int64
	ban := NewBan()

	for i := 0; i < 1000; i++ {
		for j := 0; j < 100; j++ {
			wg.Add(1)

			go func(ip int) {
				defer wg.Done()
				ipStr := fmt.Sprintf("192.168.1.%d", ip)

				if !ban.visit(ipStr) {
					atomic.AddInt64(&success, 1) // 原子操作
				}
			}(j) // 值传递,防止值覆盖
		}
	}

	wg.Wait() // 协程同步
	fmt.Println("success: ", success)
}
END ~~~
在默认下,安装Docker之后,Docker在服务器存储的镜像、容器都是存在于系统盘。之前购买几台CentOS的服务器,在购买的时候系统盘选择的是20G,比较小。所以,安装Docker之后就需要更改镜像、容器的存储路径。而且,一般来说,我们的服务器购买的都是云硬盘,升级容量相对容易。自然地将镜像、容器的存储路径更改至数据盘是一个正确有效的方式。
相对较新版本的Docker,安装的时候,默认的storage driver是overlay(因为CE版下只有overlay和overlay2支持ext4、ext3、xfs)。另外,购买腾讯云的服务器,默认的是Linux内核是3.10的,之前查资料发现此版本对于storage driver为overlay的Docker环境支持不够友好,会有限制。之前在网上找到这篇文章,它的做法是在系统上创建一个docker.service.d系统服务,里面将storage driver更改为devicemapper,并设置存储路径。后来,运行了一段时间,发现有问题,又删除了相应的设置,重装并保留默认的设置。至此,系统盘空间不够的问题依然存在。
今天请教了位同事,他给了个方案,就是创建docker的daemon.json文件(此文件路径为/etc/docker/daemon.json)。一开始,他给我的方式是ubuntu的,storage driver依然是devicemapper。操作一轮下来,发现还是启动不了Docker。后来,我将storage driver更改为overlay就好了。
daemon.json文件的内容如下:
{
  "storage-driver": "overlay",
  "graph": "docker镜像、容器的存储路径",
  "userland-proxy": false
}目前,我对于daemon.json的内容了解还不是很多。这里先留个坑,后面好好写一下为何这样设置。
END~~~
==========2017-10-03更新 BEGIN===============
这里做一些补充。对于CentOS下,按照默认方式安装了Docker,然后又想改存储路径的。操作如下几个步骤即可:
/etc/docker/daemon.json,内容如上所说这样服务器上的镜像和容器数据都不会丢失。
==========2017-10-03更新 END===============
前两个月开始了一个新的项目,依然是Rails的项目,技术栈如下:
- Rails 4.2.5.2
- Vue.js
- Webpack.js
- Redis
- Mina
- MySQL
- Themeforest Limitless 模板
技术选择理由:
- Rails依然是Ruby世界的一大中心点。看看每年各地的RubyConf大会和RailsConf大会,Rails的主题依然占据了好大一份额。而且,Rails作为一个full-stack型的web框架,在今天各种web框架遍地开花的情况下,仍然是一把好的利器。
- Vue.js是目前逐渐流行起来的一个具备当前流行前端**的一个库。Angular.js由于其1.x的版本跟2.0的差异太大,便放弃。至于React.js,则由于Vue.js稍微更轻量点,所以也没考虑了。(好吧,其实只是google了一下而已,没做具体的比较。)
- Webpack.js,则是为了替换Rails Assets Pipeline。诚然,Rails Assets Pipeline是一个蛮不错的前端构建工具。但,对于使用了没有封装成Gem的前端模板以及采用CMD/AMD模式的时候,Assets Pipeline就显得有点坑爹。而且,现在前端的发展很快,更多依赖基于Node.js而出现的工具。所以,对于前端的构建,可以选择的东西更多了。
- Redis, 作为缓存层,简单、易用、高效。
- Mina,部署功能,简单、有效。原本想使用Jenkins这样的部署工具,后来由于工作的调动就没有搞了。然后,目前没有专门的服务器去跑Jenkins这样的服务,故此,Mina这样类型的部署工具是最好的选择。当然,Ruby社区还有一个更为流行的工具Capistrano。但,Mina相对于Capistrano速度更快以及更轻量。(好吧,目前搞技术的,说更轻量有时候则是人为的感觉而已。)
- MySQL,目前比较熟悉的一个数据库。自然而然就用了。
- 这个项目买了一个前端模板,基于这个前端模板进行开发,目的是为了快速实现前端的效果和功能。
在这篇内容里面,我主要想总结一下如何使用Webpack.js和Vue.js去进行前端构建,以及在用Mina部署Rails项目的时候,如何进行前端资源的生成。
目前,基于Node.js而创建出来的前端构建工具很多,如Grunt.js、Gulp.js、Webpack.js。以及,不基于Node.js社区的第三库,直接利用NPM Scripts也可以(可能不会那么好用而已)。Webpack.js相较于Grunt.js和Gulp.js来说,出来在市场上稍微晚一点。之前,有一个项目使用Gulp.js进行前端的构建。所以,个人的感觉就是Gulp.js会比Webpack.js简单点,也好好理解一点。
其实,这次项目使用Webpack.js也大部分是参考Ruby China社区的一篇文章。
首先,毫无疑问的,项目的环境需要安装Node.js。
其次,安装Webpack.js.
// 需要全局安装Webpack.js
npm install -g webpack

// 然后进行项目的根目录也把Webpack.js给拉取下来
npm install --dev-save webpack
构建项目目录(以下是Rails的项目的目录):
/rails_app
  /app
  /config
  /db
  /public
    /assets
    /componets
    /view_models
    /plugins
  /lib
  /webpack_config
    /dev.webpack.config.js
    /prod.webpack.config.js
/...从目录来看,/public/assets是存放已经构建好的资源文件,/public/components和/public/view_models则是具体项目前端逻辑的资源文件。而,/webpack_config文件夹下面的,则是Webpack的项目设置。
待续~~~
RBM Installer Shell Script from https://get.rvm.io:
#!/usr/bin/env bash

shopt -s extglob
set -o errtrace
set -o errexit

rvm_install_initialize()
{
  DEFAULT_SOURCES=(github.com/rvm/rvm bitbucket.org/mpapis/rvm)

  BASH_MIN_VERSION="3.2.25"
  if
    [[ -n "${BASH_VERSION:-}" &&
      "$(\printf "%b" "${BASH_VERSION:-}\n${BASH_MIN_VERSION}\n" | LC_ALL=C \sort -t"." -k1,1n -k2,2n -k3,3n | \head -n1)" != "${BASH_MIN_VERSION}"
    ]]
  then
    echo "BASH ${BASH_MIN_VERSION} required (you have $BASH_VERSION)"
    exit 1
  fi

  export HOME PS4
  export rvm_trace_flag rvm_debug_flag rvm_user_install_flag rvm_ignore_rvmrc rvm_prefix rvm_path

  PS4="+ \${BASH_SOURCE##\${rvm_path:-}} : \${FUNCNAME[0]:+\${FUNCNAME[0]}()}  \${LINENO} > "
}

log()  { printf "%b\n" "$*"; }
debug(){ [[ ${rvm_debug_flag:-0} -eq 0 ]] || printf "%b\n" "Running($#): $*"; }
fail() { log "\nERROR: $*\n" ; exit 1 ; }

rvm_install_commands_setup()
{
  \which which >/dev/null 2>&1 || fail "Could not find 'which' command, make sure it's available first before continuing installation."
  \which grep >/dev/null 2>&1 || fail "Could not find 'grep' command, make sure it's available first before continuing installation."
  if
    [[ -z "${rvm_tar_command:-}" ]] && builtin command -v gtar >/dev/null
  then
    rvm_tar_command=gtar
  elif
    ${rvm_tar_command:-tar} --help 2>&1 | GREP_OPTIONS="" \grep -- --strip-components >/dev/null
  then
    rvm_tar_command="${rvm_tar_command:-tar}"
  else
    case "$(uname)" in
      (OpenBSD)
        log "Trying to install GNU version of tar, might require sudo password"
        if (( UID ))
        then sudo pkg_add -z gtar-1
        else pkg_add -z gtar-1
        fi
        rvm_tar_command=gtar
        ;;
      (Darwin|FreeBSD|DragonFly) # it's not possible to autodetect on OSX, the help/man does not mention all flags
        rvm_tar_command=tar
        ;;
      (SunOS)
        case "$(uname -r)" in
          (5.10)
            log "Trying to install GNU version of tar, might require sudo password"
            if (( UID ))
            then
              if \which sudo >/dev/null 2>&1
              then sudo_10=sudo
              elif \which /opt/csw/bin/sudo >/dev/null 2>&1
              then sudo_10=/opt/csw/bin/sudo
              else fail "sudo is required but not found. You may install sudo from OpenCSW repository (https://www.opencsw.org/about)"
              fi
              pkginfo -q CSWpkgutil || $sudo_10 pkgadd -a $rvm_path/config/solaris/noask -d https://get.opencsw.org/now CSWpkgutil
              sudo /opt/csw/bin/pkgutil -iy CSWgtar -t https://mirror.opencsw.org/opencsw/unstable
            else
              pkginfo -q CSWpkgutil || pkgadd -a $rvm_path/config/solaris/noask -d https://get.opencsw.org/now CSWpkgutil
              /opt/csw/bin/pkgutil -iy CSWgtar -t https://mirror.opencsw.org/opencsw/unstable
            fi
            rvm_tar_command=/opt/csw/bin/gtar
            ;;
          (*)
            rvm_tar_command=tar
            ;;
        esac
    esac
    builtin command -v ${rvm_tar_command:-gtar} >/dev/null ||
    fail "Could not find GNU compatible version of 'tar' command, make sure it's available first before continuing installation."
  fi
  if
    [[ " ${rvm_tar_options:-} " != *" --no-same-owner "*  ]] &&
    $rvm_tar_command --help 2>&1 | GREP_OPTIONS="" \grep -- --no-same-owner >/dev/null
  then
    rvm_tar_options="${rvm_tar_options:-}${rvm_tar_options:+ }--no-same-owner"
  fi
}

usage()
{
  printf "%b" "

Usage

  rvm-installer [options] [action]

Options

  [[--]version] <version>

    The version or tag to install. Valid values are:

      latest         - The latest tagged version.
      latest-minor   - The latest minor version of the current major version.
      latest-<x>     - The latest minor version of version x.
      latest-<x>.<y> - The latest patch version of version x.y.
      <x>.<y>.<z>    - Major version x, minor version y and patch z.

  [--]branch <branch>

    The name of the branch from which RVM is installed. This option can be used
    with the following formats for <branch>:

      <account>/

        If account is wayneeseguin or mpapis, installs from one of the following:

          https://github.com/rvm/rvm/archive/master.tar.gz
          https://bitbucket.org/mpapis/rvm/get/master.tar.gz

       Otherwise, installs from:

         https://github.com/<account>/rvm/archive/master.tar.gz

      <account>/<branch>

        If account is wayneeseguin or mpapis, installs from one of the following:

          https://github.com/rvm/rvm/archive/<branch>.tar.gz
          https://bitbucket.org/mpapis/rvm/get/<branch>.tar.gz

        Otherwise, installs from:

          https://github.com/<account>/rvm/archive/<branch>.tar.gz

      [/]<branch>

        Installs the branch from one of the following:

          https://github.com/rvm/rvm/archive/<branch>.tar.gz
          https://bitbucket.org/mpapis/rvm/get/<branch>.tar.gz

      [--]source <source>

        Defines the repository from which RVM is retrieved and installed in the format:

          <domain>/<account>/<repo>

        Where:

          <domain>  - Is bitbucket.org, github.com or a github enterprise site serving
                      an RVM repository.
          <account> - Is the user account in which the RVM repository resides.
          <repo>    - Is the name of the RVM repository.

        Note that when using the [--]source option, one should only use the [/]branch format
        with the [--]branch option. Failure to do so will result in undefined behavior.

      --trace

        Provides debug logging for the installation script.
Actions

  master - Installs RVM from the master branch at rvm/rvm on github or mpapis/rvm
           on bitbucket.org.
  stable - Installs RVM from the stable branch a rvm/rvm on github or mpapis/rvm
           on bitbucket.org.
  help   - Displays this output.

"
}

## duplication marker 32fosjfjsznkjneuera48jae
__rvm_curl_output_control()
{
  if
    (( ${rvm_quiet_curl_flag:-0} == 1 ))
  then
    __flags+=( "--silent" "--show-error" )
  elif
    [[ " $*" == *" -s"* || " $*" == *" --silent"* ]]
  then
    # make sure --show-error is used with --silent
    [[ " $*" == *" -S"* || " $*" == *" -sS"* || " $*" == *" --show-error"* ]] ||
    {
      __flags+=( "--show-error" )
    }
  fi
}

## duplication marker 32fosjfjsznkjneuera48jae
# -S is automatically added to -s
__rvm_curl()
(
  __rvm_which curl >/dev/null ||
  {
    rvm_error "RVM requires 'curl'. Install 'curl' first and try again."
    return 200
  }

  typeset -a __flags
  __flags=( --fail --location --max-redirs 10 )

  [[ "$*" == *"--max-time"* ]] ||
  [[ "$*" == *"--connect-timeout"* ]] ||
    __flags+=( --connect-timeout 30 --retry-delay 2 --retry 3 )

  if [[ -n "${rvm_proxy:-}" ]]
  then __flags+=( --proxy "${rvm_proxy:-}" )
  fi

  __rvm_curl_output_control

  unset curl
  __rvm_debug_command \curl "${__flags[@]}" "$@" || return $?
)

rvm_error()  { printf "ERROR: %b\n" "$*"; }
__rvm_which(){   which "$@" || return $?; true; }
__rvm_debug_command()
{
  debug "Running($#): $*"
  "$@" || return $?
  true
}
rvm_is_a_shell_function()
{
  [[ -t 0 && -t 1 ]] || return $?
  return ${rvm_is_not_a_shell_function:-0}
}

# Searches the tags for the highest available version matching a given pattern.
# fetch_version (github.com/rvm/rvm bitbucket.org/mpapis/rvm) 1.10. -> 1.10.3
# fetch_version (github.com/rvm/rvm bitbucket.org/mpapis/rvm) 1.10. -> 1.10.3
# fetch_version (github.com/rvm/rvm bitbucket.org/mpapis/rvm) 1.    -> 1.11.0
# fetch_version (github.com/rvm/rvm bitbucket.org/mpapis/rvm) ""    -> 2.0.1
fetch_version()
{
  typeset _account _domain _pattern _repo _sources _values _version
  _sources=(${!1})
  _pattern=$2
  for _source in "${_sources[@]}"
  do
    IFS='/' read -r _domain _account _repo <<< "${_source}"
    _version="$(
      fetch_versions ${_domain} ${_account} ${_repo} |
      GREP_OPTIONS="" \grep "^${_pattern:-}" | tail -n 1
    )"
    if
      [[ -n ${_version} ]]
    then
      echo "${_version}"
      return 0
    fi
  done
}

# Returns a sorted list of all version tags from a repository
fetch_versions()
{
  typeset _account _domain _repo _url
  _domain=$1
  _account=$2
  _repo=$3
  case ${_domain} in
    (bitbucket.org)
      _url=https://${_domain}/api/1.0/repositories/${_account}/${_repo}/branches-tags
      ;;
    (github.com)
      _url=https://api.${_domain}/repos/${_account}/${_repo}/tags
      ;;

    (*)
      _url=https://${_domain}/api/v3/repos/${_account}/${_repo}/tags
      ;;
  esac
  __rvm_curl -s ${_url} |
    \awk -v RS=',' -v FS='"' '$2=="name"{print $4}' |
    sort -t. -k 1,1n -k 2,2n -k 3,3n -k 4,4n -k 5,5n
}

install_release()
{
  typeset _source _sources _url _version _verify_pgp
  _sources=(${!1})
  _version=$2
  debug "Downloading RVM version ${_version}"
  for _source in "${_sources[@]}"
  do
    case ${_source} in
      (bitbucket.org*)
        _url="https://${_source}/get/${_version}.tar.gz"
        _verify_pgp="https://${_source}/downloads/${_version}.tar.gz.asc"
        ;;
      (*)
        _url="https://${_source}/archive/${_version}.tar.gz"
        _verify_pgp="https://${_source}/releases/download/${_version}/${_version}.tar.gz.asc"
        ;;
    esac
    get_and_unpack "${_url}" "rvm-${_version}.tgz" "$_verify_pgp" && return
  done
  return $?
}

install_head()
{
  typeset _branch _source _sources _url
  _sources=(${!1})
  _branch=$2
  debug "Selected RVM branch ${_branch}"
  for _source in "${_sources[@]}"
  do
    case ${_source} in
      (bitbucket.org*)
        _url=https://${_source}/get/${_branch}.tar.gz
        ;;
      (*)
        _url=https://${_source}/archive/${_branch}.tar.gz
        ;;
    esac
    get_and_unpack "${_url}" "rvm-${_branch//\//_}.tgz" && return
  done
  return $?
}

# duplication marker dfkjdjngdfjngjcszncv
# Drop in cd which _doesn't_ respect cdpath
__rvm_cd()
{
  typeset old_cdpath ret
  ret=0
  old_cdpath="${CDPATH}"
  CDPATH="."
  chpwd_functions="" builtin cd "$@" || ret=$?
  CDPATH="${old_cdpath}"
  return $ret
}

get_package()
{
  typeset _url _file
  _url="$1"
  _file="$2"
  log "Downloading ${_url}"
  __rvm_curl -sS ${_url} -o ${rvm_archives_path}/${_file} ||
  {
    _return=$?
    case $_return in
      # duplication marker lfdgzkngdkjvnfjknkjvcnbjkncvjxbn
      (60)
        log "
Could not download '${_url}', you can read more about it here:
https://rvm.io/support/fixing-broken-ssl-certificates/
To continue in insecure mode run 'echo insecure >> ~/.curlrc'.
"
        ;;
      # duplication marker lfdgzkngdkjvnfjknkjvcnbjkncvjxbn
      (77)
        log "
It looks like you have old certificates, you can read more about it here:
https://rvm.io/support/fixing-broken-ssl-certificates/
"
        ;;
      # duplication marker lfdgzkngdkjvnfjknkjvcnbjkncvjxbn
      (141)
        log "
Curl returned 141 - it is result of a segfault which means it's Curls fault.
Try again and if it crashes more than a couple of times you either need to
reinstall Curl or consult with your distribution manual and contact support.
"
        ;;
      (*)
        log "
Could not download '${_url}'.
  curl returned status '$_return'.
"
        ;;
    esac
    return $_return
  }
}

# duplication marker flnglfdjkngjndkfjhsbdjgfghdsgfklgg
rvm_install_gpg_setup()
{
  export rvm_gpg_command
  {
    rvm_gpg_command="$( \which gpg2 2>/dev/null )" &&
    [[ ${rvm_gpg_command} != "/cygdrive/"* ]]
  } ||
    rvm_gpg_command="$( \which gpg 2>/dev/null )" ||
    rvm_gpg_command=""
  debug "Detected GPG program: '$rvm_gpg_command'"
  [[ -n "$rvm_gpg_command" ]] || return $?
}

# duplication marker rdjgndfnghdfnhgfdhbghdbfhgbfdhbn
verify_package_pgp()
{
  if
    "${rvm_gpg_command}" --verify "$2" "$1"
  then
    log "GPG verified '$1'"
  else
    typeset _ret=$?
    log "\
Warning, RVM 1.26.0 introduces signed releases and \
automated check of signatures when GPG software found.
Assuming you trust Michal Papis import the mpapis public \
key (downloading the signatures).

GPG signature verification failed for '$1' - '$3'!
try downloading the signatures:

    ${SUDO_USER:+sudo }${rvm_gpg_command##*/} --keyserver hkp://keys.gnupg.net --recv-keys 409B6B1796C275462A1703113804BB82D39DC0E3

or if it fails:

    command curl -sSL https://rvm.io/mpapis.asc | ${SUDO_USER:+sudo }${rvm_gpg_command##*/} --import -

the key can be compared with:

    https://rvm.io/mpapis.asc
    https://keybase.io/mpapis
"
    exit $_ret
  fi
}

verify_pgp()
{
  [[ -n "${1:-}" ]] ||
  {
    debug "No PGP url given, skipping."
    return 0
  }

  get_package "$1" "$2.asc" ||
  {
    debug "PGP url given but does not exist: '$1'"
    return 0
  }

  rvm_install_gpg_setup ||
  {
    log "Found PGP signature at: '$1',
but no GPG software exists to validate it, skipping."
    return 0
  }

  verify_package_pgp "${rvm_archives_path}/$2" "${rvm_archives_path}/$2.asc" "$1"
}

get_and_unpack()
{
  typeset _url _file _patern _return _verify_pgp
  _url="$1"
  _file="$2"
  _verify_pgp="$3"

  get_package "$_url" "$_file" || return $?
  verify_pgp "$_verify_pgp" "$_file" || return $?

  [[ -d "${rvm_src_path}/rvm" ]] || \mkdir -p "${rvm_src_path}/rvm"
  __rvm_cd "${rvm_src_path}/rvm" ||
  {
    _return=$?
    log "Could not change directory '${rvm_src_path}/rvm'."
    return $_return
  }

  rm -rf ${rvm_src_path}/rvm/*
  __rvm_debug_command $rvm_tar_command xzf ${rvm_archives_path}/${_file} ${rvm_tar_options:-} --strip-components 1 ||
  {
    _return=$?
    log "Could not extract RVM sources."
    return $_return
  }
}

rvm_install_default_settings()
{
  # Tracing, if asked for.
  if
    [[ "$*" == *--trace* ]] || (( ${rvm_trace_flag:-0} > 0 ))
  then
    set -o xtrace
    rvm_trace_flag=1
  fi

  # Variable initialization, remove trailing slashes if they exist on HOME
  true \
    ${rvm_trace_flag:=0} ${rvm_debug_flag:=0}\
    ${rvm_ignore_rvmrc:=0} HOME="${HOME%%+(\/)}"

  if
    (( rvm_ignore_rvmrc == 0 ))
  then
    for rvmrc in /etc/rvmrc "$HOME/.rvmrc"
    do
      if
        [[ -s "$rvmrc" ]]
      then
        if
          GREP_OPTIONS="" \grep '^\s*rvm .*$' "$rvmrc" >/dev/null 2>&1
        then
          printf "%b" "
  Error: $rvmrc is for rvm settings only.
  rvm CLI may NOT be called from within $rvmrc.
  Skipping the loading of $rvmrc
  "
          exit 1
        else
          source "$rvmrc"
        fi
      fi
    done
  fi

  if
    [[ -z "${rvm_path:-}" ]]
  then
    if
      (( UID == 0 ))
    then
      rvm_user_install_flag=0
      rvm_prefix="/usr/local"
      rvm_path="${rvm_prefix}/rvm"
    else
      rvm_user_install_flag=1
      rvm_prefix="$HOME"
      rvm_path="${rvm_prefix}/.rvm"
    fi
  fi
  if [[ -z "${rvm_prefix}" ]]
  then rvm_prefix=$( dirname $rvm_path )
  fi

  # duplication marker kkdfkgnjfndgjkndfjkgnkfjdgn
  [[ -n "${rvm_user_install_flag:-}" ]] ||
  case "$rvm_path" in
    (/usr/local/rvm)         rvm_user_install_flag=0 ;;
    ($HOME/*|/${USER// /_}*) rvm_user_install_flag=1 ;;
    (*)                      rvm_user_install_flag=0 ;;
  esac
}

rvm_install_parse_params()
{
  install_rubies=()
  install_gems=()
  flags=( ./scripts/install )
  forwarded_flags=()
  while
    (( $# > 0 ))
  do
    token="$1"
    shift
    case "$token" in

      (--trace)
        set -o xtrace
        rvm_trace_flag=1
        flags=( -x "${flags[@]}" "$token" )
        forwarded_flags+=( "$token" )
        ;;

      (--debug|--quiet-curl)
        flags+=( "$token" )
        forwarded_flags+=( "$token" )
        token=${token#--}
        token=${token//-/_}
        export "rvm_${token}_flag"=1
        printf "%b" "Turning on ${token/_/ } mode.\n"
        ;;

      (--path)
        if [[ -n "${1:-}" ]]
        then
          rvm_path="$1"
          shift
        else
          fail "--path must be followed by a path."
        fi
        ;;

      (--branch|branch) # Install RVM from a given branch
        if [[ -n "${1:-}" ]]
        then
          case "$1" in
            (/*)
              branch=${1#/}
              ;;
            (*/)
              branch=master
              if [[ "${1%/}" -ne wayneeseguin ]] && [[ "${1%/}" -ne mpapis ]]
              then sources=(github.com/${1%/}/rvm)
              fi
              ;;
            (*/*)
              branch=${1#*/}
              if [[ "${1%%/*}" -ne wayneeseguin ]] && [[ "${1%%/*}" -ne mpapis ]]
              then sources=(github.com/${1%%/*}/rvm)
              fi
              ;;
            (*)
              branch="$1"
              ;;
          esac
          shift
        else
          fail "--branch must be followed by a branchname."
        fi
        ;;

      (--source|source)
        if [[ -n "${1:-}" ]]
        then
          if [[ "$1" = */*/* ]]
          then
            sources=($1)
            shift
          else
            fail "--source must be in the format <domain>/<account>/<repo>."
          fi
        else
          fail "--source must be followed by a source."
        fi
        ;;

      (--user-install|--ignore-dotfiles)
        token=${token#--}
        token=${token//-/_}
        export "rvm_${token}_flag"=1
        printf "%b" "Turning on ${token/_/ } mode.\n"
        ;;

      (--auto-dotfiles)
        flags+=( "$token" )
        export "rvm_auto_dotfiles_flag"=1
        printf "%b" "Turning on auto dotfiles mode.\n"
        ;;

      (--auto)
        export "rvm_auto_dotfiles_flag"=1
        printf "%b" "Warning, --auto is deprecated in favor of --auto-dotfiles.\n"
        ;;

      (--verify-downloads)
        if [[ -n "${1:-}" ]]
        then
          export rvm_verify_downloads_flag="$1"
          forwarded_flags+=( "$token" "$1" )
          shift
        else
          fail "--verify-downloads must be followed by level(0|1|2)."
        fi
        ;;

      (--autolibs=*)
        flags+=( "$token" )
        export rvm_autolibs_flag="${token#--autolibs=}"
        forwarded_flags+=( "$token" )
        ;;

      (--without-gems=*|--with-gems=*|--with-default-gems=*)
        flags+=( "$token" )
        value="${token#*=}"
        token="${token%%=*}"
        token="${token#--}"
        token="${token//-/_}"
        export "rvm_${token}"="${value}"
        printf "%b" "Installing RVM ${token/_/ }: ${value}.\n"
        ;;

      (--version|version)
        version="$1"
        shift
        ;;

      (head|master)
        version="head"
        branch="master"
        ;;

      (stable)
        version="latest"
        ;;

      (latest|latest-*|+([[:digit:]]).+([[:digit:]]).+([[:digit:]]))
        version="$token"
        ;;

      (--ruby)
        install_rubies+=( ruby )
        ;;

      (--ruby=*)
        token=${token#--ruby=}
        install_rubies+=( ${token//,/ } )
        ;;

      (--rails)
        install_gems+=( rails )
        ;;

      (--gems=*)
        token=${token#--gems=}
        install_gems+=( ${token//,/ } )
        ;;

      (--add-to-rvm-group)
        export rvm_add_users_to_rvm_group="$1"
        shift
        ;;

      (help|usage)
        usage
        exit 0
        ;;

      (*)
        usage
        exit 1
        ;;

    esac
  done

  if (( ${#install_gems[@]} > 0 && ${#install_rubies[@]} == 0 ))
  then install_rubies=( ruby )
  fi

  true "${version:=head}"
  true "${branch:=master}"

  if [[ -z "${sources[@]}" ]]
  then sources=("${DEFAULT_SOURCES[@]}")
  fi

  rvm_src_path="$rvm_path/src"
  rvm_archives_path="$rvm_path/archives"
  rvm_releases_url="https://rvm.io/releases"
}

rvm_install_validate_rvm_path()
{
  case "$rvm_path" in
    (*[[:space:]]*)
      printf "%b" "
It looks you are one of the happy *space* users(in home dir name),
RVM is not yet fully ready for it, use this trick to fix it:

    sudo mkdir -p /${USER// /_}.rvm
    sudo chown -R \"$USER:\" /${USER// /_}.rvm
    echo \"export rvm_path=/${USER// /_}.rvm\" >> \"$HOME/.rvmrc\"

and start installing again.

"
      exit 2
    ;;
    (/usr/share/ruby-rvm)
      printf "%b" "
It looks you are one of the happy Ubuntu users,
RVM packaged by Ubuntu is old and broken,
follow this link for details how to fix:

  https://stackoverflow.com/a/9056395/497756

"
      [[ "${rvm_uses_broken_ubuntu_path:-no}" == "yes" ]] || exit 3
    ;;
  esac

  if [[ "$rvm_path" != "/"* ]]
  then fail "The rvm install path must be fully qualified. Tried $rvm_path"
  fi
}

rvm_install_select_and_get_version()
{
  typeset _version_release

  for dir in "$rvm_src_path" "$rvm_archives_path"
  do
    [[ -d "$dir" ]] || mkdir -p "$dir"
  done

  _version_release="${version}"
  case "${version}" in
    (head)
      _version_release="${branch}"
      install_head sources[@] ${branch:-master} || exit $?
      ;;

    (latest)
      install_release sources[@] $(fetch_version sources[@]) || exit $?
      ;;

    (latest-minor)
      version="$(\cat "$rvm_path/VERSION")"
      install_release sources[@] $(fetch_version sources[@] ${version%.*}) || exit $?
      ;;

    (latest-*)
      install_release sources[@] $(fetch_version sources[@] ${version#latest-}) || exit $?
      ;;

    (+([[:digit:]]).+([[:digit:]]).+([[:digit:]])) # x.y.z
      install_release sources[@] ${version} || exit $?
      ;;

    (*)
      fail "Something went wrong, unrecognized version '$version'"
      ;;
  esac
  echo "${_version_release}" > "$rvm_path/RELEASE"
}

rvm_install_main()
{
  [[ -f ./scripts/install ]] ||
  {
    log "'./scripts/install' can not be found for installation, something went wrong, it usally means your 'tar' is broken, please report it here: https://github.com/rvm/rvm/issues"
    return 127
  }

  # required flag - path to install
  flags+=( --path "$rvm_path" )
  \command bash "${flags[@]}"
}

rvm_install_ruby_and_gems()
(
  if
    (( ${#install_rubies[@]} > 0 ))
  then
    source ${rvm_scripts_path:-${rvm_path}/scripts}/rvm
    source ${rvm_scripts_path:-${rvm_path}/scripts}/version
    __rvm_version

    for _ruby in ${install_rubies[@]}
    do command rvm "${forwarded_flags[@]}" install ${_ruby} -j 2
    done
    # set the first one as default, skip rest
    for _ruby in ${install_rubies[@]}
    do
      rvm "${forwarded_flags[@]}" alias create default ${_ruby}
      break
    done

    for _gem in ${install_gems[@]}
    do rvm "${forwarded_flags[@]}" all do gem install ${_gem}
    done

    printf "%b" "
  * To start using RVM you need to run \`source $rvm_path/scripts/rvm\`
    in all your open shell windows, in rare cases you need to reopen all shell windows.
"

    if
      [[ "${install_gems[*]}" == *"rails"* ]]
    then
      printf "%b" "
  * To start using rails you need to run \`rails new <project_dir>\`.
"
    fi
  fi
)

rvm_install()
{
  rvm_install_initialize
  rvm_install_commands_setup
  rvm_install_default_settings
  rvm_install_parse_params "$@"
  rvm_install_validate_rvm_path
  rvm_install_select_and_get_version
  rvm_install_main
  rvm_install_ruby_and_gems
}

rvm_install "$@"这个是一个工程的话题。先给自己mark一个贴,让自己后面花时间去理解和实践这一块。以下会有些资料:
The past few months, my team built two rails web app with the Repository pattern. I thought the way I used to build rails app was a better solution instead of the Fat Model Pattern. Yup, I love Repository pattern and use that way to build the app since it can make your code more cleanable and maintainable.
But, the reality is it isn't! It should be called Service Object Pattern. We only call it Repository Pattern and use Service Object Pattern by ourself. Yeah, ridiculous there, right? OK, talk is cheap. Let me show you how we implemented it at the apps:
# /app/models/user.rb
class User < ActiveRecord::Base

end
# /lib/repositories/user_repository.rb
class UserRepository
class << self
def get_by_id(id)
User.find_by_id id
end
end
end# /app/controllers/user_controller.rb
class UserController < ApplicationController
# http method: get
# url: /rest_api/users/:id
def show
user = UserRepository.get_by_id(params[:id])
render :json => { :data => user }
end
endLook at the code snippet above. UserRepository contains all the business logic about user. It makes model User and UserController thin and clean. It acts like a service object, not certainly the Repository way are. We were just wishful thinking it was a repository.
# /app/models/user.rb
class User < ActiveRecord::Base

end
# /lib/repositories/user_repository.rb
class UserRepository
class << self
def get_by_id(id)
User.find_by_id id
end
end
end# /lib/repositories/repository_manager.rb
class RepositoryManager
@@repos = { }
class << self
def register(repo_type, repo_class)
@@repos[repo_type] = repo_class
end
def for(repo_type)
repo_class = @@repos[repo_type]
raise "no repository registered" if repo_class.blank?
repo_class
end
end
end
RManager = RepositoryManager# /config/initializers/repo_init.rb
# you should load all repositories code before run the code as below
RManager.register(:user, UserRepository)
# ... more repository # /app/controllers/user_controller.rb
class UserController < ApplicationController
# http method: get
# url: /rest_api/users/:id
def show
user = RManager.for(:user).get_by_id(params[:id])
render :json => { :data => user }
end
endCompare with The First Case above, a little update here is we have a RepositoryManager to organize the repositories. And then, no any other things changed.
We just need to correct ourselves to rename it as Service Object. And break the "Repository Object" into a few small service objects, make them clean and readable.
In Ruby or Rails community, if we really want to follow pure Repository pattern, I think Hanami or rom-rb is a better solution.
End~
NSQ,一个基于Golang实现的、实时的分布式消息平台。看它的应用场景,目标在大型系统,处理海量数据的系统,牛逼轰轰。了解得稍微多一点的话,其实它就是一个分布式的、无序的消息中间件。
这个就此省略,因为可以直接从官网直接下载bin文件直接跑起来。当然,也可以按照它的说明,通过源码的方式编译出来。
以下是直接从官网下载bin(下载下来的文件,除了最主要的nsqlookd、nsqd、nsqadmin,还有一些其他NSQ维护者提供的client。具体的用法,可以在官网上看)来跑。
nsqlookupdnsqd --lookupd-tcp-address=127.0.0.1:4160 --broadcast-address=127.0.0.1 nsqadmin --lookupd-http-address=127.0.0.1:4161接下来最直观的,可以在浏览器访问http://127.0.0.1:4171 来查看整个跑起来的状态了。
TBC
官方说明是:
Træfɪk 是一个为了让部署微服务更加便捷而诞生的现代HTTP反向代理、负载均衡工具。 它支持多种后台 (Docker, Swarm, Kubernetes, Marathon, Mesos, Consul, Etcd, Zookeeper, BoltDB, Rest API, file…) 来自动化、动态的应用它的配置文件设置。
我的初步印象是,Traefik就像Nginx,只不过跟倾向于跟Docker结合,更倾向于微服务。
docker network create -d overlay --attachable traefik_webgatewaydocker-compose.yml如下:
version: '3'
services:
  traefik:
    image: traefik:latest
    command: --web --docker --docker.domain=docker.localhost --logLevel=DEBUG
    networks:
      - webgateway
    ports:
      - "80:80"
      - "8080:8080"
      - "443:443"
    volumes:
      - /var/run/docker.sock:/var/run/docker.sock
      - /dev/null:/traefik.toml
networks:
  webgateway:
    external:
      name: traefik_webgateway
跑起一个docker stack:
docker stack deploy traefik -c docker-compose.ymldocker-compose.yml如下:
version: '3'
services:
  whoami:
    image: emilevauge/whoami
    networks:
      - web
    deploy:
      replicas: 3
    labels:
      - "traefik.backend=whoami"
      - "traefik.frontend.rule=Host:whoami.local.abel.com"
networks:
  web:
    external:
      name: traefik_webgateway
跑起一个docker stack:
docker stack deploy whoami -c docker-compose.yml以上成功跑起来后,访问whoami.local.abel.com成功即表示整个基于traefik做负载均衡的应用成功跑起来了。
基于traefik做负载均衡的关键点如下:
traefik.backend和traefik.frontend.rule之前实践Daocloud的Nginx-proxy的时候,发现应用需要和Nginx-proxy在同一个Docker Stack才能被Nginx-proxy发现。相比较来说,Traefik还是蛮易用。
以上是目前的初步感受。后面如有更深刻的理解,再更新。
The Ruby environment setup stuff as below to show you how to get it up:
curl -sSL https://get.rvm.io | bash -s stableIf you get the error curl: (6) Couldn't resolve host 'get.rvm.io' or curl: (6) Couldn't resolve host 'raw.githubusercontent.com', you can visit https://get.rvm.io, and you will find that it show you a shell script. That's said, you can download that shell script and do something copy-paste to create a shell script on your machine. Next, you can run the shell on your local machine to set up RVM.
rvm install ruby-2.3.0
gem sources -a https://gems.ruby-china.org
gem sources -r https://rubygems.org/
gem install rails -v 4.2.1
# 1. download mysql rpm
wget http://dev.mysql.com/get/mysql57-community-release-el6-8.noarch.rpm

# 2. install rpm
rpm -ivh mysql57-community-release-el6-8.noarch.rpm

# 3. list all available version of this rpm
yum repolist | grep mysql

# 4. it is 5.7 by default for this rpm, we need to disable 5.7 and enable 5.6. so we need to edit mysql-community.repo
vi /etc/yum.repos.d/mysql-community.repo

# 5. checkout again
yum repolist | grep mysql

# 6. install mysql-server
yum install mysql-community-server
start mysql first time
service mysqld start
set password
/usr/bin/mysqladmin -u root password 'your password'
wget http://download.redis.io/releases/redis-3.0.7.tar.gz
install tcl
yum install tcl
un-compress redis
tar xzf redis-3.0.7.tar.gz
make
cd src
make test
make install
Nginx's requirement
# for url redirect
yum -y install pcre*
# for https
yum -y install openssl*
Nginx Download
wget http://nginx.org/download/nginx-1.9.12.tar.gz
Nginx Uncompress
tar -zxvf nginx-1.9.12.tar.gz
Go into nginx-1.9.12, and compile
cd nginx-1.9.12
./configure --prefix=/usr/local/nginx-1.9.12 --with-http_ssl_module --with-http_stub_status_module --with-pcre
If no error on terminal you found, you can do the next: Installation.
make
make install
Nginx start.
/usr/local/nginx-1.9.12/sbin/nginx
Next, you will do your own config job on nginx. Go ahead.
要使用Golang,安装完之后,你需要设置$GOPATH。而且,在$GOPATH下需要有src、bin、pkg,这三个目录。项目就存放于src之下。如果,所有项目都存放于src是很不方便的。但,如果需要分开,那你又要设置多个$GOPATH。也不方便,对不对?
另外还有就是包管理了。之前,我有写过说gom不错。虽说它借鉴于Ruby社区的Gemfile,但是gom还是跳不出上面说的那个框框。所以,这个是它的一个不足的地方。不知道,以后会不会变化。
今天,看到一位gopher的文章(文章是比较早之前的),里面他推荐Golang社区的一个工具gb。然后,我按照gb的guide line试了一下。发现gb还是蛮方便用的。
下面按照,国际惯例说说怎么用gb吧!
首先,你安装好你的Golang环境之后,在你的$GOPATH环境是这样的:
/$GOPATH
  /src
  /bin
/pkg你不用再额外去设置其他的$GOPATH。
接着,安装gb:
//注意后面的三点是需要的,否则下载下来之后不会编译安装的
go get github.com/constabulary/gb/...此时,你会发现/$GOPATH/bin下面多了gb和gb-vendor。以后,你就会经常用gb build xxxx之类的命令,而不是Golang自己的go build xxxx。
安装后gb,那我们就可以在任意的地方创建项目,而且不用再顾虑$GOPATH的问题了。现在建一个hello world的例子:
mkdir -p /go_projects/src/helloworld再创建一个代码文件helloworld.go:
cd go_projects/src/helloworld && touch helloworld.go下一步,编写如下代码:
package main

import (
    "fmt"
)

func main() {
    fmt.Println("Hello world")
}
代码写好后,就可以编译了:
cd /go_projects/src && gb build helloworld编译好之后,你会发现,go_projects目录如下:
/go_projects
  /src
    /helloworld
      /helloworld.go
  /bin
    /helloworld
  /pkg
/helloworld.a对比一下,其实和$GOPATH的结构是一样的。
**那如果说有依赖其他包,该怎么做?**做法就是,先按正常的流程去build一个项目,如gb build xxx。然后,gb在找不到相应的依赖包的时候会抛出错误来的。
来个例子:
// 目录是go_projects/src/test_tunny/main.go
package main

import (
    "io/ioutil"
    "net/http"
    "runtime"
    "github.com/jeffail/tunny"
)

func main() {
    numCPUs := runtime.NumCPU()
    runtime.GOMAXPROCS(numCPUs)

    pool, _ := tunny.CreatePool(numCPUs, func(object interface{}) interface{} {
        input, _ := object.([]byte)
        output := input
        return output
    }).Open()

    defer pool.Close()

    http.HandleFunc("/work", func(w http.ResponseWriter, r *http.Request) {
        intput, err := ioutil.ReadAll(r.Body)
        if err != nil {
            http.Error(w, "Internal error", http.StatusInternalServerError)
        }
        result, _ := pool.SendWork(intput)
        w.Write(result.([]byte))
    })

    http.ListenAndServe(":7000", nil)
}上面这个例子,引用了github上的一个包。在没解决依赖之前,执行gb build test_tunny,就会得到如下错误:
FATAL: command "build" failed: failed to resolve import path "test_tunny": import "github.com/jeffail/tunny": not found: stat /go_projects/src/github.com/jeffail/tunny: no such file or directorygb给出的解决办法是把包给下载下来:
mkdir -p vendor/src/github.com/jeffail/tunny
git clone https://github.com/jeffail/tunny vendor/src/github.com/jeffail/tunny还记得在$GOPATH/bin下有一个gb-vendor的bin吧?所以,gb会在src同级下有个vendor文件夹,用来存放依赖包,由gb-vendor来处理。(这个是个人的推测。)再执行gb build test_tunny,这时就ok了。
如果一个项目依赖了多个包,那一个一个这样手动下载,的确是不方便。所以,gb的解决方法就是一个depfile,和src文件夹同处一个级别:
/go_projects
  /depfile
  /src
    /helloworld
      /helloworld.go
  /bin
    /helloworld
  /pkg
    /helloworld.a
好了,介绍到此为止。总的来说,从用法上来说,gb是比gom灵活不少的。缺点在于depfile依赖于git的tag,这是不方便的。因为不是所有开发者都会在release一个项目的时候加上一个tag。还有就是,如果所依赖的项目来源不是github或者私有的gitlab,没有tag功能的时候呢?
END~
简单记录一下,如何在Mac OSX下安装Monit。
Monit是一个什么东西?它,其实是一个监控工具,用来监控服务器上的进程或者应用。具体请看这里。
以下是傻瓜是步骤:
1、下载Monit安装包。在其官网下载便可。
2、解压安装包,把bin文件夹的monit文件拷贝到系统usr/local/bin下面去,接着把conf文件夹下面的monitrc拷贝到usr/local/etc下面去。
之后就可以在terminal上使用monit作为命令了。
PS:Monit提供了一个web界面,默认是localhost:2812,访问需要密码。这些都可以在monitrc文件里面看得到,打开即可。
网站流量衡量名词:
最近遇到一个问题,就是整理一个系统的数据库的相关东西的时候,发现有些字段,没有统一的一个地方去注释它的意思。同时,对于团队内部知识传递的时候,对于一个Rails项目,总不可能打开一个Rails的项目,去看schema吧?
而且,对于Rails这种项目,数据库的更改,都是靠db migration。所以,我就想,既然每次都是先做db migration的工作,那么在进行db migration之后,利用某种手段把数据库的schema导出来就OK了。基于这种想法,我就先google了一番,看看ActiveRecord能提供哪种方便的手段。幸好ActiveRecord本来就提供了足够丰富的api让我们去获知数据库的相关信息。现在,跟着我来看看吧。
首先,你先有一个Rails项目。假设你有一个User的model:
class CreateUsers < ActiveRecord::Migration
  def change
    create_table :users do |t|
        t.string :name
        t.timestamps null: false
    end
  end
end
class User < ActiveRecord::Base
end然后,进去rails c,输入以下这句:
ActiveRecord::Base.descendants
# 返回它会返回
# [User(id: integer, name: string, created_at: datetime, updated_at: datetime)]从上面的代码看,User继承了ActiveRecord::Base。那么ActiveRecord::Base.descendants就可以找到所有继承了ActiveRecord::Base的对象,也就是所有Model,再进一步说就可以找到数据库里面的所有表了。(如果你发现ActiveRecord::Base.descendants返回的是一个空数组,你需要先访问一下Model。)
依然在rails c的条件下,输入:
User.table_然后,连按两次tab键。你可以找到一个model有哪些这样的方法:
User.table_exists?       User.table_name=         User.table_name_prefix=  User.table_name_suffix   User.table_name_suffix?
User.table_name User.table_name_prefix User.table_name_prefix? User.table_name_suffix= 看到里面有一个table_name的方法吧?通过它,你就可以知道一个model在数据库里面的名字是啥了。
通过这样的方式,可以接着看看字段有哪些方法可以获取,继续输入:
User.column再连按两次tab键,结果如下:
User.column_defaults       User.column_names          User.columns
User.column_for_attribute User.column_types User.columns_hash所以,到这里,就可以通过User.columns获取到一个数据表的所有字段的信息了。
根据上面的信息,以及结合spreadsheet这个gem,我就构建了一个DBSchemaExporter类,代码如下:
class DBSchemaExporter
  def initialize(options = {})
    @index = 0
    get_models()
    init_excel()
  end

  def start
    @models.each do |model|
      append_header_row(model)
      append_row(['Field Name', 'Field Type', 'Default', 'Description', 'Required'])
      model.columns.each { |c| append_row([c.name, c.sql_type, (c.default ? '' : c.default), '', (c.null ? 'No' : 'Yes')]) }

      #3 empty rows
      3.times { |i| append_row(['', '', '', '', '']) }

      increase_index()
    end

    @book.write "#{Rails.root}/tmp/db-schema-#{Time.now.strftime('%Y%m%d%H%M%S')}.xls"
  end

  private
  def increase_index
    @index = @index + 1
  end

  def init_excel
    Spreadsheet.client_encoding = 'UTF-8'
    @book = Spreadsheet::Workbook.new
    @sheet1 = @book.create_worksheet :name => "db-#{Time.now.strftime('%Y%m%d')}"
    @bold_heading = Spreadsheet::Format.new(weight: :bold, size: 14, align: :merge)
  end

  def append_row(arr)
    increase_index()
    @sheet1.row(@index).push(*arr)
  end

  def append_header_row(model)
    header_row = @sheet1.row(@index)
    # text in header row set to be center
    5.times do |i|
      header_row.set_format(i, @bold_heading)
    end
    header_row[0] = model.table_name
  end


  def get_models
    Dir["#{Rails.root}/app/models/**/*.rb"].each do |file|
      begin
        require file
      rescue
      end
    end

    # 上面先把所有的model文件require一遍,这样下面这句就能访问所有的model了
    @models = ActiveRecord::Base.descendants.sort { |x,y| x.name <=> y.name }
  end

  def db_name
    Rails.configuration.database_configuration["development"]["database"]
  end
end用法很简单,就是DBSchemaExporter.new.start。
上面通过DBSchemaExporter导出的excel是有一个字段是description。这是一个必要的字段,如果没有,那么时间一长,某些字段的解释又要花其他额外的时间去回忆了。而且,数据库有一个叫comment的功能可以给table或者column添加注解的。所以,description可以通过comment实现。
搜索一下,Ruby社区,有一个gem叫migration_comments,还蛮合适。(具体的用法,这里就不说了。可以去看它的github就有相关的用法说明。)但可惜的是,在Mysql的条件下,通过model的column返回的信息里面,通过comment方法返回的东西是nil的。(Sqlite3,却可以。)所以,最后我不得不通过相关的sql语句获得想要的comment。可以看看加入comment之后,DBSchemaExporter的具体代码:
class DBSchemaExporter
  def initialize(options = {})
    @index = 0
    get_models()
    init_excel()
  end

  def start
    @models.each do |model|
      if model.table_exists?
        append_header_row(model)
        append_header_desc_row(model)
        append_row(['Field Name', 'Field Type', 'Default', 'Description', 'Required'])
        model.columns.each { |c| append_row([c.name, c.sql_type, (c.default ? '' : c.default), get_column_comment(model, c.name), (c.null ? 'No' : 'Yes')]) }

        #3 empty rows
        3.times { |i| append_row(['', '', '', '', '']) }

        increase_index()
      end
    end

    @book.write "#{Rails.root}/tmp/db-schema-#{Time.now.strftime('%Y%m%d%H%M%S')}.xls"
  end

  private
  def increase_index
    @index = @index + 1
  end

  def init_excel
    Spreadsheet.client_encoding = 'UTF-8'
    @book = Spreadsheet::Workbook.new
    @sheet1 = @book.create_worksheet :name => "db-#{Time.now.strftime('%Y%m%d')}"
    @bold_heading = Spreadsheet::Format.new(weight: :bold, size: 14, align: :merge)
    @heading_with_no_bold = Spreadsheet::Format.new(size: 12, align: :merge)
    @all_table_column_comments = {}
  end

  def append_row(arr)
    increase_index()
    @sheet1.row(@index).push(*arr)
  end

  def append_header_row(model)
    header_row = @sheet1.row(@index)
    # text in header row set to be center
    5.times do |i|
      header_row.set_format(i, @bold_heading)
    end
    header_row[0] = model.table_name
  end

  def append_header_desc_row(model)
    increase_index()
    header_desc_row = @sheet1.row(@index)
    # text in header row set to be center
    5.times do |i|
      header_desc_row.set_format(i, @heading_with_no_bold)
    end
    header_desc_row[0] = "DESCRIPTION: #{get_table_comment(model)}"
  end

  def get_models
    Dir["#{Rails.root}/app/models/**/*.rb"].each do |file|
      begin
        require file
      rescue
      end
    end

    @models = ActiveRecord::Base.descendants.sort { |x,y| x.name <=> y.name }
  end

  def get_table_comment(model)
    ActiveRecord::Base.connection.execute("SELECT table_comment FROM INFORMATION_SCHEMA.TABLES WHERE table_schema='#{db_name}' AND table_name='#{model.table_name}';").as_json[0][0]
  end

  def get_column_comment(model, column_name)
    if !@all_table_column_comments[model.table_name]
      @all_table_column_comments[model.table_name] = ActiveRecord::Base.connection.execute("SELECT a.COLUMN_NAME, a.COLUMN_COMMENT FROM INFORMATION_SCHEMA.COLUMNS a WHERE a.TABLE_NAME = '#{model.table_name}' AND table_schema='#{db_name}';").as_json
    end

    comment = ""
    @all_table_column_comments[model.table_name].each do |cc|
      comment = cc[1] if cc[0] == column_name
    end
    return comment
  end

  def db_name
    Rails.configuration.database_configuration["development"]["database"]
  end
end
END~
Recently, we decide to dockerize all our projects and ship them to our host. Here I want to talk about what I do for dockerizing our golang projects.
The first time I dockerized my golang app was three months ago. It was a simple way which just copy the bin file and config file into the docker image, then push it to our private docker hub. The steps are as below:
The good part of building image locally are these:
Except for the good ones, the bad are:
Mostly we want it work at cloud, so we do this way:
By this way, we need to describe the complete environment requirements to docker to build the image by Dockerfile.
GB, a tool for building golang project. I think it more good for me than any other tools (such as godep, glide, gpm, ...). Since I can put my project anywhere locally and no need to care about the $GOPATH except for $GOROOT.
OK, no more blablabla... Let's take an example to go. First, we have a project named myapp and it's structure like this:
/myapp
../src
..../app
....../main.go
Locally, under the /myapp we can use gb build all or gb build app to build the project. GB will create Golang standard structure like this in our project:
/myapp
../src
..../app
....../main.go
../bin
../pkg
../vendor
If you import some packages which from community, then you will get failed and you need to follow GB's guide to fix the package references. It is too much trouble. So I have my own solution to go through it.
I will have a build.sh and depfile.json in the project. Also it needs jq which a command tool to process the json file. If I need to import a package into project, I will first put it into depfile.json. And then run sh build.sh to fix the package reference. If it failed by can not get the reference in the package, I just need to put that reference into depfile.json.
So, the depfile.json like this:
{
  "dependencies": [
    {
	"path": "github.com/labstack/echo",
	"tag": "v3.0.3"
    },
    {
        "path": "golang.org/x/crypto/chacha20poly1305"
    },
    {
	"path": "github.com/go-redis/redis"
    }
  ]
}
And build.sh is this:
#!/bin/bash

IFS=$'\n'; dependencies=($(jq -c '.dependencies[]' depfile.json))

for item in "${dependencies[@]}"
do
	path=($(echo $item | jq '.path'))
	tag=($(echo $item | jq '.tag'))

	if [[ $tag != null ]]; then
		fetch_cmd="gb vendor fetch -tag "$tag" "$path
	else
		fetch_cmd="gb vendor fetch "$path
	fi

	eval $fetch_cmd
doneAfter we can build our project successfully and easily, it is time to dockerize.
For the base image, I command to use desertbit/golang-gb:1.8-alpine, not the onbuild. Because I don't want it copy all things of the project. So my Dockerfile will like this:
FROM desertbit/golang-gb:1.8-alpine

MAINTAINER AbelLai

RUN mkdir -p $PROPATH/src/app
ADD /build.sh $PROPATH/build.sh
ADD /depfile.json $PROPATH/depfile.json
ADD /src/app $PROPATH/src/app

WORKDIR $PROPATH

RUN apk update && \
       apk add bash && \
       apk add jq && \
       apk add git && \
       bash build.sh && \
       gb build all

CMD ["./bin/app"]
OK. After we done Dockerfile, just build your image and have fun!
END ~~~
有时候,在一个git的repository里面,已经存在了一个文件。然后,由于需求的变更之类的,需要屏蔽掉那个文件。于是,我们会在.gitignore文件里面加上:
/ignore_file.file然后提交代码,发现还是屏蔽不了。原因在于这个文件已经在repository的cache里面了。所以,我们要这样干:
git rm -rf --cached .
git add .
把cache删除了,然后重新把他们加回到repository的版本控制里面就行了。
END~~~
关于Golang的context.Context这个东西,网上已经有很多说明,比如说实现goroutine的管理、不同groutine之间的value传值、超时控制等。说实话,我目前看了之后,还是有点云里雾里。
这里贴一个我自己写的例子(关于多个http并发/行请求超时处理的例子),如下:
package main

import (
	"encoding/json"
	"fmt"
	"golang.org/x/net/context"
	"net/http"
	"time"
)

func main() {
	go func() {
		http.HandleFunc("/one", handler1)
		http.HandleFunc("/two", handler2)

		fmt.Println(http.ListenAndServe(":7981", nil))
	}()

	time.Sleep(time.Second)

	baseCtx := context.Background()
	timeoutCtx, cancel := context.WithTimeout(baseCtx, time.Second*3)
	defer cancel()

	resultCh := make(chan int, 2)

	myReq1, err1 := doRequest("http://localhost:7981/one", resultCh)
	if err1 != nil {
		fmt.Println("req1 err", err1)
		return
	}
	myReq2, err2 := doRequest("http://localhost:7981/two", resultCh)
	if err2 != nil {
		fmt.Println("req2 err", err2)
		return
	}

	var resultArr []int

	for {
		select {
		case <-timeoutCtx.Done():
			myReq1.Tr.CancelRequest(myReq1.Req)
			myReq2.Tr.CancelRequest(myReq2.Req)
			fmt.Println("error from timeout context", timeoutCtx.Err())
			return
		case v := <-resultCh:
			resultArr = append(resultArr, v)
			if len(resultArr) == 2 {
				var r int

				for _, v := range resultArr {
					r = r + v
				}

				fmt.Println("Result: ", r)
				break
			}
		}
	}

	defer func() {
		fmt.Println("exit...")
	}()
}

type MyReq struct {
	Tr  *http.Transport
	Req *http.Request
}

func doRequest(url string, resultCh chan int) (req MyReq, err error) {
	var httpReq *http.Request
	httpReq, err = http.NewRequest("GET", url, nil)
	if err != nil {
		return
	}

	tr := &http.Transport{}
	client := &http.Client{Transport: tr}

	go func() {
		resp, err := client.Do(httpReq)
		if err != nil {
			fmt.Println("error for httpReq")
			return
		}

		var v Result
		err = json.NewDecoder(resp.Body).Decode(&v)
		if err != nil {
			fmt.Println("error for decoding httpReq's resp")
			return
		}

		resultCh <- v.Value
	}()

	req = MyReq{Tr: tr, Req: httpReq}
	return
}

type Result struct {
	Value int
}

func handler1(w http.ResponseWriter, req *http.Request) {
	v := Result{Value: 1}
	json.NewEncoder(w).Encode(v)
}

func handler2(w http.ResponseWriter, req *http.Request) {
	v := Result{Value: 2}
	json.NewEncoder(w).Encode(v)
}
至于更深的理解,目前还没有。以后有不一样的感受时再更新。
相关资料:
最近又重新看起了Golang。虽然,对于它的语法,多少有点别扭的感觉,但它依然有不少值得使用的地方。特别是它的并发特性。毫无疑问的,这也是它被许多人喜欢的重要原因。
那为何最近又重拾呢?因为以前觉得它还有很多不成熟的地方。现在,它本身以及整个社区已经好了很多,各种供给也完善了好多。而且,我也一直断断续续地有在关注着它。所以,应该把它拿起来,甚至用到日常的项目中去。
安装那些事情,按照官方网站就可以了。以Mac OSX的环境为例(Go 1.6版本),安装完成之后,在/usr/local/go下就是go安装目录的结构了:
/bin:包含可执行文件,如:编译器,Go 工具/doc:包含示例程序,代码工具,本地文档等/lib:包含文档模版/misc:包含与支持 Go 编辑器有关的配置文件以及 cgo 的示例/pkg:包含标准库的包的对象文件(.a)/src:包含源代码构建脚本和标准库的包的完整源代码(Go 是一门开源语言)/src/cmd:包含 Go 和 C 的编译器和命令行脚本
这里目录结构和《The way to go》里面的有些出入,可能是Go版本不同所致。
还有关于工作目录,这个我就觉得是一个比较不灵活的要求了。Go要求基于其的项目,需要设置一个环境变量$GOPATH,并且目录还要包含src、pkg、bin这几个目录。到这里,其实还好的。但是,如果你有多个工作目录,那就变得你要把多个工作目录的路径加到$GOPATH里面去。尽管现在有些工具能简化一些,但还是达不到像其他语言那样的便利。
Setup好Go语言的环境,那就来个例子吧!
没错吧?基本开始一门编程语言,我们第一句向这门编程语言的世界说的:
//hello.go
package main

import (
  "fmt"
)

func main() {
  fmt.Println("Hello World!")
}然后,执行go run hello.go,就会看得到打印出来的Hello World了。
最近几天,购买的梯子在“墙”面前,瑟瑟发抖,很多情况都用不了。所以,只能用自造的Proxy了。这里,记录一下在Mac OSX下ShadowSock的相关配置。
以上两个步骤,浏览器“跨越长城”已经是可以的了。但是,对于Terminal,则需要另外配置。
配置终端,其实就是需要安装另一个工具,叫polipo。安装的方式有两种:
brew install polipo。make all得到polipo这个执行文件。最后,在~/.bash_profile里面添加如下环境变量。
export http_proxy=”http://127.0.0.1:8123/”
export https_proxy=”http://127.0.0.1:8123/”
export ftp_proxy=”http://127.0.0.1:8123/”
export no_proxy=”localhost,127.0.0.1,localaddress,.localdomain.com”
export HTTP_PROXY=”http://127.0.0.1:8123/”
export HTTPS_PROXY=”http://127.0.0.1:8123/”
export FTP_PROXY=”http://127.0.0.1:8123/”
export NO_PROXY=”localhost,127.0.0.1,localaddress,.localdomain.com” 最后最后,运行polipo socksParentProxy=127.0.0.1:1080即可(如果是源码编译的,是这样子./polipo socksParentProxy=127.0.0.1:1080)。
END~~~
由于Golang能读懂系统环境变量
http_proxy和no_proxy,所以在Golang应用在进行网络请求的时候需要把上面说到的环境变量都注释掉!!!当然了,Docker也不例外!
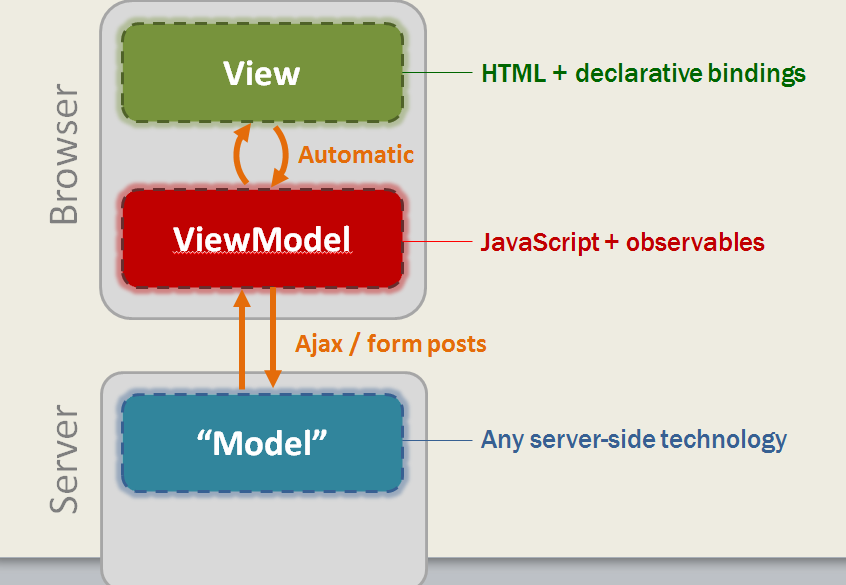
最近,在一个项目里面,写了不少前端。实践过程中,并没有使用什么大杀器的前端框架或者库(除了jQuery之外),比如Angular.js、Vue.js、Backbone.js、React.js等。毫无疑问的是,前端框架或者库是会极好的促进项目的开发,否则其没有存在的必要性。但,我没有用,其实是不想引用太多东西,在于维护的角度考虑。不过,就目前而言,我觉得一个MVVM的库加jQuery,基本可以支撑目前所做的企业应用。
MVVM,究其组成就是Model + View + ViewModel。而这里的Model可以是前端的,也可以是后端的。如Knockout.js(图片来源博客园NicolasPei):
那如果,我们换一个角度去想,用Resource替代Model,会是什么样子?基于此,我写了个例子,结构图如下:

在Web前端,JS实现一个ArticleResource,同时Server实现一个ArticlesResource API。Web前端与Server的交互则是前后端两个ArticleResource。
前端代码如下:
<h3>写我所想所思:</h3>
<div id="demo-new-article-section">
    <input type="text" data-bind="value: title" />
    <br/>
    <br/>
    <textarea rows="3" cols="20" data-bind="value: content"></textarea>
    <br/>
    <br/>
    <button data-bind="click: submit">提交</button>
</div>
var ResourceBuilder = (function () {
return {
build: function (resource_name) {
this[resource_name + "Resource"] = new (function () {
this.resource_name = resource_name.toLowerCase() + "s";
this._ajax = function (type, subUrl, data) {
var _options = {
type: type,
url: ("/" + subUrl),
dataType: 'json',
data: data
};
if(_options.type.toUpperCase() == "GET") {
_options.url += ((_options.url.indexOf("?") > -1 ? "" : "?") + "&___t=" + (new Date).getTime());
}
return $.ajax(_options);
};
this._get = function (url) {
return this._ajax("GET", url, {});
};
this._post = function (url, data) {
return this._ajax("POST", url, data);
};
this._put = function(url, data) {
return this._post(url, $.extend({ _method: "put" }, data));
};
this._delete = function(url) {
return this._post(url, { _method: "delete" });
};
this.allSync = function () {
return this._get(this.resource_name);
};
this.findSync = function (id) {
return this._get(this.resource_name + "/" + id);
};
this.deleteSync = function (id) {
return this._delete(this.resource_name + "/" + id);
};
this.createSync = function (article) {
return this._post(this.resource_name, article);
};
this.updateSync = function (id, article) {
return this._put(this.resource_name + "/" + id, article);
};
});
}
};
})();
ResourceBuilder.build("Article");
function ArticleViewModel() {
this.title = ko.observable("");
this.content = ko.observable("");
}
$.extend(ArticleViewModel.prototype, {
submit: function () {
var new_article = ResourceBuilder.ArticleResource.createSync({
title: this.title(),
content: this.content()
});
new_article.done(function (data, status, xhr) {
console.log(data);
alert("新博文提交成功!");
});
new_article.fail(function (xhr, status, err) {
console.log(err);
});
}
});
ko.applyBindings(new ArticleViewModel(), document.getElementById('demo-new-article-section'));Server端,Rails的项目里面有个ArticlesController,如下:
class ArticlesController < ApplicationController
    def index
        render_json Article.all
    end

    def show
        render_json Article.find_by_id params[:id]
    end

    def create
        new_article = Article.create(:title => params[:title], :content => params[:content])

        render_json new_article
    end

    def update

    end

    def destroy

    end

    private
        def render_json(data)
            render :json => { :data => data }
        end
end
Rails项目里,配置route如下:
Rails.application.routes.draw do
  root "home#index"

  resources :articles
end
其实,看起来和用Model是一样的。只不过,基于面向资源的角度去想一下。因为目前Server基本都是提供RESTful的接口,而RESTful则引出了ROA这个概念。
END~
Golang内部构建了goroutine来支持并发,降低并发编程的难度。所以,在Golang的项目里面,构建并发简单了许多。例如:
package main

import (
    "fmt"
    "net/http"
        "time"
)

func main() {
    http.HandleFunc("/test", testHandler)
    http.ListenAndServe(":5015", nil)
}

func testHandler(res http.ResponseWriter, req *http.Request) {
        go func() {
             time.Sleep(time.Second * 10)
             fmt.Println("concurrency stuff here")
        }()
    res.WriteHeader(http.StatusOK)
}从上面这个例子看,每接收一个/test的请求,内容就启动一个goroutine去处理请求的内容,然后立即响应回给前端。这是最简单明了的做法。**但,这样的做法有产生的作用是,如果有大量的请求进来,那么就会产生大量的goroutine。**自然随之而来的影响可以想象得到。
如果看过golang的一些资料的话,golang社区流行的一句话是并发应该靠channel(原话当然不是这样)。但,单靠channel进行一些简单后续处理,效果还是不会很明显。但,**如果加上pool的概念呢?**就好像我们在其他语言里面,有ThreadPool一样。那么channel pool就如这样channelPool := make(chan chan string, 5)。基于这样的做法和这篇文章的代码,我抽取和封装了一下,如下:
// jobActor.go
package goparallel

var jobActor (func(interface{}) error)

func attachJobActor(actor func(interface{}) error) {
    jobActor = actor
}
// jobQueue.go
package goparallel
type job interface{}
var jobQueue chan job
func initJobQueue(maxJobQueueSize int) {
jobQueue = make(chan job, maxJobQueueSize)
}
func acceptNewJob(_job interface{}) {
jobQueue <- _job
}// worker.go
package goparallel
import (
log "fmt"
)
type worker struct {
workerChannel chan chan job
jobChannel chan job
quit chan bool
}
func (w worker) start() {
go func() {
for {
w.workerChannel <- w.jobChannel
select {
case job := <- w.jobChannel:
if err := jobActor(job); err != nil {
log.Errorf("Error from job actor")
}
case <- w.quit:
return
}
}
}()
}
func (w worker) stop() {
go func() {
w.quit <- true
}()
}// dispatcher.go
package goparallel
type dispatcher struct {
workerChannel chan chan job
maxWorker int
}
func (d *dispatcher) run() {
for i := 0; i < d.maxWorker; i++ {
worker := newWorker(d.workerChannel)
worker.start()
}
go d.dispatch()
}
func (d *dispatcher) dispatch() {
for {
select {
case _job := <- jobQueue:
go func(_job job) {
jobChannel := <- d.workerChannel
jobChannel <- _job
}(_job)
}
}
}
func newDispatcher(maxWorker int) *dispatcher {
pool := make(chan chan job, maxWorker)
return &dispatcher{workerChannel: pool, maxWorker: maxWorker}
}
func newWorker(workerChannel chan chan job) worker {
return worker{
workerChannel: workerChannel,
jobChannel: make(chan job),
quit: make(chan bool),
}
}// main.go
package goparallel
func Go(maxQueueSize, maxWorker int, actor func(interface{}) error) {
initJobQueue(maxQueueSize)
attachJobActor(actor)
newDispatcher(maxWorker).run()
}
func Accept(_job interface{}) {
acceptNewJob(_job)
}以上是关于用golang处理并发的一些归纳总结。以上的代码,我归到了一个repository里面了
今天在本地build一个镜像之后,docker images之后连接不上了,出现Cannot connect to the Docker daemon at unix:///var/run/docker.sock. Is the docker daemon running?.
解决方法:
docker-machine restart&&eval "$(docker-machine env default)"&&docker-machine env .eval $(docker-machine env).一致性哈希算法主要使用在分布式数据存储系统中,按照一定的策略将数据尽可能均匀分布到所有的存储节点上去,使得系统具有良好的负载均衡性能和扩展性。
最近工作上有类似的场景,因此觉得使用一致性Hash算法能很好解决将大量的数据均匀分发到不同的处理节点上。
本文的实现是基于这篇文章的内容(它的代码在这里)以及Groupcache的一致性Hash算法实现的一个合并,并非个人的原创。因为该文章没有虚拟节点的实现,因此在参考Groupcache的实现,把虚拟节点部分加上。算是对该文章内容的一个小小的升级吧。
ring.go
package consistenthash

import (
	"sort"
	"strconv"
	"sync"
)

type Ring struct {
	replicas int
	Nodes    Nodes
	sync.Mutex
}

func NewRing(replicas int) *Ring {
	return &Ring{Nodes: Nodes{}, replicas: replicas}
}

func (r *Ring) AddNodes(ids []string) {
	r.Lock()
	defer r.Unlock()

	r.buildNodeIds(ids, func(readlNodeId, virtualNodeId string) {
		node := NewNode(readlNodeId, virtualNodeId)
		r.Nodes = append(r.Nodes, node)
	})

	sort.Sort(r.Nodes)
}

func (r *Ring) RemoveNodes(ids []string) error {
	r.Lock()
	defer r.Unlock()

	ok := true
	r.buildNodeIds(ids, func(readlNodeId, virtualNodeId string) {
		nodeIndex := r.search(virtualNodeId)
		if nodeIndex >= r.Nodes.Len() || r.Nodes[nodeIndex].Id != readlNodeId {
			ok = false
		} else {
		        r.Nodes = append(r.Nodes[:nodeIndex], r.Nodes[nodeIndex+1:]...)
                }
	})

	if !ok {
		return NodeNotFoundErr
	}
	return nil
}

func (r *Ring) GetNode(id string) *Node {
	i := r.search(id)
	if i >= r.Nodes.Len() {
		i = 0
	}

	return r.Nodes[i]
}

func (r *Ring) search(id string) int {
	return sort.Search(r.Nodes.Len(), func(i int) bool {
		return r.Nodes[i].hashId >= buildHashId(id)
	})
}

func (r *Ring) buildNodeIds(ids []string, fn func(realNodeId, virtualNodeId string)) {
	for _, id := range ids {
		for i := 0; i < r.replicas; i++ {
			fn(id, strconv.Itoa(i)+id)
		}
	}
}
node.go
package consistenthash

type Node struct {
	Id     string
	hashId uint32
}

func NewNode(realNodeId, virtaulNodeId string) *Node {
	return &Node{
		Id:     realNodeId,
		hashId: buildHashId(virtaulNodeId),
	}
}

type Nodes []*Node

func (n Nodes) Len() int           { return len(n) }
func (n Nodes) Swap(i, j int)      { n[i], n[j] = n[j], n[i] }
func (n Nodes) Less(i, j int) bool { return n[i].hashId < n[j].hashId }
error.go
package consistenthash

import (
	"errors"
)

var NodeNotFoundErr = errors.New("node not found")
helper.go
package consistenthash

import (
	"hash/crc32"
)

func buildHashId(key string) uint32 {
	return crc32.ChecksumIEEE([]byte(key))
}Nginx是目前流行的几款Web服务器之一。平常我们使用Nginx有那么两种用法:
这里简单记录一下,如何让Nginx直接输出静态网页。
需求是这样的,有些公司的官网基本就是几个静态的网页组成,所以基本就不用什么额外的后台代码支撑(比如Java、C#、Ruby、Python等)。还有,平常的服务器基本标配Nginx。所以,就可以利用Nginx直接输出这些页面。
首先,我们先有这样一个目录:
/home
  /demo
    /src
      /index.html
      /index.css
    /nginx_temp
    /nginx_cache
然后index.html的内容如下:
<!DOCTYPE html>
<html>
  <head>
    <title>Static Resource Demo</title>
    <link rel="stylesheet" href="/index.css" />
  </head>
  <body>
    <div class="text">Demo content</div>
  </body>
</html>
还有index.css:
.text {
  font-size: 18px;
  color: #ddd;
}
接下来就是Nginx的配置了。
先在nginx的conf.d里面新加一个conf文件static_demo.conf。(如果你的nginx配置里面没有conf.d,最好是先建一个这样的目录,然后include进nginx.conf的http节点去。)
然后,static_demo.conf的内容如下:
server {
  listen 3001;

  location / {
    root /home/demo/src;
    index index.html;
}配置好了,重启一下,./nginx -s reload。至此,Nginx输出静态网页就可以了。
但,静态网页和我们平常输出静态资源没区别,那我们不是可以上缓存了吗?没错,是可以的。还有,记得刚开始的时候,目录有两个文件夹nginx_temp和nginx_cache吗?这两货就是缓存相关的。看如下static_demo.conf的更改:
proxy_temp_path /home/demo/nginx_temp;
proxy_cache_path /home/demo/nginx_cache levels=1:2 keys_zone=static_cache:10m inactive=3d max_size=30g;

server {
  listen 3001;

  location / {
    root /home/demo/src;
    index index.html;
  }

  location ~ .*\.(css)(.*) {
    root /home/demo/src;
    proxy_redirect off;
    proxy_set_header Host $host;
    proxy_cache static_cache;
    proxy_cache_valid 200 302 1h;
    proxy_cache_valid 301 1d;
    proxy_cache_valid any 1m;
    expires 30d;
  }
}
至此,Nginx输出静态网页+缓存已经配置完毕。至于缓存配置哪些参数,迟点回来补充。
END~
第一次接触Ruby应该是2013年,记得当时就是看了看语法以及根据ROR官方网站的文档跑了下。后来,便没下文了(没项目驱动还是会很快就没下文的了)。为什么那时会突然接触呢?应该是看了松本行弘的两本书吧,然后觉得Ruby是门蛮酷的语言。Yeah,没错,我喜欢酷的东西。
到了2014年12月,部门由于项目的需要,便组了Ruby开发team,由我来带。而此前,我一直都是折腾.NET的web相关的开发工作。C#以及web前端的东西,我蛮熟。同时,team内的几名成员也都是我以.NET开发者的身份招进来的。也就是说,基本整个team都是小白。随后,便是熟悉Ruby以及ROR的东西。但,由于我还要参与.NET team的开发工作,所以那会我并没有参与什么Ruby的项目,自然的对于Ruby以及ROR的熟悉是比不上Ruby开发team的同学。最近,慢慢地从.NET这边退出来,便有些时间去看Ruby的东西。下面便是最近个人学习Ruby/ROR的感受。
从业这4、5年左右,也学了些编程语言。Ruby这门语言,我是觉得很酷的,但也是语法最多的一门语言。比如就很多新手来说,有时候很难区别一句Ruby的代码,它调用的是方法还是属性,如:
class Man
  attr_accessor :name

  def initialize
  end

  def get_name
    @name
  end
end

abel = Man.new
puts abel.name
puts abel.get_name   #有时候比较难区分这个是属性还是方法
以和Ruby同是解释型的Javascript来说,我们习惯了这样:
function Man() {
  this.name = "";
  this.get_name = function () { return this.name; }
}

abel = new Man();
console.log(abel.name);
console.log(abel.get_name());
如果你去看Ruby作者松本行弘的一些书,你就会知道该作者造这门语言会比其他语言更多的考虑到开发者的体验。所以,使用Ruby进行开发的确是一种很爽的体验。因为它有足够多的语法糖,你能以更快、更简洁的方式编写出一个功能,效率会比较高。Ruby除了酷之外,它也很强大。ROR便是举证Ruby强大的一个很好的例子。Ruby也因为ROR这个web framework而被更多的人知道以及接受。
熟悉一下Ruby的语法之后,ROR基本成了每一个从事Ruby开发第二个要学习的环节(我估计甚至有些人第一步就开始ROR。)。我觉得学习ROR之后,基本可以引出Ruby开发方面的枝枝节节。例如,学习ROR,其他官方网站那个教程是跑不掉。当你跑完它那个教程之后,你可以发现以后Ruby开发所涉及东西都在里面,只需要自己去拓展。比如:
上面这些,跑完ROR的教程之后,每一个都去看看。比如,为什么需要一个gemfile;如何创建一个gemfile;gemfile的用法;bundle的用法;项目如何引用bundle;rake是什么;怎么创建一个rake task;等等等等。
到了今天,由于现在软件开发越来越复杂,ROR已经是一个大杀器,也是一个庞然大物,能进行快速开发。所以,很多创业型的项目都喜欢用它,最后如果成功的话,再抛弃它(你没看错,而且已经有很多例子是这样干的)或者重构自己的项目。它依赖的东西太多,需要去更多的熟悉,比如asset handler等等。当然,Ruby的世界,也并不是只有ROR这一大怪物。
随着对ROR有更多的熟悉,我慢慢地不大喜欢ROR。因为东西多,Sinatra蛮好的。 :-)
Ruby on Rails作为一个全栈型的Web开发框架,其有提高开发效率的能力。但是,由于其本身的一些特点,你会发现去熟悉一个自己从未接触过的Rails App是有一定的难度的。比如我们想看看一个Rails App的数据模型,自然就会去看Model。可是,由于Ruby以及ActiveRecord的特点,一个Model不会在该文件里面列出其所包含的属性或者字段。对于熟手来说问题不大,可是对于新手来说就显得不知所措了。
对于前面所说,国外一个哥们Justin Weiss写了篇文章。我这里,结合该作者的观点做一下笔记:
- 先大体了解该Rails App的背景或者说用途
- 先浏览一下app/models这个文件夹有多少个model,然后去浏览db/schema.rb,并且注意里面那些*_id字段。或者可以借助一些gem包来可视化db/schema.rb里面table的关系(比如rails-erd这个gem包)。
- 必要的时候再去看app/models里面的model,因为里面的model可能会包含一些其他的字段/属性。
- 把Rails App运行起来,去体验一下,把功能和model联系起来。
- 挑某一部分功能详读。
End~
好早之前就买了本《数据结构与算法Javascript描述》,最近在重看,然后将里面的例子用Golang实现一次。所以,这里的例子算是是对该书例子的翻译。
package main

import (
	"fmt"
)

type Stack struct {
	dataStore []interface{}
	top       int
}

func (s *Stack) Push(element interface{}) {
	s.top = s.top + 1
	s.dataStore = append(s.dataStore, element)
}

func (s *Stack) Pop() (bool, interface{}) {
	if s.top == 0 {
		return false, nil
	}

	s.top = s.top - 1
	return true, s.dataStore[s.top]
}

func (s *Stack) Peek() (bool, interface{}) {
	if s.top == 0 {
		return false, nil
	}

	return true, s.dataStore[s.top-1]
}

func (s *Stack) Clear() {
	s.dataStore = []interface{}{}
	s.top = 0
}

func (s *Stack) Length() int {
	return s.top
}

func NewStack() *Stack {
	return &Stack{dataStore: []interface{}{}, top: 0}
}

func main() {
	stack := NewStack()
	stack.Push("David")
	stack.Push("Raymond")
	stack.Push("Bryan")

	fmt.Println("length:", stack.Length())
	_, peekValue := stack.Peek()
	fmt.Println("Peek:", peekValue)

	_, popedValue := stack.Pop()
	fmt.Println("poped:", popedValue)

	fmt.Println("length:", stack.Length())
	_, peekValue = stack.Peek()
	fmt.Println("Peek:", peekValue)

	stack.Push("Cynthia")
	fmt.Println("length:", stack.Length())
	_, peekValue = stack.Peek()
	fmt.Println("Peek:", peekValue)

	stack.Clear()
	fmt.Println("length:", stack.Length())
	_, peekValue = stack.Peek()
	fmt.Println("Peek:", peekValue)
}package main
import (
"fmt"
)
type Queue struct {
dataStore []string
}
func (q *Queue) Enqueue(item string) {
q.dataStore = append(q.dataStore, item)
}
func (q *Queue) Dequeue() (bool, string) {
l := q.Length()
if l == 0 {
return false, ""
}
str := q.dataStore[0]
q.dataStore = q.dataStore[1:l]
return true, str
}
func (q *Queue) Length() int {
return len(q.dataStore)
}
func (q *Queue) Front() (bool, string) {
if q.Length() == 0 {
return false, ""
}
return true, q.dataStore[0]
}
func (q *Queue) Back() (bool, string) {
l := q.Length()
if l == 0 {
return false, ""
}
return true, q.dataStore[l-1]
}
func (q *Queue) ToString() string {
var str string
for _, v := range q.dataStore {
str += v + "\n"
}
return str
}
func NewQueue() *Queue {
return &Queue{dataStore: []string{}}
}
func main() {
q := NewQueue()
q.Enqueue("Meredith")
q.Enqueue("Cynthia")
q.Enqueue("Jennifer")
fmt.Println(q.ToString())
q.Dequeue()
fmt.Println(q.ToString())
_, f := q.Front()
fmt.Println("Front of queue: " + f)
_, b := q.Back()
fmt.Println("Back of queue: " + b)
}TBC...
A declarative, efficient, and flexible JavaScript library for building user interfaces.
🖖 Vue.js is a progressive, incrementally-adoptable JavaScript framework for building UI on the web.
TypeScript is a superset of JavaScript that compiles to clean JavaScript output.
An Open Source Machine Learning Framework for Everyone
The Web framework for perfectionists with deadlines.
A PHP framework for web artisans
Bring data to life with SVG, Canvas and HTML. 📊📈🎉
JavaScript (JS) is a lightweight interpreted programming language with first-class functions.
Some thing interesting about web. New door for the world.
A server is a program made to process requests and deliver data to clients.
Machine learning is a way of modeling and interpreting data that allows a piece of software to respond intelligently.
Some thing interesting about visualization, use data art
Some thing interesting about game, make everyone happy.
We are working to build community through open source technology. NB: members must have two-factor auth.
Open source projects and samples from Microsoft.
Google ❤️ Open Source for everyone.
Alibaba Open Source for everyone
Data-Driven Documents codes.
China tencent open source team.