PURPOSE
If you're using a VPN service today, you may have found the following limitations:
- All or nothing. Either ALL traffic goes down the VPN or none - unable to be selective.
- Only one VPN at a time. Cannot selectively route certain sites down one VPN, and others down another VPN.
- Unless you've configured your VPN at the router level, it's likely that only a single device can use your VPN at one time.
This project serves to address each of the above - see the FEATURES section.
Please review my blog post here http://darranboyd.wordpress.com/2013/07/05/selective-vpn-routing-solution-dsvr/
FEATURES

-
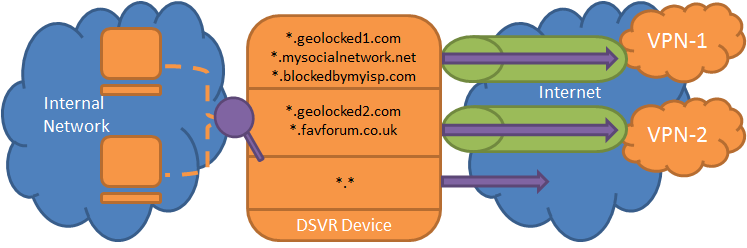
Per-site VPN routing down specific VPN connections whilst all other traffic goes down the native internet connection, for example:
ussite1.com -> United States based PPTP VPN ussite2.com -> United States based PPTP VPN uksite1.com -> United Kingdom based PPTP VPN uksite2.com -> United Kingdom based PPTP VPN allothersites -> Native internet connection
-
Supports multiple concurrent PPTP connections
-
Transparent in-line device - no configuration changes required on any other network components or clients
-
User specified DNS server for per-site DNS queries, for privacy from your ISP.
-
Stateful firewall (SPI)
-
Port Forwarding & uPnP on existing router/AP not affected (see TODO)
-
CLI access via SSH
-
Web administration portal
PRE-REQUISTES
Existing:
- Separate Modem/CE device with ethernet and DHCP server
- Separate Router/AP to provide Wifi/Wired access to clients
- Minimum of one PPTP VPN account from a service provider. Else it'll just be a pass-through router/firewall.
New components required:
- Raspberry Pi (Model B, 512mb RAM)
- SD Card (4gb min) flashed with Raspbian Wheezy
- Power source for Raspberry Pi
- USB NIC adapter (suggest Apple model: A1277)
- Standard Ethernet cable
KNOWN LIMITATIONS
- Theoretical 100mbit/s - likely less due to RPi using USB bus.
- Cannot perform source-based VPN routing without removal of existing NAT boundary, so that real sources can be determined. (see WIKI for workaround)
- Currently assumes your LAN subnet is 192.168.1.0 (see TODO)
- Currently only support PPTP based VPNs (see TODO)
TESTED WITH
- Raspbian Wheezy (2012-12-16)
- StrongVPN PPTP VPN accounts
INSTALLATION
-
Flash your SD card with Raspbain (Wheezy 2012-12-16) http://downloads.raspberrypi.org/images/raspbian/2012-12-16-wheezy-raspbian/2012-12-16-wheezy-raspbian.zip
-
Boot-up your RPi with the on-board NIC plugged into your network (without the USB NIC module installed), to obtain a DHCP address
-
Determine the RPi IP address (hint: look at your router web interface), and SSH into it - ssh pi@ipaddress
-
Run
sudo raspi-config, expand_rootfs, change_pass, change_locale, change_timezone, boot behavior (desktop no). Reboot - yes -
SSH back into the RPi, then update apt -
sudo apt-get update && sudo apt-get install ca-certificates -
Install GIT -
sudo apt-get install git -
In case you're not already there, move to the home directory
cd ~/ -
Download DSVR from git -
git clone https://github.com/dboyd13/DSVR.git ./dsvr-source -
cd dsvr-source -
Run the install script with sudo -
sudo ./installdsvrpackage.sh- take note of any errors that may come up, note that the failure to start the ISC DHCP Server is expected and not an issue. This will take a while, as it will be installing a number of dependent packages via the web. -
Remove the "source" folder -
rm -r ~/dsvr-source -
Issue the
sudo shutdown -h nowcommand to power-down the RPi -
With the power-off, plug the USB NIC into an available USB port.
-
Wire your RPI inline between your existing Modem/CE and your existing Router/Access Point as follows:
eth0 (onboard) is 'internet side' eth1 (usb) is 'lan side'
                        eth (inside)      eth (wan)
                        DHCP Server       DHCP Client
      +-----+           +                 NAT (Hide)        +-----+
      | P   |           |                 +                 | I   |
      | U   |           |                 |                 | N   |
      | B I |           |                 |                 | T C |
      | L N |    +------+   +---------+   +------------+    | E L |
      | I T |<---+Modem/|<--+Raspberry|<--+Router/     |<---+ R I |
      | C E |    |CE    |   |Pi       |   |Access Point|    | N E |
      |   R |    +------+   +---------+   +------------+    | A N |
      |   N |               |         |                     | L T |
      |   E |               |         +                     |   S |
      |   T |               |         eth1 (usb)            |     |
      +-----+               |         10.254.254.254        +-----+
                            +         DHCP Server
               eth0 (onboard)         Web admin server
                  DHCP Client         SSH server
                   NAT (Hide)         VPN gateway
- Power-up the RPi, whilst it's booting power-down and power-up both your Modem/CE and your Router/Access Point
- Wait a while for things to come up, I'd guess around 3-5mins
- On your Router/Access Point verify that the WAN interface has received a DHCP lease from the RPi, something in the 10.254.254.x range
- Verify that the internet is still working from your client machines. If not wait a while longer, else something has gone wrong.
- Verify you can ssh to your RPi - ssh [email protected], verify that the RPi can access the internet both via IP and DNS.
- Verify that you pass the ShieldsUp! (www.grc.com/shieldsup) 'All Service Ports' stealth test, this is to test the SPI firewall is functional.
The device should be a functional pass-through router/firewall at this point, see the next section to setup per-site VPNs.
VPN CONFIGURATION
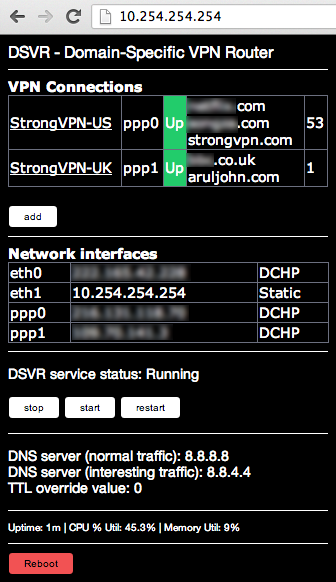
- Browse to http://10.254.254.254
- Click 'add' to add a PPTP VPN connection
- Input all fields (note that VPN server MUST be an IP address - see TODO), and specify which sites you want to be routed down this connection, suggest you include a unique 'ip address checker' (aruljohn.com, strongvpn.com) site for each - this will help in verifying it's functional
- Click 'update', then 'back'
- Repeat 2-4 for each required PPTP VPN.
- Reboot router
- Wait - maybe 3-5mins, then test that per-site VPN routing is functional. If you included a unique 'ip address checker' site for each connection, this is the best initial test.
Should be working now. Enjoy.
TODO
-
Short Term
-
'DMZ' for inside interface to circumvent dbl-nat issues (e.g. uPnP, port forwarding, VPN server)
installdsvrpackage.sh
-
Run/debug and fix.
-
Add Y/N prompt to explain what needs to happen once it completes (wiring, IP to connect to, setup PPTP connections)
makedsvrpackage.sh
- create scripts to refresh files in installstubs/
- create VERSION file based on provided arg[0]
dsvr-webadmin.py
- Allow hostname OR IP address input/parsing/encoding for peer VPN server. - FIXED.
- Read and display VERSION file
- Don't assume 'require-mppe-128' and allow user to specify PPTP encryption (or not)
dsvr.py
- Read and display VERSION file
-
-
Medium Term
- make webadmin look better on iPad webkit browser
- form input validation
- Authentication for webadmin
-
Long Term
- Add support for OpenVPN
- Allow change from 10.254.254.254 inside default (remember dhcpd.conf and DNSRouter init changes needed too!)
- Installer to prompt user for variables such as - inside IP address, LAN segment, install location
- don't assume 192.168.1.0 is LAN segment for routes and iptables
CREDIT
Portions of code taken from the dnschef project (https://thesprawl.org/projects/dnschef/)

Copyright (C) 2013 Peter Kacherginsky
All rights Reserved
LICENSE
DSVR (Domain Specific VPN Router)
Copyright 2013 Darran Boyd

dboyd13 [at @] gmail.com

Licensed under the "Attribution-NonCommercial-ShareAlike" Vizsage
Public License (the "License"). You may not use this file except
in compliance with the License. Roughly speaking, non-commercial
users may share and modify this code, but must give credit and
share improvements. However, for proper details please
read the full License, available at
    http://vizsage.com/license/Vizsage-License-BY-NC-SA.html
and the handy reference for understanding the full license at
    http://vizsage.com/license/Vizsage-Deed-BY-NC-SA.html

Unless required by applicable law or agreed to in writing, any
software distributed under the License is distributed on an
"AS IS" BASIS, WITHOUT WARRANTIES OR CONDITIONS OF ANY KIND,
either express or implied. See the License for the specific
language governing permissions and limitations under the License.
LINKS
- ASCII diagram (http://www.asciiflow.com/#Draw8450497916007412677/1697158644)
- To properly calc memory usage due to disk caching - http://www.linuxatemyram.com/index.html