

🔎 Building the package was tested on Ubuntu Xenial and Debian Jessie, runtime tests were done on Jessie.
Contents
- What is this?
- How to build and install the package
- Trouble-Shooting
- How to set up a simple "sentry" instance
- Configuration Files
- Data Directories
- Release Notes
- References
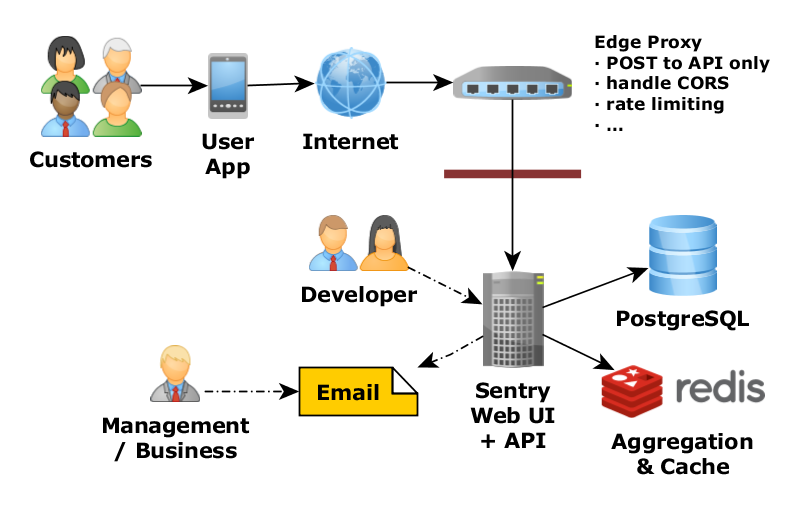
While the officially preferred way to install Sentry is via the project's Docker images by now, there are still enough situations where you want to use a classic host-centric installation method. This project helps with that on Debian-like targets, by providing DEB packaging for the server component. This makes life-cycle management on production hosts a lot easier, and avoids common drawbacks of ‘from source’ installs, like needing build tools and direct internet access in production environments.
A typical on-premise deployment with application data pushed from the Internet
The Debian packaging metadata in
debian
puts the sentry Python package and its dependencies as released on PyPI into a DEB package,
using dh-virtualenv.
The resulting omnibus package is thus easily installed to and removed from a machine,
but is not a ‘normal’ Debian python-* package. If you want that, look elsewhere.
The final package includes the official sentry-plugins,
see install_requires in setup.py for others that are added by default.
This is also the place where you can put in your own
– only use versioned dependencies so package builds are reproducible.
The easiest way to build the package is using the provided Dockerfile.build.
Then you do not need to install tooling and build dependencies on your machine,
and the package gets built in a pristine environment.
The only thing you need on your workstatioon is a docker-ce installation of version 17.06 or higher
(either on Debian
or on Ubuntu).
Call ./build.sh debian:buster to build the package for Debian Buster
– building for Debian Jessie, Debian Stretch, and Ubuntu Bionic (with ./build.sh ubuntu:bionic) is also supported.
See Building Debian Packages in Docker
for more details.
The resulting package files are placed in the dist/ directory.
To test the new package quickly without any permanent changes to any system, give it a spin in an ephemeral Docker container:
docker run -it --rm  -v $PWD/dist:/root/dist debian:buster

# Then, in the container…
apt update; apt install -yyq libpq5 python2.7 libpython2.7 libxml2 libyaml-0-2 zlib1g
dpkg -i $(ls -1 ~/dist/sentry.io_9*~buster*.deb | tail -n1)
/usr/bin/sentry --version
This makes sure the package can be installed and the Python application can be at least started.
Otherwise, you need a build machine with all build dependencies installed, specifically dh-virtualenv in addition to the normal Debian packaging tools. You can get it from this PPA, the official Ubuntu repositories, or Debian packages.
This code requires and is tested with dh-virtualenv v1.0
– depending on your platform you might get an older version via the standard packages.
On Jessie, install it from jessie-backports.
Zesty provides a package for Ubuntu that works on older releases too,
see “Extra steps on Ubuntu” below for how to use it.
In all other cases build v1.0 from source,
see the dh-virtualenv documentation for that.
With tooling installed,
the following commands will install a release version of sentry into /opt/venvs/sentry/,
and place a symlink for sentry into the machine's PATH.
git clone https://github.com/1and1/debianized-sentry.git
cd debianized-sentry/
# or "pip download --no-deps --no-binary :all: debianized-sentry" and unpack the archive

sudo apt-get install build-essential debhelper devscripts equivs

# Extra steps on Jessie
echo "deb http://ftp.debian.org/debian jessie-backports main" \
    | sudo tee /etc/apt/sources.list.d/jessie-backports.list >/dev/null
sudo apt-get update -qq
sudo apt-get install -t jessie-backports cmake dh-virtualenv
# END jessie

# Extra steps on Ubuntu
( cd /tmp && curl -LO "http://mirrors.kernel.org/ubuntu/pool/universe/d/dh-virtualenv/dh-virtualenv_1.0-1_all.deb" )
sudo dpkg -i /tmp/dh-virtualenv_1.0-1_all.deb
# END Ubuntu

sudo mk-build-deps --install debian/control
dpkg-buildpackage -uc -us -b
dpkg-deb -I ../sentry.io_*.deb
The resulting package, if all went well, can be found in the parent of your project directory.
You can upload it to a Debian package repository via e.g. dput, see
here
for a hassle-free solution that works with Artifactory and Bintray.
You can also install it directly on the build machine:
sudo dpkg -i ../sentry.io_*.deb
/usr/bin/sentry --version  # ensure it basically works
To list the installed version of sentry and all its dependencies, call this:
/opt/venvs/sentry/bin/pip freeze | lessIf you get errors regarding pkg-resources during the virtualenv creation,
update your build machine's pip and virtualenv.
The versions on many distros are just too old to handle current infrastructure (especially PyPI).
This is the one exception to “never sudo pip”, so go ahead and do this:
sudo pip install -U pip virtualenvThen try building the package again.
This package needs a reasonably recent pip for building.
On Debian Jessie, for the internal pip upgrade to work,
that means you need a newer pip on the system,
or else at least dh-virtualenv 1.1 installed (as of this writing, that is git HEAD).
To upgrade pip (which makes sense anyway, version 1.5.6 is ancient), call sudo pip install -U pip.
And to get dh-virtualenv 1.1 right now on Jessie, you need to apply this patch before building it:
--- a/debian/changelog
+++ b/debian/changelog
@@ -1,3 +1,9 @@
+dh-virtualenv (1.1-1~~dev1) unstable; urgency=medium
+
+  * Non-maintainer upload.
+
+ -- Juergen Hermann <[email protected]>  Wed, 20 Jun 2018 10:22:32 +0000
+
 dh-virtualenv (1.0-1) unstable; urgency=medium

   * New upstream release
--- a/debian/rules
+++ b/debian/rules
@@ -1,7 +1,7 @@
 #!/usr/bin/make -f

 %:
-       dh $@ --with python2 --with sphinxdoc
+       dh $@ --with python2

 override_dh_auto_clean:
        rm -rf doc/_build
@@ -13,6 +13,3 @@ override_dh_auto_build:
        rst2man doc/dh_virtualenv.1.rst > doc/dh_virtualenv.1
        dh_auto_build

-override_dh_installdocs:
-       python setup.py build_sphinx
-       dh_installdocs doc/_build/html

--- a/setup.py
+++ b/setup.py
@@ -25,7 +25,7 @@ from setuptools import setup

 project = dict(
     name='dh_virtualenv',
-    version='1.0',
+    version='1.1.dev1',
     author=u'Jyrki Pulliainen',
     author_email='[email protected]',
     url='https://github.com/spotify/dh-virtualenv',
See this ticket for details, and hopefully for a resolution at the time you read this.
After installing the package, follow the steps in Installation with Python, taking into account the differences as outlined below.
In case you want to test the setup procedure in a Docker container,
start one using docker run --rm -it -v $PWD/..:/data debian:8 bash
and then execute these commands:
PKG=$(ls -rt1 /data/sentry.io_*~buster_amd64.deb | tail -n1)
apt-get update
apt-get install sudo $(dpkg -I $PKG | egrep Depends: | cut -f2- -d: | sed -re 's/\([^)]+\),?|,//g')
dpkg -i $PKG
Note that this assumes you built the sentry.io binary package before that,
and called docker from the workdir of this project (otherwise adapt the volume mapping).
For a simple experimental installation on a single host or in Docker, also install these additional packages for related services:
sudo apt-get install redis-server postgresql postgresql-contribIn the configuration, you need to at least generate a unique secret key, like this:
new_key=$(sentry config generate-secret-key | sed -e 's/[\/&]/\\&/g')
sed -i -re "s/^system.secret-key:.+\$/system.secret-key: '$new_key'/" /etc/sentry/config.yml
unset new_key
If you use a fresh configuration set as produced by sentry init /etc/sentry,
e.g. in your configuration management,
be sure to diff against the files in etc to make sure you don't lose
changes like the correct filestore location.
To set up the PostgreSQL database, execute these commands in a root shell:
# Create DB user & schema
cd /tmp
sudo -u postgres -- createuser sentry --pwprompt
sudo -u postgres -- createdb -E utf-8 sentry
echo "GRANT ALL PRIVILEGES ON DATABASE sentry TO sentry;" \
    | sudo -u postgres -- psql -d template1
echo "ALTER ROLE sentry superuser;" \
    | sudo -u postgres -- psql -d template1

# Now change "PASSWORD" to the one you entered when creating the 'sentry' DB user!
${EDITOR:-vi} /etc/sentry/sentry.conf.py

# Create tables
sudo -u sentry SENTRY_CONF=/etc/sentry sentry upgrade
# After a while, you'll be prompted to create an initial Sentry user, say 'Y'es…
#   Would you like to create a user account now? [Y/n]:
#
# Make this user a super user (admin), there is a prompt for that too.

# Revoke temp. superuser privileges
echo "ALTER ROLE sentry nosuperuser;" \
    | sudo -u postgres -- psql -d template1
See getsentry/sentry#6098 for details regarding the temporary superuser privileges.
Regarding services, you can ignore the “Starting …” as well as the “Running Sentry as a Service” sections
of Sentry.io's ‘on premise’ instructions.
The package already contains the necessary systemd units, and starting all services is done via systemctl:
# sentry-web requires sentry-worker and sentry-cron,
# so there is no need to start / enable them separately
sudo systemctl enable sentry-web
sudo systemctl start sentry-web

# This should show 3 services in state "active (running)"
systemctl status 'sentry-*' | grep -B2 Active:
The web interface should now be reachable on port 9000 – consider putting a reverse proxy before the uWSGI server, as mentioned in the Sentry documentation.
All Sentry services run as sentry.daemon.
Note that the sentry user is not removed when purging the package,
but the /var/{log,opt}/sentry directories and the configuration files are.
After an upgrade, the services do not restart automatically by default,
to give you a chance to run the DB migration manually,
and then restart them yourself.
That means you should pin the version of the sentry package,
be it on the production hosts or in your configuration management
(i.e. do not use latest).
If on the other hand you set SENTRY_AUTO_MIGRATE=true in /etc/default/sentry,
then during package configuration the migration is performed.
If it is successful, the services are started again.
Details of the migration are logged to /var/log/sentry/upgrade-‹version›-‹timestamp›.log.
To re-try a failed migration, use dpkg-reconfigure sentry.io.
The best way to change or augment the configuration of a systemd service
is to use a ‘Drop-In’ file.
For example, to increase the limit for open file handles
above the system defaults, use this in a root shell:
unit=sentry-web

# Change max. number of open files for ‘$unit’…
mkdir -p /etc/systemd/system/$unit.service.d
cat >/etc/systemd/system/$unit.service.d/limits.conf <<'EOF'
[Service]
LimitNOFILE=8192
EOF

systemctl daemon-reload
systemctl restart $unit

# Check that the changes are effective…
systemctl cat $unit
let $(systemctl show $unit -p MainPID)
cat "/proc/$MainPID/limits" | egrep 'Limit|files'/etc/default/sentry– Operational parameters like data retention and global log levels./etc/sentry/config.yml– The Sentry YAML configuration (email, Redis, storage)./etc/sentry/sentry.conf.py– The Sentry dynamic configuration (database, and everything else)./etc/cron.d/sentry– The house-keeping cron job that callssentry cleanupeach day.
ℹ️ Please note that the files in /etc/sentry are not world-readable, since they contain passwords.
/var/log/sentry– Extra log files (by the cron job)./var/opt/sentry– Data files, thefilessubdirectory contains the default blob storage (e.g. images).
You should stick to these locations, because the maintainer scripts have special handling for them. If you need to relocate, consider using symbolic links to point to the physical location.
General notes:
- The build was tested under Xenial so far (and only very cursory).
psycopg2is installed from source, because themanylinux1wheel causes problems during ELF dynamic loading / linking.
If you're upgrading to version 9, make sure you are using the right database engine setting
in /etc/sentry.conf.py:
…
DATABASES = {
    'default': {
        'ENGINE': 'sentry.db.postgres',
…- getsentry – The Sentry GitHub organization.
- onjin/docker-sentry-with-plugins – A Docker image with some pre-installed plugins, and related docs.
- Based on slafs/sentry-docker
- clarkdave/logstash-sentry.rb – A Logstash output plugin to feed Sentry.
- Sentry for JIRA (Cloud only)
- Springerle/debianized-pypi-mold – Cookiecutter to create this type of project.
- c7n_sentry – Generic Cloud Watch log scanner /subscription that searches for tracebacks, extracts frames, and posts them to Sentry.
| Project | Version | Description |
|---|---|---|
| getsentry/sentry-plugins |  |
Official plugins by Sentry, includes GitHub and HipChat ones. |
| Banno/getsentry-ldap-auth |  |
Use LDAP as an authentication source. |
| Banno/getsentry-kafka |  |
Push events into Kafka topics. |
| simonpercivall/sentry-mailagain |  |
Resend the mail notification on receiving new events in an unresolved group. |
| andialbrecht/sentry-responsible |  |
This extension adds a widget on the sidebar of a event page to mark team members as being responsible for a event. |
| dmclain/sentry-export |  |
Allow developers to export event data in self-service. |
| yoshiori/sentry-notify-github-issues |  |
A notification plugin for GitHub issues. |
| gisce/sentry-irc |  |
Send notifications to IRC channels. |


