tp : 原本是想拿这里当图床,是图片的首字母缩写,不过发现倒是用来做笔记挺不错,欢迎参观 ^_^
tp's Introduction
tp's People
Contributors

Watchers
tp's Issues
Python版的端口、web扫描工具:ALLiN
项目代码地址:https://github.com/P1-Team/AlliN/blob/main/README_zh.md
点击下载Python脚本:AlliN.py.txt
端口扫描
python AlliN.py --host 172.252.59.212 -p- -m pscan
[root@iZuf6fshb9l6umlkgs2g4uZ ~]# python AlliN.py --host 172.252.59.212 -p- -m pscan


 █████╗ ██╗     ██╗     ██╗███╗   ██╗
██╔══██╗██║     ██║     ██║████╗  ██║
███████║██║     ██║     ██║██╔██╗ ██║
██╔══██║██║     ██║     ██║██║╚██╗██║   v2.4.2 #2.6.6
██║  ██║███████╗███████╗██║██║ ╚████║
╚═╝  ╚═╝╚══════╝╚══════╝╚═╝╚═╝  ╚═══╝


 Timelocal:  Thu Oct 19 16:47:28 2023 |  Threads:  200

            _|_|_|                          _|
            _|    _|    _|_|    _|  _|_|  _|_|_|_|
            _|_|_|    _|    _|  _|_|        _|
            _|        _|    _|  _|          _|
            _|          _|_|    _|            _|_|


[ ssh     open     172.252.59.212     22/tcp ]

[ unknown     open     172.252.59.212     6698/tcp ]

[ unknown     open     172.252.59.212     16101/tcp ]

 [ >>>>>>>>>>>>>>>>>>>>>>>>>>>>>> ]  65535/65535 (100%)     0 to Go

Task completed

Total time taken 112.003724 seconds
不如直接在Kali里面用 hping3 命令
内网尽量不要使用nmap,用hping3代替
└─# hping3 -S 172.252.59.212 --scan 1-65535
Scanning 172.252.59.212 (172.252.59.212), port 1-65535
65535 ports to scan, use -V to see all the replies
+----+-----------+---------+---+-----+-----+-----+
|port| serv name |  flags  |ttl| id  | win | len |
+----+-----------+---------+---+-----+-----+-----+
   25 smtp       : .S..A... 128 36387 64240    46
  110 pop3       : .S..A... 128 36643 64240    46
   22 ssh        : .S..A... 128 36899 64240    46
 6698            : .S..A... 128 31540 64240    46
16101            : .S..A... 128 43075 64240    46
All replies received. Done.
┌──(root㉿kali)-[~]
└─# hping3 -S 192.168.2.112  --scan 1-65535
Scanning 192.168.2.112 (192.168.2.112), port 1-65535
65535 ports to scan, use -V to see all the replies
+----+-----------+---------+---+-----+-----+-----+
|port| serv name |  flags  |ttl| id  | win | len |
+----+-----------+---------+---+-----+-----+-----+
   25 smtp       : .S..A... 128 19495 64240    46
  110 pop3       : .S..A... 128 19751 64240    46
  135 epmap      : .S..A... 128 20007 64240    46
  139 netbios-ssn: .S..A... 128 20519 64240    46
  445 microsoft-d: .S..A... 128 20775 64240    46
  902            : .S..A... 128 20521 64240    46
  912            : .S..A... 128 20777 64240    46
 1134            : .S..A... 128 21801 64240    46
49685            : .S..A... 128 42811 64240    46
 5040            : .S..A... 128 57162 64240    46
 6000 x11        : .S..A... 128   844 64240    46
13818            : .S..A... 128 12901 64240    46
13819            : .S..A... 128 13157 64240    46
14659            : .S..A... 128 15209 64240    46
49665            : .S..A... 128 56796 64240    46
49664            : .S..A... 128 41230 64240    46
49666            : .S..A... 128 41742 64240    46
49667            : .S..A... 128 42766 64240    46
49671            : .S..A... 128 43278 64240    46
All replies received. Done.
一个用于监控linux系统用户登陆信息推送飞书机器人webhook的脚本。
MULI.sh脚本的用法
1、检查 PAM 配置:在 Linux 系统中,PAM 配置文件通常位于/etc/pam.d/ 目录下。
可以检查 /etc/pam.d/sshd 文件中是否包含以下内容:
session optional pam_exec.so /path/to/MULI.sh #需实际脚本文件存放路径。
如果没有这一行配置,可以手动添加。如果有这一行配置,可以检查脚本路径是否正确。
2、检查 PAM 模块:在 Linux 系统中,PAM 模块通常位于 /lib/security/ 目录下。
可以检查 /etc/ssh/sshd_config 文件中是否包含以下内容:
UsePAM yes
如果没有这一行配置,可以手动添加。如果有这一行配置,可以检查 PAM 模块路径是否正确。
3、重启 SSH 服务:在修改 PAM 配置或者 PAM 模块后,需要重启 SSH 服务才能生效。
可以使用以下命令重启 SSH 服务:
systemctl restart sshd
4、如果以上方法都无法解决问题,可以尝试查看系统日志,以了解登录过程中是否出现了错误。
可以使用以下命令查看系统日志:
journalctl -u sshd
请注意,脚本需要有执行权限(chmod u+x MULI.sh)。另外,您可以根据您的具体需求修改消息类型和内容。
MULI.sh脚本的内容
#!/bin/bash
hostname=$(hostname)
usetty=$PAM_TTY
WEBHOOK_URL=https://open.feishu.cn/open-apis/bot/v2/hook/#机器人webhook
username=$PAM_USER
ip_address=$(echo $PAM_RHOST | awk -F/ '{print $1}')

if [ "$PAM_TYPE" = "open_session" ]; then
    login_time=$(date)
    msg_type="text"
    content="用户 $username 登录系统:$hostname ($(curl ip.me)),IP地址为:$ip_address,登录时间为:$login_time,协议:$usetty"
fi
if [ "$PAM_TYPE" = "close_session" ]; then
    msg_type="text"
    content="用户 $username 登出系统:$hostname ($(curl ip.me)),IP地址为:$ip_address,登出时间为:$(date),协议:$usetty"
fi

json_data="{\"msg_type\":\"$msg_type\",\"content\":{\"text\":\"$content\"}}"

curl -X POST -H "Content-Type: application/json" -d "$json_data" "$WEBHOOK_URL"

if [ "$PAM_TYPE" = "open_session" ]; then
    echo "$(date) - 用户 $username 登录系统,IP地址为 $ip_address" >> /var/log/login_notify.log
fi

exit 0
CentOS、Ubuntu快速配置网卡聚合shell脚本
说明事项
1、此脚本仅在CentOS7、Ubuntu22.04环境下测试过,其他环境可能不支持。
2、将此文件net.txt下载到系统,然后bash net.txt即可使用。
3、在系统内使用wget -O net.ag.sh https://sducaynvuekh.objectstorage.ap-sydney-1.oci.customer-oci.com/n/sducaynvuekh/b/bucket-20230920-1345/o/shell-script%2Fnet.txt命令下载到系统,然后执行bash net.ag.sh即可使用。
文件内容如下:
#!/bin/bash

# 设置彩色字体代码变量
RED='\033[0;31m'
GREEN='\033[0;32m'
YELLOW='\033[0;33m'
BLUE='\033[0;34m'
NC='\033[0m' # 重置颜色

# 检测系统版本并设置对应的命令
if [ -f /etc/centos-release ]; then
    OS="CentOS"
    IP_COMMAND="ip addr show"
elif [ -f /etc/lsb-release ]; then
    OS="Ubuntu"
    IP_COMMAND="ip address"
else
    echo -e "${RED}Unsupported operating system.${NC}"
    exit 1
fi

echo -e "\n${GREEN}Detected OS: $OS${NC}"

# 显示网卡信息
echo -e "\n${YELLOW}Network Interface Information:${NC}"

# 获取网卡信息并进行处理
$IP_COMMAND | awk '
    # 匹配以数字开头的行,表示网卡名称
    /^[0-9]/ {
        if (interface) {
            print ""
        }
        print "'$BLUE'Interface Name:'$NC'", $2
        interface=$2
    }

    # 匹配 inet 字段,表示 IPv4 地址和子网掩码
    /inet / {
        split($2, ip, "/")
        print "IPv4 Address: " ip[1]
        print "IPv4 Subnet Mask: " ip[2]
    }

    # 匹配 inet6 字段,表示 IPv6 地址和子网掩码
    /inet6/ {
        split($2, ip, "/")
        print "IPv6 Address: " ip[1]
        print "IPv6 Subnet Mask: " ip[2]
    }
'

# 获取所有网卡列表
interfaces=($(ip -o link show | awk -F': ' '{print $2}'))

# 手动选择要聚合的网卡
echo -e "\n${RED}Select network interfaces for aggregation:${NC}"
for i in "${!interfaces[@]}"; do
    echo "$((i+1)). ${interfaces[$i]}"
done

read -p "$(echo -e "\n${RED}Enter the numbers separated by comma (e.g. 1,2): ${NC}")" selected_interfaces

# 验证所选的网卡是否存在
for index in $(echo $selected_interfaces | tr ',' ' '); do
    if ! [[ $index =~ ^[0-9]+$ ]] || [ $index -gt ${#interfaces[@]} ] || [ $index -eq 0 ]; then
        echo -e "${RED}Invalid selection. Exiting.${NC}"
        exit 1
    fi
done

# 手动选择端口聚合模式
modes=("active-backup" "balance-rr" "balance-xor" "802.3ad")
echo -e "\n${RED}Select port aggregation mode:${NC}"
for i in "${!modes[@]}"; do
    echo "$((i+1)). ${modes[$i]}"
done

read -p "$(echo -e "\n${RED}Enter the number for mode: ${NC}")" selected_mode

# 验证所选的聚合模式是否存在
if ! [[ $selected_mode =~ ^[0-9]+$ ]] || [ $selected_mode -gt ${#modes[@]} ] || [ $selected_mode -eq 0 ]; then
    echo -e "${RED}Invalid selection. Exiting.${NC}"
    exit 1
fi

# 根据选择的序号获取对应的网卡和模式
selected_interfaces_arr=()
IFS=',' read -ra selected_arr <<< "$selected_interfaces"
for index in "${selected_arr[@]}"; do
    selected_interfaces_arr+=("${interfaces[$((index-1))]}")
done

selected_mode=${modes[$((selected_mode-1))]}

# 在这里添加后续处理逻辑,比如根据选择聚合网卡等进行设置

echo -e "\nSelected network interfaces:${GREEN} ${selected_interfaces_arr[@]}${NC}"
echo -e "Selected mode:${GREEN} $selected_mode${NC}"
#echo -e "Configuration for network aggregation completed.${NC}"

# 根据操作系统类型生成相应的网络聚合配置文件
if [ "$OS" == "Ubuntu" ]; then
    # 生成针对 Ubuntu 的配置文件
    config_file="/etc/netplan/bond.yaml"

    echo -e "network:" > "$config_file"
    echo -e "  version: 2" >> "$config_file"
    echo -e "  ethernets:" >> "$config_file"
    for interface in "${selected_interfaces_arr[@]}"; do
        echo -e "    ${interface}:" >> "$config_file"
        echo -e "      addresses: []" >> "$config_file"
        echo -e "      dhcp4: no" >> "$config_file"
    done
    echo -e "  bonds:" >> "$config_file"
    echo -e "    bond0:" >> "$config_file"
    echo -e "      addresses:" >> "$config_file"
    read -p "$(echo -e "${RED}Enter the IP Address for bond0 (e.g. 192.168.1.1/24): ${NC}")" ip_address
    echo -e "        - ${ip_address}" >> "$config_file"
    read -p "$(echo -e "${RED}Enter the Default Gateway for bond0 (e.g. 192.168.1.254): ${NC}")" default_gateway
    echo -e "      gateway4: ${default_gateway}" >> "$config_file"
    echo -e "      nameservers:" >> "$config_file"
    echo -e "        addresses:" >> "$config_file"
    read -p "$(echo -e "${RED}Enter the DNS Server Address for bond0 (e.g. 8.8.8.8): ${NC}")" dns_server
    echo -e "          - ${dns_server}" >> "$config_file"
    echo -e "      interfaces:" >> "$config_file"
    for interface in "${selected_interfaces_arr[@]}"; do
        echo -e "        - ${interface}" >> "$config_file"
    done
    echo -e "      parameters:" >> "$config_file"
    echo -e "        mode: ${selected_mode}" >> "$config_file"

    echo -e "\n${GREEN}Configuration file for Ubuntu generated.${NC}"
    echo -e "${BLUE}Create /etc/netplan/bond.yaml Success,The content is as follows: ${NC}"
    cat /etc/netplan/bond.yaml
    echo -e "\nNow, you can use commands like ${GREEN}netplan apply${NC} to restart the network card and make the configuration take effect."

elif [ "$OS" == "CentOS" ]; then
    # 生成针对 CentOS 的网络聚合配置文件
    config_file="/etc/sysconfig/network-scripts/ifcfg-Bond0"

    echo -e "BONDING_OPTS=\"downdelay=0 miimon=100 mode=${selected_mode} updelay=0\"" > "$config_file"
    echo -e "TYPE=Bond" >> "$config_file"
    echo -e "BONDING_MASTER=yes" >> "$config_file"
    echo -e "BOOTPROTO=none" >> "$config_file"
    echo -e "NAME=Bond0" >> "$config_file"
    #echo -e "UUID=3e551126-a54b-4b25-b55c-06a1a6338bc2" >> "$config_file"
    echo -e "DEVICE=auto-bond" >> "$config_file"
    echo -e "ONBOOT=yes" >> "$config_file"
    read -p "$(echo -e "\n${RED}Enter the IP Address for Bond0 (e.g. 192.168.1.1): ${NC}")" ip_address
    echo -e "IPADDR=${ip_address}" >> "$config_file"
    read -p "$(echo -e "${RED}Enter the Subnet Prefix for Bond0 (e.g. 24): ${NC}")" subnet_prefix
    echo -e "PREFIX=${subnet_prefix}" >> "$config_file"
    read -p "$(echo -e "${RED}Enter the Default Gateway for Bond0 (e.g. 192.168.1.254): ${NC}")" default_gateway
    echo -e "GATEWAY=${default_gateway}" >> "$config_file"
    read -p "$(echo -e "${RED}Enter the DNS Server Address for Bond0 (e.g. 8.8.8.8): ${NC}")" dns_server
    echo -e "DNS1=${dns_server}" >> "$config_file"

    echo -e "\n${GREEN}Configuration file for Bond0 generated. ${NC}"
    echo -e "${BLUE}Create /etc/sysconfig/network-scripts/ifcfg-Bond0 Success,The content is as follows: ${NC}"
    cat /etc/sysconfig/network-scripts/ifcfg-Bond0

    # 生成针对物理网卡的配置文件
    for interface in "${selected_interfaces_arr[@]}"; do
        physical_config_file="/etc/sysconfig/network-scripts/ifcfg-${interface}"

        echo -e "TYPE=Ethernet" > "$physical_config_file"
        echo -e "NAME=${interface}" >> "$physical_config_file"
        echo -e "DEVICE=${interface}" >> "$physical_config_file"
        echo -e "ONBOOT=yes" >> "$physical_config_file"
        echo -e "MASTER=auto-bond" >> "$physical_config_file"
        echo -e "SLAVE=yes" >> "$physical_config_file"

        echo -e "\n${GREEN}Configuration file for ${interface} generated. ${NC}"
        echo -e "${BLUE}Create /etc/sysconfig/network-scripts/ifcfg-${interface} Success,The content is as follows: ${NC}"
        cat "/etc/sysconfig/network-scripts/ifcfg-${interface}"
    done
    echo -e "\nNow, you can use commands like ${GREEN}systemctl restart network${NC} to restart the network card and make the configuration take effect."
fi
Linux 服务器一键测试、测速脚本 SuperBench 修复,支持CentOS 8
原作者似乎已经放弃这个脚本了,原版最后一个更新停留在了1.1.7,在最新的CentOS 8下无法正常运行,而且部分 SpeedTest 节点也已经失效。
脚本简介
Linux 服务器一键测试脚本,支持speedtest国内外测速(显示上行、下行、抖动和丢包率)、Geekbench v5单核、多核性能测试,Netflix、YOuTube Premium、BiliBili、iQIYI和OpenGPT等解锁测试,以及**大陆方向路由测试等集成多项常用linux测试项目。
使用
bash <(wget -qO- https://down.vpsaff.net/linux/speedtest/superbench.sh)
或
wget -qO- https://down.vpsaff.net/linux/speedtest/superbench.sh | sudo bash
建议使用
bash <(wget -qO- https://down.vpsaff.net/linux/speedtest/superbench.sh) -f 跳过Geekbench和国际speedtest测试
bash <(wget -qO- https://down.vpsaff.net/linux/speedtest/superbench.sh) speed 仅speedtest国内
bash <(wget -qO- https://down.vpsaff.net/linux/speedtest/superbench.sh) --no-geekbench 跳过Geekbench
ssh私钥口令使用John的暴力破解
1、地址导航
John官网:https://www.openwall.com/john/
John官方项目地址(JtR地址):https://github.com/openwall/john
John更新地址:https://raw.githubusercontent.com/openwall/john/bleeding-jumbo/run/ssh2john.py
由于Kali系统自带的版本以及官网提供的版本都可能不是最新的,需要进行编译安装github上的John。
虽然这是渗透最基础的工具使用,由于系统自带的John版本问题存在很大的坑,还是需要注意一下的。
2、依赖环境:必须要libssl-dev
┌──(root㉿kali)-[~]
└─# apt search libssl-dev
Sorting... Done
Full Text Search... Done
libssl-dev/kali-rolling,now 3.0.10-1 amd64 [installed]
  Secure Sockets Layer toolkit - development files
┌──(root㉿kali)-[~]
└─# apt install libssl-dev
3、将源代码git下来,非国内环境去掉https://ghproxy.com/加速链接
┌──(root㉿kali)-[~]
└─# git clone https://ghproxy.com/https://github.com/openwall/john.git
4、编译安装John
┌──(root㉿kali)-[~]
└─# cd john/src
┌──(root㉿kali)-[~/john/src]
└─# ./configure

5、创建程序:
┌──(root㉿kali)-[~/john/src]
└─# make -s clean && make -sj4
/usr/bin/ar: creating aes.a
/usr/bin/ar: creating poly1305-donna.a
/usr/bin/ar: creating ed25519-donna.a
/usr/bin/ar: creating secp256k1.a
******
Make process completed.
6、将id_rsa私钥文件转换为John可使用的文件,非国内环境去掉https://ghproxy.com/加速链接
┌──(root㉿kali)-[~]
└─# wget https://ghproxy.com/https://raw.githubusercontent.com/openwall/john/bleeding-jumbo/run/ssh2john.py
┌──(root㉿kali)-[~]
└─# python3 ssh2john.py /root/.ssh/id_rsa > /root/.ssh/id_john
7、开始跑字典破解口令
┌──(root㉿kali)-[~]
└─# ./john/run/john /root/.ssh/id_john --wordlist=/usr/share/wordlists/rockyou.txt.gz --format=SSH
Using default input encoding: UTF-8
Loaded 1 password hash (SSH, SSH private key [RSA/DSA/EC/OPENSSH 32/64])
Cost 1 (KDF/cipher [0=MD5/AES 1=MD5/3DES 2=Bcrypt/AES]) is 2 for all loaded hashes
Cost 2 (iteration count) is 24 for all loaded hashes
Will run 4 OpenMP threads
Press 'q' or Ctrl-C to abort, 'h' for help, almost any other key for status
然后按任意键查看进度。
8、查看结果,如果成功将会有结果
┌──(root㉿kali)-[~]
└─# ./john/run/john /root/.ssh/id_john --show
0 password hashes cracked, 1 left
非LVM磁盘分区根目录扩容操作
需求描述
在操作系统部署时,根目录使用的是非LVM分区,后期空间不足又无法扩容。
提供一个思路是新增一块硬盘,创建为逻辑卷,把根目录迁移过去,然后引导以新分区启动。
迁移完成后,旧的根目录可以再格式化为逻辑卷,合并到新磁盘分区。
本操作仅在CentOS Linux release 7.9.2009实验过,其他环境可能不支持。
效果展示
迁移前:
[root@localhost ~]# lsblk
NAME            MAJ:MIN RM  SIZE RO TYPE MOUNTPOINT
sda               8:0    0   20G  0 disk
├─sda1            8:1    0  300M  0 part /boot
├─sda2            8:2    0    2G  0 part [SWAP]
└─sda3            8:3    0 17.7G  0 part  /
sdb               8:16   0   30G  0 disk
└─sdb1            8:17   0   30G  0 part
sr0              11:0    1 1024M  0 rom
迁移后:
[root@localhost ~]# lsblk
NAME            MAJ:MIN RM  SIZE RO TYPE MOUNTPOINT
sda               8:0    0   20G  0 disk
├─sda1            8:1    0  300M  0 part /boot
├─sda2            8:2    0    2G  0 part [SWAP]
└─sda3            8:3    0 17.7G  0 part
sdb               8:16   0   30G  0 disk
└─sdb1            8:17   0   30G  0 part
  └─my_vg-my_lv 253:0    0   30G  0 lvm  /
sr0              11:0    1 1024M  0 rom
与旧分区合并:
[root@localhost ~]# lsblk
NAME            MAJ:MIN RM  SIZE RO TYPE MOUNTPOINT
sda               8:0    0   20G  0 disk
├─sda1            8:1    0  300M  0 part /boot
├─sda2            8:2    0    2G  0 part [SWAP]
└─sda3            8:3    0 17.7G  0 part
  └─my_vg-my_lv 253:0    0 47.7G  0 lvm  /
sdb               8:16   0   30G  0 disk
└─sdb1            8:17   0   30G  0 part
  └─my_vg-my_lv 253:0    0 47.7G  0 lvm  /
sr0              11:0    1 1024M  0 rom
新磁盘创建逻辑卷
将新磁盘创建逻辑卷分区,磁盘分区可选为8e类型,过程不再赘述,只提供逻辑卷操作步骤:
# 创建物理卷(如果尚未创建)
pvcreate /dev/sdb1

# 创建卷组
vgcreate my_vg /dev/sdb1

# 创建逻辑卷
lvcreate -n my_lv -l 100%FREE my_vg

# 格式化分区
mkfs.ext4 /dev/mapper/my_vg-my_lv
迁移操作步骤:
注意事项和准备工作:
1、确保您拥有管理员权限或者以root用户身份登录。
2、确保您了解所执行操作的风险,并且已经备份了所有重要数据。
3、请谨慎操作,并严格按照下列步骤操作。
操作步骤:
1、挂载新的(逻辑卷)根分区:
[root@localhost ~]# mkdir /mnt/new_root
[root@localhost ~]# mount /dev/mapper/my_vg-my_lv /mnt/new_root/
[root@localhost ~]# lsblk
NAME            MAJ:MIN RM  SIZE RO TYPE MOUNTPOINT
sda               8:0    0   20G  0 disk
├─sda1            8:1    0  300M  0 part /boot
├─sda2            8:2    0    2G  0 part [SWAP]
└─sda3            8:3    0 17.7G  0 part /
sdb               8:16   0   30G  0 disk
└─sdb1            8:17   0   30G  0 part
  └─my_vg-my_lv 253:0    0   30G  0 lvm  /mnt/new_root
sr0              11:0    1 1024M  0 rom
2、挂载旧的根分区:
[root@localhost ~]# mkdir /mnt/temp_root
[root@localhost ~]# mount /dev/sda3 /mnt/temp_root/
[root@localhost ~]# lsblk
NAME            MAJ:MIN RM  SIZE RO TYPE MOUNTPOINT
sda               8:0    0   20G  0 disk
├─sda1            8:1    0  300M  0 part /boot
├─sda2            8:2    0    2G  0 part [SWAP]
└─sda3            8:3    0 17.7G  0 part /mnt/temp_root
sdb               8:16   0   30G  0 disk
└─sdb1            8:17   0   30G  0 part
  └─my_vg-my_lv 253:0    0   30G  0 lvm  /mnt/new_root
sr0              11:0    1 1024M  0 rom
3、迁移根目录数据到新的逻辑卷:
[root@localhost ~]# rsync -avxHAX /mnt/temp_root/ /mnt/new_root/ --info=progress2
4、数据检查:
[root@localhost ~]# df -Th
Filesystem              Type      Size  Used Avail Use% Mounted on
***
/dev/sda3               xfs        18G  4.4G   14G  25% /
***
/dev/mapper/my_vg-my_lv ext4       30G  4.4G   24G  16% /mnt/new_root
可以看到sda3和my_vg-my_lv的Used数据量是一致的。
5、更新/boot下的引导信息:
[root@localhost ~]# grub2-mkconfig -o /boot/grub2/grub.cfg
Generating grub configuration file ...
Found linux image: /boot/vmlinuz-3.10.0-1160.el7.x86_64
Found initrd image: /boot/initramfs-3.10.0-1160.el7.x86_64.img
Found linux image: /boot/vmlinuz-0-rescue-8ff399da12b8416993db7c4fb98f39e4
Found initrd image: /boot/initramfs-0-rescue-8ff399da12b8416993db7c4fb98f39e4.img
Found CentOS Linux release 7.9.2009 (Core) on /dev/mapper/my_vg-my_lv
done
6、更新/mnt/new_root/etc/fstab文件:
使用文本编辑器打开/mnt/new_root/etc/fstab,将旧根分区的UUID更新为新逻辑卷的UUID。
[root@localhost ~]# vim /mnt/new_root/etc/fstab
UUID=</dev/mapper/my_vg-my_lv的UUID> / ext4 defaults 0 0
7、更新启动加载项:
[root@localhost ~]# grub2-install /dev/sdb
Installing for i386-pc platform.
Installation finished. No error reported.
如果/dev/sdb不是您的启动磁盘,请将其替换为正确的磁盘。
8、更新initramfs:
[root@localhost ~]# dracut -f /boot/initramfs-$(uname -r).img $(uname -r)
9、卸载临时挂载点:
[root@localhost ~]# umount /mnt/temp_root
[root@localhost ~]# lsblk
NAME            MAJ:MIN RM  SIZE RO TYPE MOUNTPOINT
sda               8:0    0   20G  0 disk
├─sda1            8:1    0  300M  0 part /boot
├─sda2            8:2    0    2G  0 part [SWAP]
└─sda3            8:3    0 17.7G  0 part /
sdb               8:16   0   30G  0 disk
└─sdb1            8:17   0   30G  0 part
  └─my_vg-my_lv 253:0    0   30G  0 lvm  /mnt/new_root
sr0              11:0    1 1024M  0 rom
10、注释掉/boot配置文件中旧的启动项,大概是在87~118行:
[root@localhost ~]# vim /boot/grub2/grub.cfg

11、重启系统:
[root@localhost ~]# reboot

12、检查迁移后的磁盘:
[root@localhost ~]# lsblk
NAME            MAJ:MIN RM  SIZE RO TYPE MOUNTPOINT
sda               8:0    0   20G  0 disk
├─sda1            8:1    0  300M  0 part /boot
├─sda2            8:2    0    2G  0 part [SWAP]
└─sda3            8:3    0 17.7G  0 part
sdb               8:16   0   30G  0 disk
└─sdb1            8:17   0   30G  0 part
  └─my_vg-my_lv 253:0    0   30G  0 lvm  /
sr0              11:0    1 1024M  0 rom
[root@localhost ~]# df -Th
Filesystem              Type      Size  Used Avail Use% Mounted on
***
/dev/mapper/my_vg-my_lv ext4       30G  4.4G   24G  16% /
***
分区合并操作
若您希望将sda3分区添加到my_vg-my_lv逻辑卷中,您可以按照以下步骤进行操作:
确保sda3分区没有被挂载,否则需要先卸载它。
使用 pvcreate 命令将sda3分区转换为物理卷。
将新的物理卷添加到卷组(Volume Group)中,您可以使用 vgextend 命令。
最后,您可以使用 lvextend 命令将逻辑卷(Logical Volume)扩展至所需大小。
以下是具体的命令示例:
1、卸载sda3分区(如果已经挂载)
umount /dev/sda3
2、将sda3分区转换为物理卷
[root@localhost ~]# pvcreate /dev/sda3
WARNING: xfs signature detected on /dev/sda3 at offset 0. Wipe it? [y/n]: y
  Wiping xfs signature on /dev/sda3.
  Physical volume "/dev/sda3" successfully created.
3、将新的物理卷添加到卷组中
[root@localhost ~]# vgextend my_vg /dev/sda3
  Volume group "my_vg" successfully extended
4、扩展逻辑卷至所需大小
[root@localhost ~]# lvextend -l +100%FREE /dev/mapper/my_vg-my_lv
  Size of logical volume my_vg/my_lv changed from <30.00 GiB (7679 extents) to <47.70 GiB (12211 extents).
  Logical volume my_vg/my_lv successfully resized.
5、(可选)对扩展后的逻辑卷进行文件系统的扩展,以便能够利用新的空间
[root@localhost ~]# resize2fs /dev/mapper/my_vg-my_lv
resize2fs 1.42.9 (28-Dec-2013)
Filesystem at /dev/mapper/my_vg-my_lv is mounted on /; on-line resizing required
old_desc_blocks = 4, new_desc_blocks = 6
The filesystem on /dev/mapper/my_vg-my_lv is now 12504064 blocks long.
6、检查修改后的逻辑卷状态
[root@localhost ~]# lvdisplay /dev/mapper/my_vg-my_lv
  --- Logical volume ---
  LV Path                /dev/my_vg/my_lv
  LV Name                my_lv
  VG Name                my_vg
  LV UUID                gEMnMQ-Hsqz-ZD9D-PTtp-2f1u-Rs4C-q3DbFL
  LV Write Access        read/write
  LV Creation host, time localhost.localdomain, 2023-10-18 18:16:25 -0700
  LV Status              available
  # open                 1
  LV Size                <47.70 GiB
  Current LE             12211
  Segments               2
  Allocation             inherit
  Read ahead sectors     auto
  - currently set to     8192
  Block device           253:0
7、检查修改后的磁盘状态
[root@localhost ~]# lsblk
NAME            MAJ:MIN RM  SIZE RO TYPE MOUNTPOINT
sda               8:0    0   20G  0 disk
├─sda1            8:1    0  300M  0 part /boot
├─sda2            8:2    0    2G  0 part [SWAP]
└─sda3            8:3    0 17.7G  0 part
  └─my_vg-my_lv 253:0    0 47.7G  0 lvm  /
sdb               8:16   0   30G  0 disk
└─sdb1            8:17   0   30G  0 part
  └─my_vg-my_lv 253:0    0 47.7G  0 lvm  /
sr0              11:0    1 1024M  0 rom
[root@localhost ~]# df -Th
Filesystem              Type      Size  Used Avail Use% Mounted on
***
/dev/mapper/my_vg-my_lv ext4       47G  4.4G   41G  10% /
***
注意事项和细节:
1、请务必仔细检查每个步骤,确保命令的准确性和正确的选项。
2、检查新的逻辑卷是否具有足够的空间来承载整个根分区的数据。
3、请确保文件系统和分区大小的兼容性。
4、在进行操作之前最好先在测试环境中尝试这些步骤。
一个使用win系统自带netsh命令实现端口转发的.cmd/.bat脚本
为了方便在老的windows系统上实现端口转发的小工具,
因为市面上实在是没找到能支持ipv6的工具,
于是自己写了个脚本,
此脚本支持TCP的ipv4和ipv6任意转发,
顺便在此记录备份一下,
复制下列代码保存为.bat或者.cmd
然后使用右键-管理员身份运行即可.
@echo off
:menu
REM 清除变量
set "action="
set "forwardingType="
set "listenPort="
set "listenAddress="
set "connectAddress="
set "connectPort="
set "forwardingType1="
REM 显示配置
echo === Current Port Mapping Configuration ===
netsh interface portproxy show all
echo =========================================================
REM 选择配置
echo Do you want to manage existing port mappings? (Type 'd'/'a'/'r'or'q')
echo PS:'d'='delete','a'='add','q'='quit','r'='refresh'
set /p action=Enter your choice:
if /i "%action%"=="q" goto quit
if /i "%action%"=="r" goto refresh
REM 选择转发类型
echo Do you want to forwarding type? (Type '44'/'46'/'64'/'66')
echo PS:'44'='v4tov4','46'='v4tov6','64'='v6tov4','66'='v6tov6'
set /p forwardingType1=Enter forwarding type:
if /i %forwardingType1%==44 set forwardingType=v4tov4
if /i %forwardingType1%==46 set forwardingType=v4tov6
if /i %forwardingType1%==64 set forwardingType=v6tov4
if /i %forwardingType1%==66 set forwardingType=v6tov6
REM 配置本地监听地址和端口
set /p listenAddress=Enter listen address (e.g., 127.0.0.1 or [::1]):
set /p listenPort=Enter listen port:
echo === To delete an entry, you can skip it by pressing enter ===
REM 配置远程连接地址和端口
set /p connectAddress=Enter connect address:
set /p connectPort=Enter connect port:
if /i "%action%"=="d" goto delete
if /i "%action%"=="a" goto add
REM 添加转发条目
:add
   echo === Adding new port mapping...
   netsh interface portproxy add %forwardingType% listenport=%listenPort% listenaddress=%listenAddress% connectport=%connectPort% connectaddress=%connectAddress% && echo === Port mapping added %forwardingType% %listenAddress% %listenPort% successfully. === || echo === Port mapping add Failed. ===
   pause
   goto menu
REM 删除转发条目
:delete
   echo === Deleting existing port mapping...
   netsh interface portproxy delete %forwardingType% listenport=%listenPort% listenaddress=%listenAddress% && echo === Port mapping deleted %forwardingType% %listenAddress% %listenPort% successfully. === || echo === Port mapping delete Failed. ===
   pause
   goto menu
REM 清空变量以及屏幕
:refresh
   echo === Refresh port mapping...
   CLS
   goto menu
REM 退出程序
:quit
   echo === Quitting...
   exit
创建转发设置
=== Current Port Mapping Configuration ===

=========================================================
Do you want to manage existing port mappings? (Type 'd'/'a'/'r'or'q')
PS:'d'='delete','a'='add','q'='quit','r'='refresh'
Enter your choice: a
Do you want to forwarding type? (Type '44'/'46'/'64'/'66')
PS:'44'='v4tov4','46'='v4tov6','64'='v6tov4','66'='v6tov6'
Enter forwarding type: 44
Enter listen address (e.g., 127.0.0.1 or [::1]): 127.1.2.3
Enter listen port: 12311
=== To delete an entry, you can skip it by pressing enter ===
Enter connect address: 192.168.123.123
Enter connect port: 12322
=== Adding new port mapping...

=== Port mapping added v4tov4 127.1.2.3 12311 successfully. ===
请按任意键继续. . .
=== Current Port Mapping Configuration ===

侦听 ipv4:                 连接到 ipv4:

地址            端口        地址            端口
--------------- ----------  --------------- ----------
127.1.2.3       12311       192.168.123.123 12322

=========================================================
Do you want to manage existing port mappings? (Type 'd'/'a'/'r'or'q')
PS:'d'='delete','a'='add','q'='quit','r'='refresh'
Enter your choice:
删除转发设置
=== Current Port Mapping Configuration ===

侦听 ipv4:                 连接到 ipv4:

地址            端口        地址            端口
--------------- ----------  --------------- ----------
127.1.2.3       12311       192.168.123.123 12322

=========================================================
Do you want to manage existing port mappings? (Type 'd'/'a'/'r'or'q')
PS:'d'='delete','a'='add','q'='quit','r'='refresh'
Enter your choice: d
Do you want to forwarding type? (Type '44'/'46'/'64'/'66')
PS:'44'='v4tov4','46'='v4tov6','64'='v6tov4','66'='v6tov6'
Enter forwarding type: 44
Enter listen address (e.g., 127.0.0.1 or [::1]): 127.1.2.3
Enter listen port: 12311
=== To delete an entry, you can skip it by pressing enter ===
Enter connect address:
Enter connect port:
=== Deleting existing port mapping...

=== Port mapping deleted v4tov4 127.1.2.3 12311 successfully. ===
请按任意键继续. . .
.swf(flash)文件播放器
如何在本地播放SWF内容?其实只有在试图播放一些上古媒体时可能碰上这样的问题。
目前有两个解决办法:
Ⅰ使用Flash制作软件如Animate;
Ⅱ使用国产浏览器+特供版Flash Player。
在我看来实际上都是下策,方法Ⅰ要安装一个臃肿且几乎没有什么用的软件,操作复杂,而且如果SWF中包含ActionScript2代码,很可能无法播放或者大量报错;方法Ⅱ会带来可能不需要的流氓软件,而且操作也很复杂,如果不是要访问在线的Flash内容并不推荐。
播放本地SWF其实只需要一个Adobe官方的StandAlone的Flash Player即可,不作为插件运行,没有漏洞风险,体积小巧,无需安装,绿色无毒,adobe.com/support/flash是Linux和Mac的下载页面,而Windows版本在这里下载
一个实时监TCP端口开启状态的Python程序【Windows】
脚本功能:
1、从外部手动输入 IP 地址、端口列表和超时时间。
2、运行时监听用户输入,如果输入为"q",则退出程序。
注意事项:
脚本仅在Windows 11下使用Python 3.12.3测试能运行,其他环境未测试。
代码如下:
import socket
import datetime
import time
import msvcrt

def check_tcp_ports(ip_address, port_list, timeout_ms):
    while True:
        for port in port_list:
            sock = socket.socket(socket.AF_INET, socket.SOCK_STREAM)
            try:
                sock.settimeout(timeout_ms / 1000.0)  # 将毫秒转换为秒并设置超时时间
                result = sock.connect_ex((ip_address, port))
                if result == 0:
                    print(f"{datetime.datetime.now()}: Port {port} is open")
                else:
                    print(f"{datetime.datetime.now()}: Port {port} is closed")
            except socket.timeout:  # 捕获超时异常
                print(f"{datetime.datetime.now()}: Connection timed out for port {port}")
            except Exception as e:
                print(f"{datetime.datetime.now()}: An error occurred while checking port {port}: {e}")
            finally:
                sock.close()
        time.sleep(1)
        # 监听用户输入,如果输入为"q",则退出程序
        if msvcrt.kbhit():  # 检查是否有键盘输入
            key = msvcrt.getch().decode('utf-8')  # 获取按下的键
            if key.lower() == "q":
                print("程序退出")
                return

# 从外部手动输入 IP 地址、端口列表和超时时间
ip = input("请输入IP地址:")
ports = list(map(int, input("请输入端口列表,用逗号分隔:").split(',')))
timeout = int(input("请输入超时时间(毫秒),建议大于1000:"))
print ("开始检查端口状态,按q退出程序")

check_tcp_ports(ip, ports, timeout)
运行效果:

snowdreamtechamd64/frps
docker pull snowdreamtechamd64/frps:0.52.2

docker run --restart=always --network host -d -v /etc/frp/frps.toml:/etc/frp/frps.toml --name frps snowdreamtechamd64/frps:0.52.2
从0.52.0开始,配置文件格式改为TOML, YAML, 和 JSON,而INI格式被弃用。
配置不生效可尝试使用旧版本变量。
frps:
root@PVMmbb49r:~# cat /etc/frp/frps.toml
[common]
bind_port = 7777
bind_udp_port = 7777
vhost_http_port = 7778
vhost_https_port = 7779
bindAddr = 0.0.0.0
dashboard_port = 7780
dashboard_user = admin
dashboard_pwd = eec0e2f3-c504-4e14-b376-5c1d95e28695
token = eec0e2f3-c504-4e14-b376-5c1d95e28695

allow_ports = 8000-8999

#tls_only = true
#tls_cert_file = /etc/frp/www.top_public.crt
#tls_key_file = /etc/frp/www.top.key
#tls_trusted_ca_file = /etc/frp/www.top_chain.crt

dashboard_tls_mode = true
dashboard_tls_cert_file = /etc/frp/www.top_public.crt
dashboard_tls_key_file = /etc/frp/www.top.key
frpc:
[common]
server_addr = www.top
server_port = 7777
token = eec0e2f3-c504-4e14-b376-5c1d95e28695

#tls_enable = true
#tls_cert_file = /opt/www.top_public.crt
#tls_key_file = /opt/www.top.key
#tls_trusted_ca_file = /opt/www.top_chain.crt
#tls_server_name = www.top

[web_tcp_8008]
type = tcp
local_ip = 192.168.148.1
local_port = 80
remote_port = 8008
conf/frps.toml
conf/frps_full.ini
conf/frpc_full.ini
Windows搭配FRP Manager使用。
frpmgr-1.15.0-setup-x64.zip
在ubuntu应用商店下载的qv2ray运行提示无core的解决办法
找到官方开源地址 https://github.com/Qv2ray/Qv2ray 提示已停止维护 ( win版下载 )
没办法找到v2ray-core的开源项目地址 https://github.com/v2fly/v2ray-core/releases ,将内核 v2ray-linux-64.zip 下载

解压到 /home/username/snap/qv2ray/4729/.config/qv2ray/vcore/ 目录(安装后默认是这个路径,可能vcore不存在,需要手动创建一下,路径可自定义)


一个监测Linux系统电量推送到飞书webhook机器人的shell脚本。
每5分钟监控电池电量,低于50则推送到飞书webhook机器人。 使用 crontab 工具定时运行脚本。在终端中输入以下命令打开 crontab 编辑器:
crontab -e
在文件末尾添加以下内容:
*/5 * * * * /path/to/check_battery.sh ##这将每隔 5 分钟运行一次脚本。注意将 /path/to/check_battery.sh 替换为你实际的脚本路径。
check_battery.sh脚本内容:
#!/bin/bash

# 获取电池电量
battery_level=$(cat /sys/class/power_supply/BAT1/capacity)
Charg_status=$(cat /sys/class/power_supply/BAT1/status)
if [ "$Charg_status" = "Charging" ]; then
  CN_Charg_status="电池正在充电"
elif [ "$Charg_status" = "Discharging" ]; then
  CN_Charg_status="电池正在放电"
elif [ "$Charg_status" = "Full" ]; then
  CN_Charg_status="电池已充满"
else
  CN_Charg_status="无法读取电池状态"
fi
# 判断电量是否低于50
if [ $battery_level -lt 50 ]; then
  # 构造消息内容
  message="电池电量低于50%,当前电量为:$battery_level,当前充电状态:$CN_Charg_status"

  # 发送消息到飞书机器人
  curl -X POST -H "Content-Type: application/json" -d "{\"msg_type\": \"text\", \"content\": {\"text\": \"$message\"}}" https://open.feishu.cn/open-apis/bot/v2/hook/飞书机器人地址
fi
【记录】在H3C NX54里部署Tailscale(重启失效)
官方下载链接地址:https://tailscale.com/download/linux/static
在Linux下选择【Manually install on :Othrt】
会跳转到:https://pkgs.tailscale.com/stable/#static
下载 arm: tailscale_1.66.3_arm.tgz 【https://pkgs.tailscale.com/stable/tailscale_1.66.3_arm.tgz】
然后起一个HTTP服务,把文件放在目录下
我使用的是python服务模块 python -m http.server 801
然后telnet进入NX54路由器:.\telnet.exe 192.168.124.1 15000
<H3C_NX54>debugshell    #进入系统
***
BusyBox v1.30.1 () built-in shell (ash)

 ---------------------------------------------------------------
   For those about to rock... (Chaos Calmer, unknown)
 ---------------------------------------------------------------
root@OpenWrt:/# cd /root/    #切换目录
root@OpenWrt:~# wget http://192.168.124.234:801/tailscale_1.66.3_arm.tgz #下载软件包
root@OpenWrt:~# tar xzvf tailscale_1.66.3_arm.tgz  #解压软件包
root@OpenWrt:~# cd tailscale_1.66.3_arm/   #进入程序目录
root@OpenWrt:~/tailscale_1.66.3_arm# ./tailscaled --state=tailscaled.state &    #启动服务,然后开一个新终端进入到此目录
root@OpenWrt:~/tailscale_1.66.3_arm# ./tailscale up #登录tailscale
root@OpenWrt:~/tailscale_1.66.3_arm# ps | grep tails   #检查一下
 6963 root      1332 S    grep tails
30380 root      540m S    ./tailscaled --state=tailscaled.state
root@OpenWrt:~/tailscale_1.66.3_arm# ./tailscale status #检查一下在线设备
100.88.*.98   openwrt-h3c-nx54     anon@     linux   -
100.126.*.111  anon-wujie-14x       anon@     windows active; direct 113.116.*.130:41641, tx 61832 rx 61192
root@OpenWrt:~/tailscale_1.66.3_arm# ip ad  #查看网卡地址
23: br-lan: <BROADCAST,MULTICAST,UP,LOWER_UP> mtu 1500 qdisc noqueue state UP qlen 1000
    link/ether 10:9f:4f:e8:ad:c2 brd ff:ff:ff:ff:ff:ff
    inet 192.168.124.1/24 brd 192.168.124.255 scope global br-lan
       valid_lft forever preferred_lft forever
    inet6 2409:8a50:*:4020::1/60 scope global dynamic
       valid_lft 188080sec preferred_lft 101680sec
    inet6 fe80::124/64 scope link
       valid_lft forever preferred_lft forever
***
32: tailscale0: <POINTOPOINT,MULTICAST,NOARP,UP,LOWER_UP> mtu 1280 qdisc fq_codel state UNKNOWN qlen 500
    link/[65534]
    inet 100.88.*.98/32 scope global tailscale0
       valid_lft forever preferred_lft forever
    inet6 fd7a:115c:a1e0::2501:d862/128 scope global
       valid_lft forever preferred_lft forever
然后试一下使用100.88.*.98登录设备:.\telnet.exe 100.88.*.98 15000
**************************************************************************
*    Copyright (c) 2004-2023 New H3C Technologies Co.,Ltd.               *
*    All rights Reserved.                                                *
*    Without the owner's prior written consent,                          *
*    no decompiling or reverse-engineering shall be allowed.             *
**************************************************************************

<H3C_NX54>display interface vlan-interface
#
Vlan-interface1 current state: UP
Line protocol current state: UP
Hardware address is 109f-4fe8-adc2
Internet address is 192.168.124.1/24
The Maximum Transmit Unit is 1500
Description : Vlan-Interface1 Interface
#
Vlan-interface2 current state: UP
Line protocol current state: UP
Hardware address is 109f-4fe8-adc1
No Internet Address
Description : WAN1
#
<H3C_NX54>debugshell    #进入系统

BusyBox v1.30.1 () built-in shell (ash)
***
 ---------------------------------------------------------------
   For those about to rock... (Chaos Calmer, unknown)
 ---------------------------------------------------------------
root@OpenWrt:/# tailscale_1.66.3_arm# ip ad  #查看网卡地址
23: br-lan: <BROADCAST,MULTICAST,UP,LOWER_UP> mtu 1500 qdisc noqueue state UP qlen 1000
    link/ether 10:9f:4f:e8:ad:c2 brd ff:ff:ff:ff:ff:ff
    inet 192.168.124.1/24 brd 192.168.124.255 scope global br-lan
       valid_lft forever preferred_lft forever
    inet6 2409:8a50:*:4020::1/60 scope global dynamic
       valid_lft 188080sec preferred_lft 101680sec
    inet6 fe80::124/64 scope link
       valid_lft forever preferred_lft forever
***
32: tailscale0: <POINTOPOINT,MULTICAST,NOARP,UP,LOWER_UP> mtu 1280 qdisc fq_codel state UNKNOWN qlen 500
    link/[65534]
    inet 100.88.*.98/32 scope global tailscale0
       valid_lft forever preferred_lft forever
    inet6 fd7a:115c:a1e0::2501:d862/128 scope global
       valid_lft forever preferred_lft forever
root@OpenWrt:/# vim /etc/rc.local    #手动添加自启
root@OpenWrt:/# cat /etc/rc.local | grep tails
/root/tailscale_1.66.3_arm/tailscaled --state=tailscaled.state &
root@OpenWrt:/#
然后在本地Windows系统检查一下设备列表
PS C:\WINDOWS\system32> tailscale.exe status
100.126.*.111  anon-wujie-14x       anon@     windows -
100.88.*.98   openwrt-h3c-nx54     anon@     linux   active; direct 36.148.*.225:23672, tx 93720 rx 98488
PS C:\WINDOWS\system32>
TCPView:Windows更丰富且更便于展示的 Netstat 程序。
部署Stable Diffusion玩转AI绘画
Stable Diffusion 是一个 Python 命令行程序,我们直接使用需要对它的命令和参数有详尽的了解,有一定学习成本。好在,有一个 Stable Diffusion WebUI 的开源项目,可以直接将 Stable Diffusion 的操作通过网页透出,让我们轻松通过 Web 页面就能使用 Stable Diffusion 生成图片。所以,我们选择安装和使用 Stable Diffusion WebUI 来完成实验。
安装 Stable Diffusion WebUI
- 1、安装基础工具。
Stable Diffusion WebUI的安装与运行需要使用到一些工具软件,我们需要先通过Yum安装它们。
执行如下命令,安装基础工具。
sudo yum install -y git conda mesa-libGL
- 2、初始化conda环境。
Conda是一个优秀的跨平台、跨语言包管理工具。同时,它的环境隔离功能也能很好的帮助我们屏蔽服务器间基础设施的不同,为我们提供一个干净、统一的程序运行环境。
依次执行如下命令,在Bash中初始化Conda,同时创建并激活名为aigc的虚拟环境。
sudo bash -c "conda init bash" && bash
conda create -y -n aigc python=3.10.6
conda activate aigc
💡注意:之后的操作都将基于aigc这个虚拟环境,如果你切换了Terminal或者不小心退出了环境,可以再次执行conda activate aigc命令回到aigc虚拟环境中。
- 3、拉取Stable Diffusion WebUI代码。
3.1 执行如下命令,从Github上获取最新的Stable Diffusion WebUI代码。
git clone https://github.com/AUTOMATIC1111/stable-diffusion-webui.git
💡说明:由于Github访问存在不稳定性,如果从上述地址clone失败,可以使用我们在Gitee上为大家准备的镜像项目,采用如下命令:
git clone https://gitee.com/developer-aliyun-com/stable-diffusion-webui.git
3.2 项目下载完成后,我们将Web Terminal的操作目录设置为项目所在目录。
cd stable-diffusion-webui
- 4、安装项目依赖。
Stable Diffusion的运行还需要许多依赖包,执行如下命令,把它们都安装到Conda提供的虚拟环境中。
conda install -y pytorch torchvision torchaudio cpuonly -c pytorch
pip3 install opencv-python-headless gfpgan open-clip-torch xformers pyngrok clip-anytorch
pip3 install -r requirements_versions.txt
- 5、启动Stable Diffusion WebUI。
当一切准备就绪,执行如下命令,启动Stable Diffusion WebUI。
python launch.py --listen --lowvram --no-half --skip-torch-cuda-test
💡说明:在启动时,Stable Diffusion WebUI会根据需要下载一些必要模型数据,另外,加载模型也需要花费一些时间,所以我们现在要做的就是耐心等待。当Terminal 中显示出
Running on local URL: http://0.0.0.0:7860字样,就表示程序已经启动并对外提供服务了。
阿里云实验室Aliunx系统+Docker容器+DVWA靶机部署(三小时实验室)
#1.远程连接ECS实例。
#2.安装Docker。
以镜像版本Alibaba Cloud Linux 3为例,步骤如下:
#a.运行以下命令,添加docker-ce的dnf源。
sudo dnf config-manager --add-repo=https://mirrors.aliyun.com/docker-ce/linux/centos/docker-ce.repo
#b.运行以下命令,安装Alibaba Cloud Linux 3专用的dnf源兼容插件。
sudo dnf -y install dnf-plugin-releasever-adapter --repo alinux3-plus
#c.运行以下命令,安装Docker。
sudo dnf -y install docker-ce --nobest
#4.执行以下命令,启动Docker服务,并设置开机自启动。
sudo systemctl start docker
sudo systemctl enable docker

[root@iZuf69qx2t0dhnq9rxy7mfZ ~]# docker run --rm -it -p 80:80 vulnerables/web-dvwa
Unable to find image 'vulnerables/web-dvwa:latest' locally
latest: Pulling from vulnerables/web-dvwa
3e17c6eae66c: Pull complete
0c57df616dbf: Pull complete
eb05d18be401: Pull complete
e9968e5981d2: Pull complete
2cd72dba8257: Pull complete
6cff5f35147f: Pull complete
098cffd43466: Pull complete
b3d64a33242d: Pull complete
Digest: sha256:dae203fe11646a86937bf04db0079adef295f426da68a92b40e3b181f337daa7
Status: Downloaded newer image for vulnerables/web-dvwa:latest
[+] Starting mysql...
[ ok ] Starting MariaDB database server: mysqld.
[+] Starting apache
[....] Starting Apache httpd web server: apache2AH00558: apache2: Could not reliably determine the server's fully qualified domain name, using 172.17.0.2. Set the 'ServerName' directive globally to suppress this message
. ok
==> /var/log/apache2/access.log <==

==> /var/log/apache2/error.log <==
[Thu Oct 26 06:57:14.695982 2023] [mpm_prefork:notice] [pid 309] AH00163: Apache/2.4.25 (Debian) configured -- resuming normal operations
[Thu Oct 26 06:57:14.696076 2023] [core:notice] [pid 309] AH00094: Command line: '/usr/sbin/apache2'

==> /var/log/apache2/other_vhosts_access.log <==

==> /var/log/apache2/access.log <==
浏览器访问实验机80端口

DVWA默认用户与密码
默认用户 = admin
默认密码 = password
v2ray/xray多用户管理部署程序
#!/bin/bash
# Author: Jrohy
# github: https://github.com/Jrohy/multi-v2ray

#记录最开始运行脚本的路径
begin_path=$(pwd)

#安装方式, 0为全新安装, 1为保留v2ray配置更新
install_way=0

#定义操作变量, 0为否, 1为是
help=0

remove=0

chinese=0

base_source_path="https://multi.netlify.app"

util_path="/etc/v2ray_util/util.cfg"

util_cfg="$base_source_path/v2ray_util/util_core/util.cfg"

bash_completion_shell="$base_source_path/v2ray"

clean_iptables_shell="$base_source_path/v2ray_util/global_setting/clean_iptables.sh"

#Centos 临时取消别名
[[ -f /etc/redhat-release && -z $(echo $SHELL|grep zsh) ]] && unalias -a

[[ -z $(echo $SHELL|grep zsh) ]] && env_file=".bashrc" || env_file=".zshrc"

#######color code########
red="31m"
green="32m"
yellow="33m"
blue="36m"
fuchsia="35m"

colorEcho(){
    color=$1
    echo -e "\033[${color}${@:2}\033[0m"
}

#######get params#########
while [[ $# > 0 ]];do
    key="$1"
    case $key in
        --remove)
        remove=1
        ;;
        -h|--help)
        help=1
        ;;
        -k|--keep)
        install_way=1
        colorEcho ${blue} "keep config to update\n"
        ;;
        --zh)
        chinese=1
        colorEcho ${blue} "安装中文版..\n"
        ;;
        *)
                # unknown option
        ;;
    esac
    shift # past argument or value
done
#############################

help(){
    echo "bash v2ray.sh [-h|--help] [-k|--keep] [--remove]"
    echo "  -h, --help           Show help"
    echo "  -k, --keep           keep the config.json to update"
    echo "      --remove         remove v2ray,xray && multi-v2ray"
    echo "                       no params to new install"
    return 0
}

removeV2Ray() {
    #卸载V2ray脚本
    bash <(curl -L -s https://multi.netlify.app/go.sh) --remove >/dev/null 2>&1
    rm -rf /etc/v2ray >/dev/null 2>&1
    rm -rf /var/log/v2ray >/dev/null 2>&1

    #卸载Xray脚本
    bash <(curl -L -s https://multi.netlify.app/go.sh) --remove -x >/dev/null 2>&1
    rm -rf /etc/xray >/dev/null 2>&1
    rm -rf /var/log/xray >/dev/null 2>&1

    #清理v2ray相关iptable规则
    bash <(curl -L -s $clean_iptables_shell)

    #卸载multi-v2ray
    pip uninstall v2ray_util -y
    rm -rf /usr/share/bash-completion/completions/v2ray.bash >/dev/null 2>&1
    rm -rf /usr/share/bash-completion/completions/v2ray >/dev/null 2>&1
    rm -rf /usr/share/bash-completion/completions/xray >/dev/null 2>&1
    rm -rf /etc/bash_completion.d/v2ray.bash >/dev/null 2>&1
    rm -rf /usr/local/bin/v2ray >/dev/null 2>&1
    rm -rf /etc/v2ray_util >/dev/null 2>&1
    rm -rf /etc/profile.d/iptables.sh >/dev/null 2>&1
    rm -rf /root/.iptables >/dev/null 2>&1

    #删除v2ray定时更新任务
    crontab -l|sed '/SHELL=/d;/v2ray/d'|sed '/SHELL=/d;/xray/d' > crontab.txt
    crontab crontab.txt >/dev/null 2>&1
    rm -f crontab.txt >/dev/null 2>&1

    if [[ ${package_manager} == 'dnf' || ${package_manager} == 'yum' ]];then
        systemctl restart crond >/dev/null 2>&1
    else
        systemctl restart cron >/dev/null 2>&1
    fi

    #删除multi-v2ray环境变量
    sed -i '/v2ray/d' ~/$env_file
    sed -i '/xray/d' ~/$env_file
    source ~/$env_file

    rc_service=`systemctl status rc-local|grep loaded|egrep -o "[A-Za-z/]+/rc-local.service"`

    rc_file=`cat $rc_service|grep ExecStart|awk '{print $1}'|cut -d = -f2`

    sed -i '/iptables/d' ~/$rc_file

    colorEcho ${green} "uninstall success!"
}

closeSELinux() {
    #禁用SELinux
    if [ -s /etc/selinux/config ] && grep 'SELINUX=enforcing' /etc/selinux/config; then
        sed -i 's/SELINUX=enforcing/SELINUX=disabled/g' /etc/selinux/config
        setenforce 0
    fi
}

checkSys() {
    #检查是否为Root
    [ $(id -u) != "0" ] && { colorEcho ${red} "Error: You must be root to run this script"; exit 1; }

    if [[ `command -v apt-get` ]];then
        package_manager='apt-get'
    elif [[ `command -v dnf` ]];then
        package_manager='dnf'
    elif [[ `command -v yum` ]];then
        package_manager='yum'
    else
        colorEcho $red "Not support OS!"
        exit 1
    fi
}

#安装依赖
installDependent(){
    if [[ ${package_manager} == 'dnf' || ${package_manager} == 'yum' ]];then
        ${package_manager} install socat crontabs bash-completion which -y
    else
        ${package_manager} update
        ${package_manager} install socat cron bash-completion ntpdate gawk -y
    fi

    #install python3 & pip
    source <(curl -sL https://python3.netlify.app/install.sh)
}

updateProject() {
    [[ ! $(type pip 2>/dev/null) ]] && colorEcho $red "pip no install!" && exit 1

    [[ -e /etc/profile.d/iptables.sh ]] && rm -f /etc/profile.d/iptables.sh

    rc_service=`systemctl status rc-local|grep loaded|egrep -o "[A-Za-z/]+/rc-local.service"`

    rc_file=`cat $rc_service|grep ExecStart|awk '{print $1}'|cut -d = -f2`

    if [[ ! -e $rc_file || -z `cat $rc_file|grep iptables` ]];then
        local_ip=`curl -s http://api.ipify.org 2>/dev/null`
        [[ `echo $local_ip|grep :` ]] && iptable_way="ip6tables" || iptable_way="iptables"
        if [[ ! -e $rc_file || -z `cat $rc_file|grep "/bin/bash"` ]];then
            echo "#!/bin/bash" >> $rc_file
        fi
        if [[ -z `cat $rc_service|grep "\[Install\]"` ]];then
            cat >> $rc_service << EOF

[Install]
WantedBy=multi-user.target
EOF
            systemctl daemon-reload
        fi
        echo "[[ -e /root/.iptables ]] && $iptable_way-restore -c < /root/.iptables" >> $rc_file
        chmod +x $rc_file
        systemctl restart rc-local
        systemctl enable rc-local

        $iptable_way-save -c > /root/.iptables
    fi

    pip install -U v2ray_util

    if [[ -e $util_path ]];then
        [[ -z $(cat $util_path|grep lang) ]] && echo "lang=en" >> $util_path
    else
        mkdir -p /etc/v2ray_util
        curl $util_cfg > $util_path
    fi

    [[ $chinese == 1 ]] && sed -i "s/lang=en/lang=zh/g" $util_path

    rm -f /usr/local/bin/v2ray >/dev/null 2>&1
    ln -s $(which v2ray-util) /usr/local/bin/v2ray
    rm -f /usr/local/bin/xray >/dev/null 2>&1
    ln -s $(which v2ray-util) /usr/local/bin/xray

    #移除旧的v2ray bash_completion脚本
    [[ -e /etc/bash_completion.d/v2ray.bash ]] && rm -f /etc/bash_completion.d/v2ray.bash
    [[ -e /usr/share/bash-completion/completions/v2ray.bash ]] && rm -f /usr/share/bash-completion/completions/v2ray.bash

    #更新v2ray bash_completion脚本
    curl $bash_completion_shell > /usr/share/bash-completion/completions/v2ray
    curl $bash_completion_shell > /usr/share/bash-completion/completions/xray
    if [[ -z $(echo $SHELL|grep zsh) ]];then
        source /usr/share/bash-completion/completions/v2ray
        source /usr/share/bash-completion/completions/xray
    fi

    #安装V2ray主程序
    [[ ${install_way} == 0 ]] && bash <(curl -L -s https://multi.netlify.app/go.sh)
}

#时间同步
timeSync() {
    if [[ ${install_way} == 0 ]];then
        echo -e "Time Synchronizing.. "
        if [[ `command -v ntpdate` ]];then
            ntpdate pool.ntp.org
        elif [[ `command -v chronyc` ]];then
            chronyc -a makestep
        fi

        if [[ $? -eq 0 ]];then
            colorEcho $green "Time Sync Success"
            colorEcho $blue "now: `date -R`"
        fi
    fi
}

profileInit() {

    #清理v2ray模块环境变量
    [[ $(grep v2ray ~/$env_file) ]] && sed -i '/v2ray/d' ~/$env_file && source ~/$env_file

    #解决Python3中文显示问题
    [[ -z $(grep PYTHONIOENCODING=utf-8 ~/$env_file) ]] && echo "export PYTHONIOENCODING=utf-8" >> ~/$env_file && source ~/$env_file

    #全新安装的新配置
    [[ ${install_way} == 0 ]] && v2ray new

    echo ""
}

installFinish() {
    #回到原点
    cd ${begin_path}

    [[ ${install_way} == 0 ]] && WAY="install" || WAY="update"
    colorEcho  ${green} "multi-v2ray ${WAY} success!\n"

    if [[ ${install_way} == 0 ]]; then
        clear

        v2ray info

        echo -e "please input 'v2ray' command to manage v2ray\n"
    fi
}


main() {

    [[ ${help} == 1 ]] && help && return

    [[ ${remove} == 1 ]] && removeV2Ray && return

    [[ ${install_way} == 0 ]] && colorEcho ${blue} "new install\n"

    checkSys

    installDependent

    closeSELinux

    timeSync

    updateProject

    profileInit

    installFinish
}

main
一些其他的配置处理:
##(可选)创建swap分区,为TLS传输做准备,因为TLS需要2G运存:
dd if=/dev/zero of=/opt/swap bs=1M count=2048
mkswap /opt/swap
swapon /opt/swap
swapon -s
free -h
echo '/opt/swap swap swap defaults 0 0' >> /etc/fstab
mount -ar
##安装脚本:
source <(curl -sL https://multi.netlify.app/v2ray.sh) --zh
##卸载脚本:
source <(curl -sL https://multi.netlify.app/v2ray.sh) --remove
##开启BBR:
echo "net.core.default_qdisc=fq" >> /etc/sysctl.conf
echo "net.ipv4.tcp_congestion_control=bbr" >> /etc/sysctl.conf
sysctl -p
lsmod | grep bbr
##(可选)设置服务器DNS锁定
systemctl stop systemd-resolved.service
systemctl disable systemd-resolved.service
systemctl mask systemd-resolved.service
mv /etc/resolv.conf /etc/resolv.conf.BAK
echo 'nameserver 8.8.8.8' >> /etc/resolv.conf
echo 'nameserver 1.1.1.1' >> /etc/resolv.conf
chattr +i /etc/resolv.conf
cat /etc/resolv.conf
##(可选)关闭阿里云助手:
systemctl stop aliyun.service
systemctl disable aliyun.service
wget "http://update2.aegis.aliyun.com/download/uninstall.sh" && chmod +x uninstall.sh && ./uninstall.sh
##(可选)禁止ubuntu用户登陆:
chsh ubuntu -s /sbin/nologin
##(可选)pip报错处理:
具体配置文件路径, ~/.pip/pip.conf(没有则添加一个)
[global]
timeout = 10
index-url =  http://mirrors.aliyun.com/pypi/simple/
extra-index-url= http://pypi.douban.com/simple/
[install]
trusted-host=
    mirrors.aliyun.com
    pypi.douban.com
##换DNS参数信息查询:https://public-dns.info/
##换时区参数信息查询:https://www.zeitverschiebung.net/
##针对之前的老版本v2ray启动报错,需修改v2ray.service服务文件,此为ubuntu20.04系统所在位置:
vim /etc/systemd/system/v2ray.service
##将ExecStart=/usr/bin/v2ray/v2ray -config /etc/v2ray/config.json 修改为 ExecStart=/usr/bin/v2ray/v2ray run -config /etc/v2ray/config.json
sed -i 's/v2ray .*-config/v2ray run -config/g' /etc/systemd/system/v2ray.service
systemctl daemon-reload
##或者 v2ray update v4.45.2 或更新的版本
##再用v2ray命令启动服务
##以下步骤为使用Brook配置中转服务器:
##Brook一个为开发者设计的跨平台网络工具-https://github.com/txthinking/brook
bash <(curl https://bash.ooo/nami.sh)
nami install brook
##brook relay 可以中继任何 TCP 和 UDP server, 这是一个独立的功能:
brook relay --from :46948 --to 110.110.110.110:46948
##Joker可以将进程变成守护进程-https://github.com/txthinking/joker/blob/master/readme_zh.md
nami install joker
joker brook relay --from :46948 --to 110.110.110.110:46948
joker list
#Jinbe可以添加开机自动启动命令-https://github.com/txthinking/jinbe/blob/master/readme_zh.md
nami install jinbe
jinbe joker brook relay --from :46948 --to 110.110.110.110:46948
jinbe list
##Brook一般用法https://txthinking.github.io/brook/
nami install joker brook
#服务端:
joker brook server -l :9999 -p hello
#命令客户端
brook client -s 110.110.110.110:9999 -p hello
SwitchyOmega 规则列表
AutoProxy格式的黑白名单自动切换规则
这是自用的自动代理规则列表
黑名单gfwlist.pac来源 https://github.com/gfwlist/gfwlist
白名单whitelist.pac来源 https://github.com/neko-dev/gfw_whitelist
在黑名单基础上增加了一部分规则 在白名单的基础上增加了一部分国内CDN域名和常用域名(白名单只提供常用网站)
黑名单
SwitchyOmega 扩展里新建 switch profile 模式(适用于Firefox 57+和Chrome)
规则列表地址填入 https://git.io/gfw-list 或 https://raw.githubusercontent.com/aglent/autoproxy/master/gfwlist.pac
格式选择 autoproxy
白名单
SwitchyOmega 扩展里新建 switch profile 模式(适用于Firefox 57+和Chrome)
规则列表地址填入 https://git.io/whitelistpac 或 https://raw.githubusercontent.com/aglent/autoproxy/master/whitelist.pac
格式选择 autoproxy
国内IP白名单
国内IP白名单chinaiplist.pac来源 https://github.com/17mon/china_ip_list
SwitchyOmega 扩展里新建 pac profile 模式(适用于Chrome),填写 PAC URL:https://git.io/chinaip 。
IP段会不定期更新。
使用Brook进行端口转发,访问被墙的服务器
brook 官网:https://brook.app/
官网程序下载地址:https://github.com/txthinking/brook/releases/
转发:
brook relay -f :中转端口 -t 落地ip:落地端口
后台执行:
joker brook relay -f :中转端口 -t 落地ip:落地端口
关于typecho无法加载CSS、JS的解决方法
问题描述:在配置完 HTTPS(SSL)证书后整个网站的 css、js 无法加载的,全是 html 页面。
解决办法:编辑 Typecho 站点根目录下的文件 config.inc.php,加入下面一行配置:
/** 开启HTTPS */
define('__TYPECHO_SECURE__',true);
Docker安装部署、国内镜像加速配置
镜像加速:国内访问 Docker Hub 有时会遇到困难,此时可以配置镜像加速器。
配置文件默认为:/etc/docker/daemon.json。
配置加速地址:
https://hub-mirror.c.163.com
https://docker.m.daocloud.io
https://ghcr.io
https://mirror.baidubce.com
https://docker.nju.edu.cn
另外还推荐使用自己的镜像加速地址:
DaoCloud 加速器:https://<你的ID>.m.daocloud.io
阿里云加速器:https://<你的ID>.mirror.aliyuncs.com
-----安装部署操作文档-----基于阿里云加速器-----
Ubuntu,CentOS
1. 安装/升级Docker客户端
推荐安装1.10.0以上版本的Docker客户端,参考文档docker-ce
2. 配置镜像加速器
针对Docker客户端版本大于 1.10.0 的用户
您可以通过修改daemon配置文件/etc/docker/daemon.json来使用加速器
sudo mkdir -p /etc/docker
sudo tee /etc/docker/daemon.json <<-'EOF'
{
  "registry-mirrors": ["https://<你的ID>.mirror.aliyuncs.com"]
}
EOF
sudo systemctl daemon-reload
sudo systemctl restart docker
Mac
1. 安装/升级Docker客户端
对于10.10.3以下的用户 推荐使用Docker Toolbox
Mac安装文件:http://mirrors.aliyun.com/docker-toolbox/mac/docker-toolbox/
对于10.10.3以上的用户 推荐使用Docker for Mac
Mac安装文件:http://mirrors.aliyun.com/docker-toolbox/mac/docker-for-mac/
2. 配置镜像加速器
针对安装了Docker Toolbox的用户,您可以参考以下配置步骤:
创建一台安装有Docker环境的Linux虚拟机,指定机器名称为default,同时配置Docker加速器地址。
docker-machine create --engine-registry-mirror=https://<你的ID>.mirror.aliyuncs.com -d virtualbox default
查看机器的环境配置,并配置到本地,并通过Docker客户端访问Docker服务。
docker-machine env default
eval "$(docker-machine env default)"
docker info
针对安装了Docker for Mac的用户,您可以参考以下配置步骤:
在任务栏点击 Docker Desktop 应用图标 -> Perferences,在左侧导航菜单选择 Docker Engine,在右侧输入栏编辑 json 文件。将
https://<你的ID>.mirror.aliyuncs.com 加到 "registry-mirrors" 的数组里,点击 Apply & Restart按钮,等待Docker重启并应用配置的镜像加速器。
3. 相关文档
Docker 命令参考文档
Dockerfile 镜像构建参考文档
Windows
1. 安装/升级Docker客户端
对于Windows 10以下的用户,推荐使用Docker Toolbox
Windows安装文件:http://mirrors.aliyun.com/docker-toolbox/windows/docker-toolbox/
对于Windows 10以上的用户 推荐使用Docker for Windows
Windows安装文件:http://mirrors.aliyun.com/docker-toolbox/windows/docker-for-windows/
2. 配置镜像加速器
针对安装了Docker Toolbox的用户,您可以参考以下配置步骤:
创建一台安装有Docker环境的Linux虚拟机,指定机器名称为default,同时配置Docker加速器地址。
docker-machine create --engine-registry-mirror=https://<你的ID>.mirror.aliyuncs.com -d virtualbox default
查看机器的环境配置,并配置到本地,并通过Docker客户端访问Docker服务。
docker-machine env default
eval "$(docker-machine env default)"
docker info
针对安装了Docker for Windows的用户,您可以参考以下配置步骤:
在系统右下角托盘图标内右键菜单选择 Settings,打开配置窗口后左侧导航菜单选择 Docker Daemon。编辑窗口内的JSON串,填写下方加速器地址:
{
  "registry-mirrors": ["https://<你的ID>.mirror.aliyuncs.com"]
}
编辑完成后点击 Apply 保存按钮,等待Docker重启并应用配置的镜像加速器。
注意
Docker for Windows 和 Docker Toolbox互不兼容,如果同时安装两者的话,需要使用hyperv的参数启动。
docker-machine create --engine-registry-mirror=https://<你的ID>.mirror.aliyuncs.com -d hyperv default
Docker for Windows 有两种运行模式,一种运行Windows相关容器,一种运行传统的Linux容器。同一时间只能选择一种模式运行。
3. 相关文档
Docker 命令参考文档
Dockerfile 镜像构建参考文档
Cisco 产品下载链接汇总
Cisco Anyconnect 4.10.04065
百度网盘链接:https://pan.baidu.com/s/1WFcSX8ZHHHrrQtZ_abcg5Q?pwd=et4a
Cisco Anyconnect 4.10.04071
百度网盘链接:https://pan.baidu.com/s/1WJ0iz3ViFHnBi86XGJe5Kg?pwd=gh8t
Cisco Anyconnect 4.10.04085
百度网盘链接:https://pan.baidu.com/s/19vMZFa23MQP8kpKUh7Sr_Q?pwd=7gn0
Cisco Anyconnect 4.10.04095
百度网盘链接:https://pan.baidu.com/s/1N5t2kPqTD1h0g0S-SRrurQ?pwd=em0b
Cisco Anyconnect 4.10.05111
百度网盘链接:https://pan.baidu.com/s/1ulkjQSgYEHnXSjPrsd0Hgg?pwd=ur21
Cisco Anyconnect 4.10.06079
百度网盘链接:https://pan.baidu.com/s/1czwgSY-51UXMDDTICjb-5A?pwd=hn3f
Cisco Anyconnect 4.10.06090
百度网盘链接:https://pan.baidu.com/s/1u1stzHddc2T-ebQGwXArUw?pwd=pf02
Cisco Anyconnect 4.10.07061
百度网盘链接:https://pan.baidu.com/s/1JxmAt_rvRIKUUAxcokpSRA?pwd=000a
Cisco Anyconnect 4.10.07062 for Windows (Intel) only
百度网盘链接:https://pan.baidu.com/s/1GP0V25mrdtykqXe8tRN03A?pwd=9sn8
Cisco Anyconnect 4.10.07073
百度网盘链接:https://pan.baidu.com/s/1x664NwycRyk2R1rFQFYrKw?pwd=3ben
新版已发布:Cisco Secure Client 5.0.05040 (macOS, Linux, Windows & iOS, Andrord) - VPN 和远程访问
cisco-secure-client-win-5.0.03072-core-vpn-predeploy-k9.msi from https://olemiss.edu/helpdesk/vpn/
在Kali Linux上更换桌面环境,从Xfce到GNOME
1、环境确认: 将桌面缩放恢复成默认100% ,apt update 更新系统源信息。

2、以root权限安装GNOME:
┌──(root㉿kali)-[~]
└─# tasksel
3、选中GNOME并去掉Xfce。

4、设置默认桌面环境为gnome:
┌──(root㉿kali)-[~]
└─# update-alternatives --config x-session-manager
There are 3 choices for the alternative x-session-manager (providing /usr/bin/x-session-manager).

  Selection    Path                    Priority   Status
------------------------------------------------------------
* 0            /usr/bin/xfce4-session   40        auto mode
  1            /usr/bin/gnome-session   50        manual mode
  2            /usr/bin/startxfce4      50        manual mode
  3            /usr/bin/xfce4-session   40        manual mode

Press <enter> to keep the current choice[*], or type selection number: 1
5、重启系统使配置生效:
┌──(root㉿kali)-[~]
└─# reboot
6、重启后即可看到新桌面,命令查看结果:
┌──(root㉿kali)-[~]
└─# update-alternatives --config x-session-manager
There are 3 choices for the alternative x-session-manager (providing /usr/bin/x-session-manager).

  Selection    Path                    Priority   Status
------------------------------------------------------------
  0            /usr/bin/gnome-session   50        auto mode
* 1            /usr/bin/gnome-session   50        manual mode
  2            /usr/bin/startxfce4      50        manual mode
  3            /usr/bin/xfce4-session   40        manual mode

Press <enter> to keep the current choice[*], or type selection number:
其实也可以使用命令安装,原理是一样的:
┌──(root㉿kali)-[~]
└─# apt install kali-desktop-gnome
CompTIA Security+ Study Guide: Exam SY0-601 8th Edition 电子书
Learn the key objectives and most crucial concepts covered by the Security+ Exam SY0-601 with this comprehensive and practical study guide! An online test bank offers 650 practice questions and flashcards!
The Eighth Edition of the CompTIA Security+ Study Guide Exam SY0-601 efficiently and comprehensively prepares you for the SY0-601 Exam. Accomplished authors and security experts Mike Chapple and David Seidl walk you through the fundamentals of crucial security topics, including the five domains covered by the SY0-601 Exam:
Attacks, Threats, and Vulnerabilities
Architecture and Design
Implementation
Operations and Incident Response
Governance, Risk, and Compliance
The study guide comes with the Sybex online, interactive learning environment offering 650 practice questions! Includes a pre-assessment test, hundreds of review questions, practice exams, flashcards, and a glossary of key terms. The book is written in a practical and straightforward manner, ensuring you can easily learn and retain the material.
Perfect for everyone planning to take the SY0-601 Exam—as well as those who hope to secure a high-level certification like the CASP+, CISSP, or CISA—the study guide also belongs on the bookshelves of everyone who has ever wondered if the field of IT security is right for them. It's a must-have reference!
Buy a book on Amazon
Exam Tips: CompTIA Security+ (SY0-601)
Security+ SY0-601 Exam: 3 Things You Need to Know Get a 10% discount on your CompTIA Exam Voucher using code CERTMIKE10 in the CompTIA Store.
epub/pdf Download Address:
蓝奏网盘|PDF|English
蓝奏网盘|epub|English
蓝奏网盘|epub|彩云小译.中英对照 | 有兴趣的可以通过使用bilingual_book_maker自己动手翻译
Oracle-object-storage|PDF|English
Oracle-object-storage|epub|English
Oracle-object-storage|epub|彩云小译.中英对照 | 有兴趣的可以通过使用bilingual_book_maker自己动手翻译
在Sing-box-yg脚本24.3.2 v2.2.1部署之后的快速创建伪装网页的脚本。
因Sing-box-yg 脚本部署使用后没有web伪装页面,遂编写此懒人脚本。
甬哥Github项目 :github.com/yonggekkk
甬哥Blogger博客 :ygkkk.blogspot.com
仅在以下环境进行过测试,限定于Ubuntu系统。
Sing-box-yg 脚本版本:24.3.2 v2.2.1
系统:Ubuntu 20.04.6 LTS 内核:5.4.0
Vmess-ws-tls端口:8443
在使用脚本【12. 管理 Acme 申请域名证书】完成TLS开启后再执行nginx部署脚本。以确保/root/ygkkkca/ 目录下存在cert.crt和private.key
脚本执行信息如下

脚本文件↓
1111111111.txt
SeeMoon :利用云函数的动态实例不同的出口IP,从而获取到了干净(非威胁情报黑名单)、随机的外网IP代理来进行渗透测试。
- Sea Moon基于 Serverless 的动态特性、分别从网络层、应用层实现对应的能力,并利用serverless-devs工具来实现快捷的部署/跨厂商操作。
- Sea Moon能做什么:https://seamoon.dvkunion.cn/guide/introduce/#%F0%9F%8C%9F-%E6%9C%88%E6%B5%B7%E8%83%BD%E5%81%9A%E4%BB%80%E4%B9%88
- 利用SeaMoon+Sealos部署WSS代理,实现代理上网。
Trojan部署脚本
仓库地址:easytrojan/README.md
EasyTrojan
世界上最简单的Trojan部署脚本,仅需一行命令即可搭建一台代理服务器
-
该项目会自动提供trojan服务所需的免费域名与证书,无需购买、解析等繁琐操作
-
支持RHEL 7、8、9 (CentOS、RedHat、AlmaLinux、RockyLinux)、Debian 9、10、11、12、Ubuntu 16、18、20、22
-
技术原理不做解释,初衷只为解决个人用户与主机商家被阻断连接的问题,降低大量IP被阻断造成的各种后续影响
-
该项目仅限研究用途,用户应根据所在管辖区的当地法律评估自己的法规遵从义务
首次安装
请将结尾的password更换为自己的密码,例如 bash easytrojan.sh 123456,安装成功后会返回trojan的连接参数
curl https://raw.githubusercontent.com/eastmaple/easytrojan/main/easytrojan.sh -o easytrojan.sh && chmod +x easytrojan.sh && bash easytrojan.sh password
放行端口
如果服务器开启了防火墙,应放行TCP80与443端口,如在云厂商的web管理页面有防火墙应同时放行TCP80与443端口
# RHEL 7、8、9 (CentOS、RedHat、AlmaLinux、RockyLinux) 放行端口命令
firewall-cmd --permanent --add-port=80/tcp --add-port=443/tcp && firewall-cmd --reload && iptables -F

# Debian 9、10、11、12、Ubuntu 16、18、20、22 放行端口命令
sudo ufw allow proto tcp from any to any port 80,443 && sudo iptables -F
验证端口是否放行 (示例IP应修改为trojan服务器的IP)
通过浏览器访问脚本提供的免费域名,例如1.3.5.7.nip.io
如果自动跳转至https,页面显示Service Unavailable,说明端口已放行
密码管理
请将结尾的password更换为自己的密码,仅限字母、数字、下划线,非多密码管理用途无需使用
# 下载trojan密码管理脚本
curl https://raw.githubusercontent.com/eastmaple/easytrojan/main/mytrojan.sh -o mytrojan.sh && chmod +x mytrojan.sh

# 创建密码
bash mytrojan.sh add password

# 一次创建多个密码示例
bash mytrojan.sh add password1 password2 ...

# 删除密码
bash mytrojan.sh del password

# 一次删除多个密码示例
bash mytrojan.sh del password1 password2 ...

# 流量查询
bash mytrojan.sh status password1 password2 ...

# 流量归零
bash mytrojan.sh rotate
*流量统计归零后会自动在/etc/caddy/trojan/data目录下生成历史记录

# 密码列表
bash mytrojan.sh list
重新安装
systemctl stop caddy.service && curl https://raw.githubusercontent.com/eastmaple/easytrojan/main/easytrojan.sh -o easytrojan.sh && chmod +x easytrojan.sh && bash easytrojan.sh password
完全卸载
systemctl stop caddy.service && systemctl disable caddy.service && rm -rf /etc/caddy /usr/local/bin/caddy /etc/systemd/system/caddy.service
脚本说明
- 注意事项
必须使用root用户部署

请勿修改配置文件参数
- 免费域名
通过nip.io提供的免费域名解析服务获取,域名由ServerIP+nip.io组成
例如你的服务器IP为1.3.5.7,对应的域名则是1.3.5.7.nip.io
- 指定域名
仅建议在免费域名被阻断时使用
在密码后加入域名即可指定域名重新安装,密码与域名之间应使用空格分隔,执行命令如下:
systemctl stop caddy.service && curl https://raw.githubusercontent.com/eastmaple/easytrojan/main/easytrojan.sh -o easytrojan.sh && chmod +x easytrojan.sh && bash easytrojan.sh password yourdomain

*当指定域名后,如需切换回免费域名,必须完全卸载脚本,重新执行首次安装命令
- 更换端口
仅建议在443端口被阻断时临时使用
# 将443端口更换为8443端口示例
sed -i "s/443/8443/g" /etc/caddy/Caddyfile && systemctl restart caddy.service

*更换端口后应开启对应端口的防火墙
*当测试临时端口超过48小时未阻断后,应尽快更换IP并重新安装,使用默认的443端口
- 免费证书
通过Caddy的HTTPS模块实现,会自动申请letsencrypt或zerossl的免费证书

*关闭防火墙后执行重新安装命令,能大概率解决证书申请失败的问题

# RHEL 7、8、9 (CentOS、RedHat、AlmaLinux、RockyLinux)
systemctl stop firewalld.service && systemctl disable firewalld.service

# Debian 9、10、11、Ubuntu 16、18、20、22
sudo ufw disable
- 连接参数
IP为1.3.5.7 密码为123456的服务器示例
地址:1.3.5.7.nip.io  #根据服务器IP生成(即免费域名)
端口:443
密码:123456          #安装时设置的密码
ALPN: h2/http1.1
- 服务伪装
非密码正确的trojan客户端访问返回503状态,将trojan伪装成过载的Web服务
连接方式
客户端的TLS指纹是导致trojan被封端口的重要原因之一,但问题不仅存在于客户端,服务端也应作出对应配置
移动设备建议使用能够开启uTLS指纹功能的客户端,暂未有数据表明其它设备会因未启用uTLS指纹功能被封端口
为方便用户理解,配置示例中使用服务器IP:1.3.5.7、密码:123456,实际应修改为trojan服务器真实的连接参数

客户端不只局限于以下几种,仅需支持trojan连接即可
- 常见客户端连接trojan示例
- Windows
配置示例 | V2rayN-Core | 加速下载- MacOS
配置示例 | V2rayU | 加速下载-64 | 加速下载-arm- Android
配置示例 | V2rayNG | 加速下载- iOS
配置示例 | Shadowrocket | AppStore海外代购
-
OpenWRT passwall 配置示例
-
Xray连接trojan部分示例
{
    ...

    "outbounds": [
        {
            "protocol": "trojan",
            "settings": {
                "servers": [
                    {
                        "address": "1.3.5.7",        #连接trojan的服务器IP或域名
                        "port": 443,
                        "password": "123456"         #连接trojan的密码
                    }
                ]
            },
            "streamSettings": {
                "network": "tcp",
                "security": "tls",
                "tlsSettings": {
                    "allowInsecure": false,
                    "serverName": "1.3.5.7.nip.io",  #连接trojan的域名
                    "fingerprint": "chrome",
                    "alpn": "h2,http/1.1"
                }
            }
        }
    ]
}
- Clash连接trojan部分示例(仅限非ARM设备)
- name: "trojan"
    type: trojan
    server: 1.3.5.7
    port: 443
    password: 123456
    udp: true
    sni: 1.3.5.7.nip.io
    alpn:
      - h2
      - http/1.1
    skip-cert-verify: false
警告:请勿在移动设备及其它除Mac外的ARM设备上使用Clash及不包含UTLS指纹功能的客户端连接trojan
用户交流
数据报告
自北京时间2022年10月3日起,不断有**大陆的用户报告基于TLS的代理服务器被封端口。
- 普遍现象:先被封禁443端口,更换端口后会在1~2天的时间内被再次封禁,多次更换端口后服务器IP被阻断
- 讨论结果:客户端指纹、服务端指纹、连接数量过多、TLS in TLS被识别等,总之众说纷纭,没有解决方案
该项目经过多台服务器测试,以及与部分包含trojan协议的客户端开发者沟通,总结出了相对可靠的抗封锁方案,由于用户的客户端、网络环境差异很大,不保证部署后一定不封禁端口。
样本服务器测试数据:
- 2022年10月初,2台来自境内用户日常使用的Non-TLS代理服务器相继被阻断IP
- 2022年10月初,2台样本服务器更换为trojan协议,客户端使用路由器连接,稳定运行
- 2022年10月上,多用户使用移动客户端连接其中1台trojan服务器,必定出现1天内被封端口现象
- 2022年10月上,排查原因,分析变量,调研多个被封样本,推测出三个最有可能的原因
- 2022年10月中,逐条更换变量测试,最终确定被封问题来自一个移动端不可描述的原因
- 2022年10月末,2台服务器在每日约10台设备连接、日流量消耗10~20G的情况下稳定运行
- 2022年10月末,新购1台封端口重灾区的服务器,并联系了10位使用trojan被封端口的用户,内测该部署方案
- 2022年11月初,样本服务器中,12台443端口正常,1台被封443端口,原因是客户端跳过了证书验证,更正后稳定运行
- 2022年11月中,总计13台样本服务器,443端口全部正常,期间有围观用户尝试部署,未收到端口被封反馈
- 2022年11月末,少量用户在移动设备使用clash客户端连接trojan被封端口,更换为该项目建议的客户端后均稳定运行
- 2022年11月末,已有超过100台服务器使用该项目部署,暂未收到用户服务器端口被封的反馈
- 2022年黑色星期五,将该部署方案制作成脚本并发布,并在10天后登上Github Trending总榜

鸣谢项目
NextTrace:一款追求轻量化的开源可视化路由跟踪工具。


V2Ray 路由规则文件加强版
简介
V2Ray 路由规则文件加强版,可代替 V2Ray 官方 geoip.dat 和 geosite.dat,兼容 Shadowsocks-windows、Xray-core、Trojan-Go 和 leaf。利用 GitHub Actions 北京时间每天早上 6 点自动构建,保证规则最新。
规则文件生成方式
geoip.dat
- 通过仓库 @Loyalsoldier/geoip 生成
- 其中全球 IP 地址(IPv4 和 IPv6)来源于 MaxMind GeoLite2,
CN(**大陆)类别下的 IPv4 地址融合了 ipip.net 和 @gaoyifan/china-operator-ip,CN(**大陆)类别下的 IPv6 地址融合了 MaxMind GeoLite2 和 @gaoyifan/china-operator-ip - 新增类别(方便有特殊需求的用户使用):
geoip:cloudflaregeoip:cloudfrontgeoip:facebookgeoip:fastlygeoip:googlegeoip:netflixgeoip:telegramgeoip:twitter
希望定制
geoip.dat文件?查看仓库 @Loyalsoldier/geoip。
geosite.dat
- 基于 @v2fly/domain-list-community/data 数据,通过仓库 @Loyalsoldier/domain-list-custom 生成
- 加入大量**大陆域名、Apple 域名和 Google 域名:
- @felixonmars/dnsmasq-china-list/accelerated-domains.china.conf 加入到
geosite:cn类别中 - @felixonmars/dnsmasq-china-list/apple.china.conf 加入到
geosite:geolocation-!cn类别中(如希望本文件中的 Apple 域名直连,请参考下面 geosite 的 Routing 配置方式) - @felixonmars/dnsmasq-china-list/google.china.conf 加入到
geosite:geolocation-!cn类别中(如希望本文件中的 Google 域名直连,请参考下面 geosite 的 Routing 配置方式)
- @felixonmars/dnsmasq-china-list/accelerated-domains.china.conf 加入到
- 加入 GFWList 域名:
- 基于 @gfwlist/gfwlist 数据,通过仓库 @cokebar/gfwlist2dnsmasq 生成
- 加入到
geosite:gfw类别中,供习惯于 PAC 模式并希望使用 GFWList 的用户使用 - 同时加入到
geosite:geolocation-!cn类别中
- 加入 EasyList 和 EasyListChina 广告域名:通过 @AdblockPlus/EasylistChina+Easylist.txt 获取并加入到
geosite:category-ads-all类别中 - 加入 AdGuard DNS Filter 广告域名:通过 @AdGuard/DNS-filter 获取并加入到
geosite:category-ads-all类别中 - 加入 Peter Lowe 广告和隐私跟踪域名:通过 @PeterLowe/adservers 获取并加入到
geosite:category-ads-all类别中 - 加入 Dan Pollock 广告域名:通过 @DanPollock/hosts 获取并加入到
geosite:category-ads-all类别中 - 加入 Windows 操作系统相关的系统升级和隐私跟踪域名:
- 基于 @crazy-max/WindowsSpyBlocker 数据
- [慎用] Windows 操作系统使用的隐私跟踪域名 @crazy-max/WindowsSpyBlocker/hosts/spy.txt 加入到
geosite:win-spy类别中 - [慎用] Windows 操作系统使用的系统升级域名 @crazy-max/WindowsSpyBlocker/hosts/update.txt 加入到
geosite:win-update类别中 - [慎用] Windows 操作系统附加的隐私跟踪域名 @crazy-max/WindowsSpyBlocker/hosts/extra.txt 加入到
geosite:win-extra类别中 - 关于这三个类别的使用方式,请参考下面 geosite 的 Routing 配置方式
- 可添加自定义直连、代理和广告域名:由于上游域名列表更新缓慢或缺失某些域名,所以引入需要添加的域名列表。
hidden 分支里的三个文件direct.txt、proxy.txt和reject.txt,分别存放自定义的需要添加的直连、代理、广告域名,最终分别加入到geosite:cn、geosite:geolocation-!cn和geosite:category-ads-all类别中 - 可移除自定义直连、代理和广告域名:由于上游域名列表存在需要被移除的域名,所以引入需要移除的域名列表。
hidden 分支里的三个文件direct-need-to-remove.txt、proxy-need-to-remove.txt和reject-need-to-remove.txt,分别存放自定义的需要从direct-list(直连域名列表)、proxy-list(代理域名列表)和reject-list(广告域名列表) 移除的域名
规则文件下载及使用方式
下载地址:
如果无法访问域名
raw.githubusercontent.com,可以使用第二个地址(cdn.jsdelivr.net),但是内容更新会有 12 小时的延迟。
- geoip.dat:
- geosite.dat:
- 直连域名列表 direct-list.txt:
- 代理域名列表 proxy-list.txt:
- 广告域名列表 reject-list.txt:
- Apple 在**大陆可直连的域名列表 apple-cn.txt:
- Google 在**大陆可直连的域名列表 google-cn.txt:
- GFWList 域名列表 gfw.txt:
- Windows 操作系统使用的隐私跟踪域名列表 win-spy.txt:
- Windows 操作系统使用的系统升级域名列表 win-update.txt:
- Windows 操作系统使用的附加隐私跟踪域名列表 win-extra.txt:
使用方式:
- 安装适用于自己操作系统的客户端
- 下载本项目的
geoip.dat和geosite.dat - 把下载下来的
geoip.dat和geosite.dat放入到客户端的规则文件目录,替换掉原来的geoip.dat和geosite.dat - 如果使用的是 V2Ray v4 版本客户端,配置可参考下面 👇👇👇
参考配置(仅适用于 V2Ray v4 版本)
geoip.dat
跟 V2Ray 官方 geoip.dat 配置方式相同。
Routing 配置方式:
"routing": {
  "rules": [
    {
      "type": "field",
      "outboundTag": "Direct",
      "ip": [
        "223.5.5.5/32",
        "119.29.29.29/32",
        "180.76.76.76/32",
        "114.114.114.114/32",
        "geoip:cn",
        "geoip:private"
      ]
    },
    {
      "type": "field",
      "outboundTag": "Proxy",
      "ip": [
        "1.1.1.1/32",
        "1.0.0.1/32",
        "8.8.8.8/32",
        "8.8.4.4/32",
        "geoip:us",
        "geoip:ca",
        "geoip:telegram"
      ]
    }
  ]
}
geosite.dat
跟 V2Ray 官方 geosite.dat 配置方式相同。相比官方 geosite.dat 文件,本项目特有的类别:
geosite:apple-cn:包含 @felixonmars/dnsmasq-china-list/apple.china.conf 文件里的域名,供希望 Apple 域名直连(不走代理)的用户使用。geosite:google-cn:包含 @felixonmars/dnsmasq-china-list/google.china.conf 文件里的域名,供希望 Google 域名直连(不走代理)的用户使用。- [慎用]
geosite:win-spy:包含 @crazy-max/WindowsSpyBlocker/hosts/spy.txt 文件里的域名,供希望屏蔽 Windows 操作系统隐私跟踪域名的用户使用。 - [慎用]
geosite:win-update:包含 @crazy-max/WindowsSpyBlocker/hosts/update.txt 文件里的域名,供希望屏蔽 Windows 操作系统自动升级的用户使用。 - [慎用]
geosite:win-extra:包含 @crazy-max/WindowsSpyBlocker/hosts/extra.txt 文件里的域名,供希望屏蔽 Windows 操作系统附加隐私跟踪域名的用户使用。
⚠️ 注意:在 Routing 配置中,类别越靠前(上),优先级越高,所以geosite:apple-cn和geosite:google-cn要放置在geosite:geolocation-!cn前(上)面才能生效。
高级用法
v2fly/domain-list-community 项目 data 目录中某些列表里的规则会被标记诸如 @cn 的 attribute(如下所示),意为该域名在**大陆有接入点,可直连。
steampowered.com.8686c.com @cn
steamstatic.com.8686c.com @cn
对于玩 Steam 国区游戏,想要直连的用户,可以设置类别 geosite:steam@cn 为直连,意为将 steam 列表内所有被标记了 @cn attribute 的规则(域名)设置为直连。同理,由于 category-games 列表包含了 steam、ea、blizzard、epicgames 和 nintendo 等常见的游戏厂商。设置类别 geosite:category-games@cn 为直连,即可节省大量服务器流量。
⚠️ 注意:在 Routing 配置中,类别越靠前(上),优先级越高,所以geosite:category-games@cn等所有带有@cnattribute 的规则都要放置在geosite:geolocation-!cn前(上)面才能生效。
category-games列表内的规则(域名)可能会有疏漏,请留意规则命中情况。如发现遗漏,欢迎到项目 v2fly/domain-list-community 提 issue 反馈。
配置参考下面 👇👇👇
白名单模式 Routing 配置方式:
"routing": {
  "rules": [
    {
      "type": "field",
      "outboundTag": "Reject",
      "domain": ["geosite:category-ads-all"]
    },
    {
      "type": "field",
      "outboundTag": "Direct",
      "domain": [
        "geosite:private",
        "geosite:apple-cn",
        "geosite:google-cn",
        "geosite:tld-cn",
        "geosite:category-games@cn"
      ]
    },
    {
      "type": "field",
      "outboundTag": "Proxy",
      "domain": ["geosite:geolocation-!cn"]
    },
    {
      "type": "field",
      "outboundTag": "Direct",
      "domain": ["geosite:cn"]
    },
    {
      "type": "field",
      "outboundTag": "Proxy",
      "network": "tcp,udp"
    }
  ]
}
黑名单模式 Routing 配置方式:
"routing": {
  "rules": [
    {
      "type": "field",
      "outboundTag": "Reject",
      "domain": ["geosite:category-ads-all"]
    },
    {
      "type": "field",
      "outboundTag": "Proxy",
      "domain": ["geosite:gfw"]
    },
    {
      "type": "field",
      "outboundTag": "Proxy",
      "ip": ["geoip:telegram"]
    },
    {
      "type": "field",
      "outboundTag": "Direct",
      "network": "tcp,udp"
    }
  ]
}
DNS 配置方式:
"dns": {
  "hosts": {
    "dns.google": "8.8.8.8",
    "dns.pub": "119.29.29.29",
    "dns.alidns.com": "223.5.5.5",
    "geosite:category-ads-all": "127.0.0.1"
  },
  "servers": [
    {
      "address": "https://1.1.1.1/dns-query",
      "domains": ["geosite:geolocation-!cn"],
      "expectIPs": ["geoip:!cn"]
    },
    "8.8.8.8",
    {
      "address": "114.114.114.114",
      "port": 53,
      "domains": ["geosite:cn", "geosite:category-games@cn"],
      "expectIPs": ["geoip:cn"],
      "skipFallback": true
    },
    {
      "address": "localhost",
      "skipFallback": true
    }
  ]
}
自用 V2Ray v4 版本客户端配置(不适用于 V2Ray v5 及更新的版本)
注意事项:
- 由于下面客户端配置的 DNS 使用了
skipFallback选项,所以必须使用 v4.37.2 或更新版本的 V2Ray - 下面客户端配置使 V2Ray 在本机开启 SOCKS 代理(监听 1080 端口)和 HTTP 代理(监听 2080 端口),允许局域网内其他设备连接并使用代理
- BT 流量统统直连(实测依然会有部分 BT 流量走代理,如果服务商禁止 BT 下载,请不要为下载软件设置代理)
- 最后,不命中任何路由规则的请求和流量,统统走代理
outbounds里的第一个大括号内的配置,即为 V2Ray 代理服务的配置。请根据自身需求进行修改,并参照 V2Ray 官网配置文档中的 配置 > Outbounds > OutboundObject 部分进行补全
{
  "log": {
    "loglevel": "warning"
  },
  "dns": {
    "hosts": {
      "dns.google": "8.8.8.8",
      "dns.pub": "119.29.29.29",
      "dns.alidns.com": "223.5.5.5",
      "geosite:category-ads-all": "127.0.0.1"
    },
    "servers": [
      {
        "address": "https://1.1.1.1/dns-query",
        "domains": ["geosite:geolocation-!cn", "geosite:google@cn"],
        "expectIPs": ["geoip:!cn"]
      },
      "8.8.8.8",
      {
        "address": "114.114.114.114",
        "port": 53,
        "domains": [
          "geosite:cn",
          "geosite:icloud",
          "geosite:category-games@cn"
        ],
        "expectIPs": ["geoip:cn"],
        "skipFallback": true
      },
      {
        "address": "localhost",
        "skipFallback": true
      }
    ]
  },
  "inbounds": [
    {
      "protocol": "socks",
      "listen": "0.0.0.0",
      "port": 1080,
      "tag": "Socks-In",
      "settings": {
        "ip": "127.0.0.1",
        "udp": true,
        "auth": "noauth"
      },
      "sniffing": {
        "enabled": true,
        "destOverride": ["http", "tls"]
      }
    },
    {
      "protocol": "http",
      "listen": "0.0.0.0",
      "port": 2080,
      "tag": "Http-In",
      "sniffing": {
        "enabled": true,
        "destOverride": ["http", "tls"]
      }
    }
  ],
  "outbounds": [
    {
      //下面这行,协议类别要改为socks、shadowsocks、vmess或vless等(记得删除本行文字说明)
      "protocol": "协议类别",
      "settings": {},
      //下面这行,tag的值对应Routing里的outboundTag,这里为Proxy(记得删除本行文字说明)
      "tag": "Proxy",
      "streamSettings": {},
      "mux": {}
    },
    {
      "protocol": "dns",
      "tag": "Dns-Out"
    },
    {
      "protocol": "freedom",
      "tag": "Direct",
      "settings": {
        "domainStrategy": "UseIPv4"
      }
    },
    {
      "protocol": "blackhole",
      "tag": "Reject",
      "settings": {
        "response": {
          "type": "http"
        }
      }
    }
  ],
  "routing": {
    "domainStrategy": "IPIfNonMatch",
    "domainMatcher": "mph",
    "rules": [
      {
        "type": "field",
        "outboundTag": "Direct",
        "protocol": ["bittorrent"]
      },
      {
        "type": "field",
        "outboundTag": "Dns-Out",
        "inboundTag": ["Socks-In", "Http-In"],
        "network": "udp",
        "port": 53
      },
      {
        "type": "field",
        "outboundTag": "Reject",
        "domain": ["geosite:category-ads-all"]
      },
      {
        "type": "field",
        "outboundTag": "Proxy",
        "domain": [
          "full:www.icloud.com",
          "domain:icloud-content.com",
          "geosite:google"
        ]
      },
      {
        "type": "field",
        "outboundTag": "Direct",
        "domain": [
          "geosite:tld-cn",
          "geosite:icloud",
          "geosite:category-games@cn"
        ]
      },
      {
        "type": "field",
        "outboundTag": "Proxy",
        "domain": ["geosite:geolocation-!cn"]
      },
      {
        "type": "field",
        "outboundTag": "Direct",
        "domain": ["geosite:cn", "geosite:private"]
      },
      {
        "type": "field",
        "outboundTag": "Direct",
        "ip": ["geoip:cn", "geoip:private"]
      },
      {
        "type": "field",
        "outboundTag": "Proxy",
        "network": "tcp,udp"
      }
    ]
  }
}
使用本项目的项目
致谢
- @Loyalsoldier/geoip
- @v2fly/domain-list-community
- @Loyalsoldier/domain-list-custom
- @felixonmars/dnsmasq-china-list
- @gfwlist/gfwlist
- @cokebar/gfwlist2dnsmasq
- @AdblockPlus/EasylistChina+Easylist.txt
- @AdGuard/DNS-filter
- @PeterLowe/adservers
- @DanPollock/hosts
- @crazy-max/WindowsSpyBlocker
项目原地址 - https://github.com/Loyalsoldier/v2ray-rules-dat/tree/master
Disk2vhd:Windows物理系统迁移到虚拟机的工具
Disk2vhd 是一个实用工具,用于创建 VHD(虚拟硬盘 - Microsoft 的虚拟机磁盘格式)版本的物理磁盘,以便在 Microsoft 虚拟电脑或 Microsoft Hyper-V 虚拟机 (VM) 中使用。 Disk2vhd 和其他物理转虚拟工具的区别在于,你可以在联机系统上运行 Disk2vhd。 Disk2vhd 使用 Windows XP 中引入的 Windows 卷快照功能,为要包含在转换中的卷创建一致的时间点快照。 甚至可以让 Disk2vhd 在本地卷上创建 VHD,即使 VHD 可以通过转换获得(但磁盘上的 VHD 不同于转换的 VHD,其性能更优)。
Linux环境配置http、https代理或socks5代理的shell脚本
最快方法:终端直接执行
export all_proxy=socks5://192.168.124.8:12818
当您需要在 Linux 环境下设置代理时,可以使用此脚本来方便地配置和取消配置代理。此脚本提供了以下功能:
设置代理: 用户可以选择设置 HTTP 或 SOCKS5 代理。对于每种类型的代理,用户需要输入代理服务器的 IP 地址和端口号。脚本会验证输入的 IP 和端口号是否有效,并在设置代理后检查代理的可达性。
取消代理设置: 用户可以选择取消当前配置的任何代理设置。脚本将清除系统中的代理设置。
脚本包含了输入验证、代理可达性检查以及简单的用户界面,使得设置和取消代理变得简单易行。您可以根据需要将其用于您的 Linux 系统中,为您的网络连接提供所需的代理支持。
#!/bin/bash

# Function to validate IP address
validate_ip() {
    local ip=$1
    if [ "$ip" ] && [ "$(echo "$ip" | grep -E -o "([0-9]{1,3}[\.]){3}[0-9]{1,3}")" ]; then
        echo 1
    else
        echo 0
    fi
}

# Function to validate port number
validate_port() {
    local port=$1
    if [ "$port" ] && [ "$(echo "$port" | grep -E -o "^[0-9]+$")" ] && [ "$port" -ge 1 ] && [ "$port" -le 65535 ]; then
        echo 1
    else
        echo 0
    fi
}

# Function to check if a proxy is reachable
check_http_proxy() {
    local proxy_address=$1
    local proxy_port=$2
    curl -sS -x $proxy_address:$proxy_port http://www.example.com/ >/dev/null
    if [ $? -eq 0 ]; then
        echo "Proxy is reachable."
    else
        echo "Proxy is not reachable."
    fi
}

# Function to check if a proxy is reachable
check_socks_proxy() {
    local proxy_address=$1
    local proxy_port=$2
    curl -sS --socks5 $proxy_address:$proxy_port http://www.example.com/ >/dev/null
    if [ $? -eq 0 ]; then
        echo "Proxy is reachable."
    else
        echo "Proxy is not reachable."
    fi
}

# Function to set proxy
set_proxy() {
    echo "Which type of proxy do you want to set?"
    echo "1. HTTP and HTTPS"
    echo "2. only HTTPS"
    echo "3. SOCKS5"
    read proxy_choice

    if [ $proxy_choice -eq 1 ]; then
        echo "Enter HTTP proxy IP: "
        read http_proxy_ip
        echo "Enter HTTP proxy port: "
        read http_proxy_port
        if [ $(validate_ip "$http_proxy_ip") -eq 1 ] && [ $(validate_port "$http_proxy_port") -eq 1 ]; then
            export http_proxy="http://$http_proxy_ip:$http_proxy_port"
            export https_proxy="https://$http_proxy_ip:$http_proxy_port"
            echo "Proxy has been set to HTTP: $http_proxy and HTTPS: $https_proxy"
            check_http_proxy $http_proxy_ip $http_proxy_port
        else
            echo "Invalid IP or port. Please try again."
        fi
    elif [ $proxy_choice -eq 2 ]; then
        echo "Enter HTTPS proxy IP: "
        read https_proxy_ip
        echo "Enter HTTPS proxy port: "
        read https_proxy_port
        if [ $(validate_ip "$https_proxy_ip") -eq 1 ] && [ $(validate_port "$https_proxy_port") -eq 1 ]; then
            export https_proxy="https://$https_proxy_ip:$https_proxy_port"
            echo "Proxy has been set to HTTPS: $https_proxy"
            check_http_proxy $https_proxy_ip $https_proxy_port
        else
            echo "Invalid IP or port. Please try again."
        fi
    elif [ $proxy_choice -eq 3 ]; then
        echo "Enter SOCKS5 proxy IP: "
        read socks_proxy_ip
        echo "Enter SOCKS5 proxy port: "
        read socks_proxy_port
        if [ $(validate_ip "$socks_proxy_ip") -eq 1 ] && [ $(validate_port "$socks_proxy_port") -eq 1 ]; then
            export all_proxy="socks5://$socks_proxy_ip:$socks_proxy_port"
            echo "Proxy has been set to SOCKS5: $all_proxy"
            check_socks_proxy $socks_proxy_ip $socks_proxy_port
        else
            echo "Invalid IP or port. Please try again."
        fi
    else
        echo "Invalid choice. Please enter 1, 2 or 3."
    fi
}

# Function to unset proxy
unset_proxy() {
    unset http_proxy
    unset https_proxy
    unset all_proxy
    echo "Proxy has been unset."
}

# Main script
echo "1. Set proxy"
echo "2. Unset proxy"
echo "Enter your choice (1 or 2): "
read choice

if [ "$choice" -eq 1 ]; then
    set_proxy
elif [ "$choice" -eq 2 ]; then
    unset_proxy
else
    echo "Invalid choice. Please enter 1 or 2."
fi
在脚本中设置的环境变量仅在脚本的上下文中存在,并不会在您的当前 shell 会话中持久保存。为了让环境变量在脚本执行后仍然存在,可以考虑将脚本放在当前 shell 会话中执行,而不是作为一个单独的进程。您可以使用点号 . 或 source 命令来实现这一点。这样,脚本将在当前 shell 中执行,而不是在一个单独的子 shell 中执行。以下是修改后的示例:
假设脚本文件名为 proxy_config.sh
. ./proxy_config.sh
或者
source ./proxy_config.sh
通过这样执行脚本,您设置的环境变量将在脚本执行后在当前 shell 会话中保持有效。您可以使用 echo $all_proxy 或 echo $http_proxy 来检查环境变量是否已经设置。
Websoft9:一个开源的,快速部署企业级应用、云原生应用的免费工具
Websoft9 是一个以应用为中心的开源 PaaS 平台,也是云原生的应用商店。Websoft9 提供的 Web 的控制台,可以很方便一键部署数百个开源企业应用,满足企业数字化的大部分需求。


它简单易用,界面友好,无需任何技术知识。Websoft9 将企业部署软件的时间由 1-2 天缩短到 1 分钟。
从此,企业部署开源系统的工作不再是专业 IT 人员的专属技能,企业的 CEO 以及业务部门的管理人员,都可以自行运行所需的应用。
Websoft9 支持在 Red Hat, CentOS, Debian, Ubuntu 等主流 Linux 发行版上安装。
暂不支持 Windows 和 macOS 等操作系统
环境依赖:Python 3.8 以上 + pip
LVM磁盘根目录扩容操作步骤
查询磁盘信息
[root@v01-poc-1 opt]# lsblk
NAME                          MAJ:MIN RM  SIZE RO TYPE MOUNTPOINT
sda                             8:0    0   50G  0 disk
├─sda1                          8:1    0    1G  0 part /boot
└─sda2                          8:2    0   49G  0 part
  ├─centos_v01--poc--1-root 253:0    0   44G  0 lvm  /
  └─centos_v01--poc--1-swap 253:1    0    5G  0 lvm  [SWAP]
sdb                             8:16   0   50G  0 disk
sr0                            11:0    1 1024M  0 rom
[root@v01-poc-1 opt]# df -Th
Filesystem                            Type      Size  Used Avail Use% Mounted on
devtmpfs                              devtmpfs  7.8G     0  7.8G   0% /dev
tmpfs                                 tmpfs     7.8G  1.7M  7.8G   1% /dev/shm
tmpfs                                 tmpfs     7.8G  340M  7.5G   5% /run
tmpfs                                 tmpfs     7.8G     0  7.8G   0% /sys/fs/cgroup
/dev/mapper/centos_v01--poc--1-root xfs        44G   39G  5.5G  88% /
/dev/sda1                             xfs      1014M  151M  864M  15% /boot
tmpfs                                 tmpfs     1.6G     0  1.6G   0% /run/user/0
将新增的sdb创建分区sdb1,更改新分区类型为
8e
[root@v01-poc-1 opt]# fdisk /dev/sdb
Welcome to fdisk (util-linux 2.23.2).

Changes will remain in memory only, until you decide to write them.
Be careful before using the write command.

Device does not contain a recognized partition table
Building a new DOS disklabel with disk identifier 0x4116f461.

Command (m for help): n        <-------------------------------------n 新建磁盘分区
Partition type:
   p   primary (0 primary, 0 extended, 4 free)
   e   extended
Select (default p):        <-------------------------------------直接回车,使用默认
Using default response p
Partition number (1-4, default 1):        <-------------------------------------直接回车,使用默认
First sector (2048-104857599, default 2048):        <-------------------------------------直接回车,使用默认
Using default value 2048
Last sector, +sectors or +size{K,M,G} (2048-104857599, default 104857599):        <-------------- 直接回车,使用全部
Using default value 104857599
Partition 1 of type Linux and of size 50 GiB is set

Command (m for help): p        <-------------------------------------p 查询磁盘分区

Disk /dev/sdb: 53.7 GB, 53687091200 bytes, 104857600 sectors
Units = sectors of 1 * 512 = 512 bytes
Sector size (logical/physical): 512 bytes / 512 bytes
I/O size (minimum/optimal): 512 bytes / 512 bytes
Disk label type: dos
Disk identifier: 0x4116f461

   Device Boot      Start         End      Blocks   Id  System
/dev/sdb1            2048   104857599    52427776   83  Linux

Command (m for help): t        <-------------------------------------t 更改磁盘分区
Selected partition 1
Hex code (type L to list all codes): 8e        <-------------------------------------8e 输入分区类型,回车
Changed type of partition 'Linux' to 'Linux LVM'

Command (m for help): p        <-------------------------------------p 程序磁盘分区

Disk /dev/sdb: 53.7 GB, 53687091200 bytes, 104857600 sectors
Units = sectors of 1 * 512 = 512 bytes
Sector size (logical/physical): 512 bytes / 512 bytes
I/O size (minimum/optimal): 512 bytes / 512 bytes
Disk label type: dos
Disk identifier: 0x4116f461

   Device Boot      Start         End      Blocks   Id  System
/dev/sdb1            2048   104857599    52427776   8e  Linux LVM

Command (m for help): w        <-------------------------------------w 保存修改,退出
The partition table has been altered!

Calling ioctl() to re-read partition table.
Syncing disks.
[root@v01-poc-1 opt]# lsblk
NAME                          MAJ:MIN RM  SIZE RO TYPE MOUNTPOINT
sda                             8:0    0   50G  0 disk
├─sda1                          8:1    0    1G  0 part /boot
└─sda2                          8:2    0   49G  0 part
  ├─centos_v01--poc--1-root 253:0    0   44G  0 lvm  /
  └─centos_v01--poc--1-swap 253:1    0    5G  0 lvm  [SWAP]
sdb                             8:16   0   50G  0 disk
└─sdb1                          8:17   0   50G  0 part
sr0                            11:0    1 1024M  0 rom
要将 sdb1 扩展到 centos_v01--poc--1-root,请按照以下步骤操作:
请在进行任何磁盘或分区操作之前备份重要数据,并确保您已经了解并熟悉了所要执行的操作。
1、确保 sdb1 是已经创建的分区,并且它当前没有被使用。如果已经在使用,请确保提前备份数据。
2、将 sdb1 分区添加为物理卷(Physical Volume):
pvcreate /dev/sdb1
3、将新的物理卷添加到现有的卷组(Volume Group)centos_v01--poc--1 中:
vgextend centos_v01-poc-1 /dev/sdb1
4、确定可用的空闲空间,可以使用以下命令:
vgs
5、使用 lvextend 命令将逻辑卷(Logical Volume)centos_v01--poc--1-root 扩展到所有可用空间:
lvextend -l +100%FREE /dev/centos_v01-poc-1/root
6-a、最后,调整文件系统的大小,以便它能够利用新的空间。如果是 ext 文件系统,可以运行:
resize2fs /dev/centos_v01-poc-1/root
PS:使用 df -Th 查询文件系统类型。
6-b、使用 xfs_growfs 命令来调整 XFS 文件系统的大小:
xfs_growfs /dev/centos_v01-poc-1/root
7、最后,确认操作完成后,可以通过以下命令检查新的分区大小:
[root@v01-poc-1 opt]# df -Th
Filesystem                            Type      Size  Used Avail Use% Mounted on
devtmpfs                              devtmpfs  7.8G     0  7.8G   0% /dev
tmpfs                                 tmpfs     7.8G  1.7M  7.8G   1% /dev/shm
tmpfs                                 tmpfs     7.8G  348M  7.5G   5% /run
tmpfs                                 tmpfs     7.8G     0  7.8G   0% /sys/fs/cgroup
/dev/mapper/centos_v01--poc--1-root xfs        94G   40G   55G  43% /
/dev/sda1                             xfs      1014M  151M  864M  15% /boot
tmpfs                                 tmpfs     1.6G     0  1.6G   0% /run/user/0
[root@v01-poc-1 opt]# lsblk
NAME                          MAJ:MIN RM  SIZE RO TYPE MOUNTPOINT
sda                             8:0    0   50G  0 disk
├─sda1                          8:1    0    1G  0 part /boot
└─sda2                          8:2    0   49G  0 part
  ├─centos_v01--poc--1-root 253:0    0   94G  0 lvm  /
  └─centos_v01--poc--1-swap 253:1    0    5G  0 lvm  [SWAP]
sdb                             8:16   0   50G  0 disk
└─sdb1                          8:17   0   50G  0 part
  └─centos_v01--poc--1-root 253:0    0   94G  0 lvm  /
sr0                            11:0    1 1024M  0 rom
Aliunx/CentOS部署并使用Docker
iOS Shadowrocket 规则

由于原作者已经不再自动更新仓库,所以这是从 h2y 仓库地址 fork 并部署的第三方仓库链接
本仓库每日自动发布更新, 或许也会有一些简单的维护
本规则具有以下特点:
- 黑名单由最新版 GFWList 自动转换;白名单针对全球 top500 站点的连通情况定期自动生成。
- 自动转换最新版本的 EasyList, Eaylist China, 乘风规则 为 DMhsot Clash 规则,全面去除广告且去除重复。
- 也包括自定义的广告过滤规则,针对 iOS 端的网页广告、App 广告和视频广告。
- 提供多个规则文件让大家自由选择或者自由切换使用。
- 专门针对 ShadowRocket 开发,可以保证与 DMhost 的兼容性。
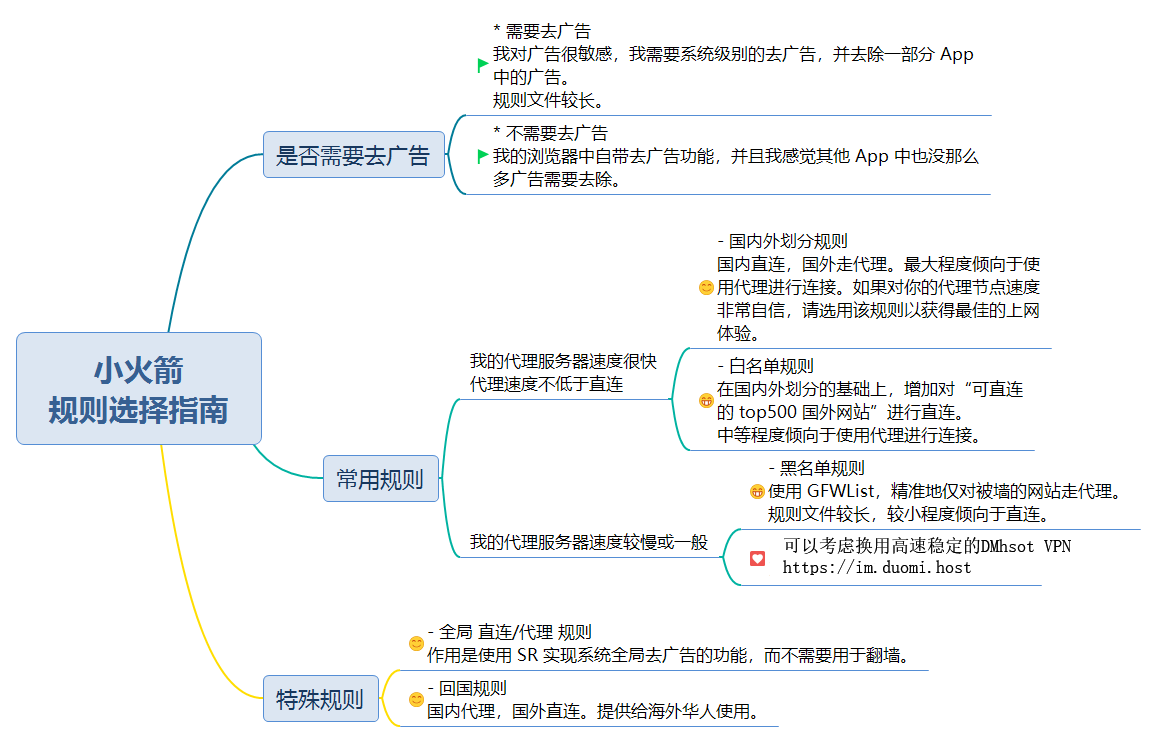
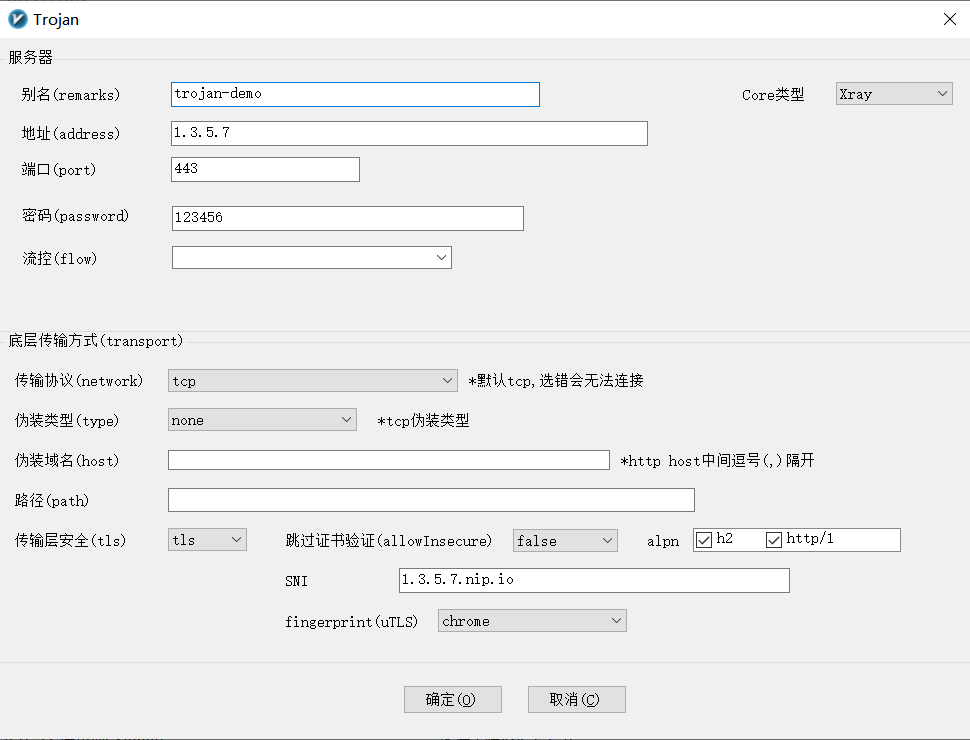
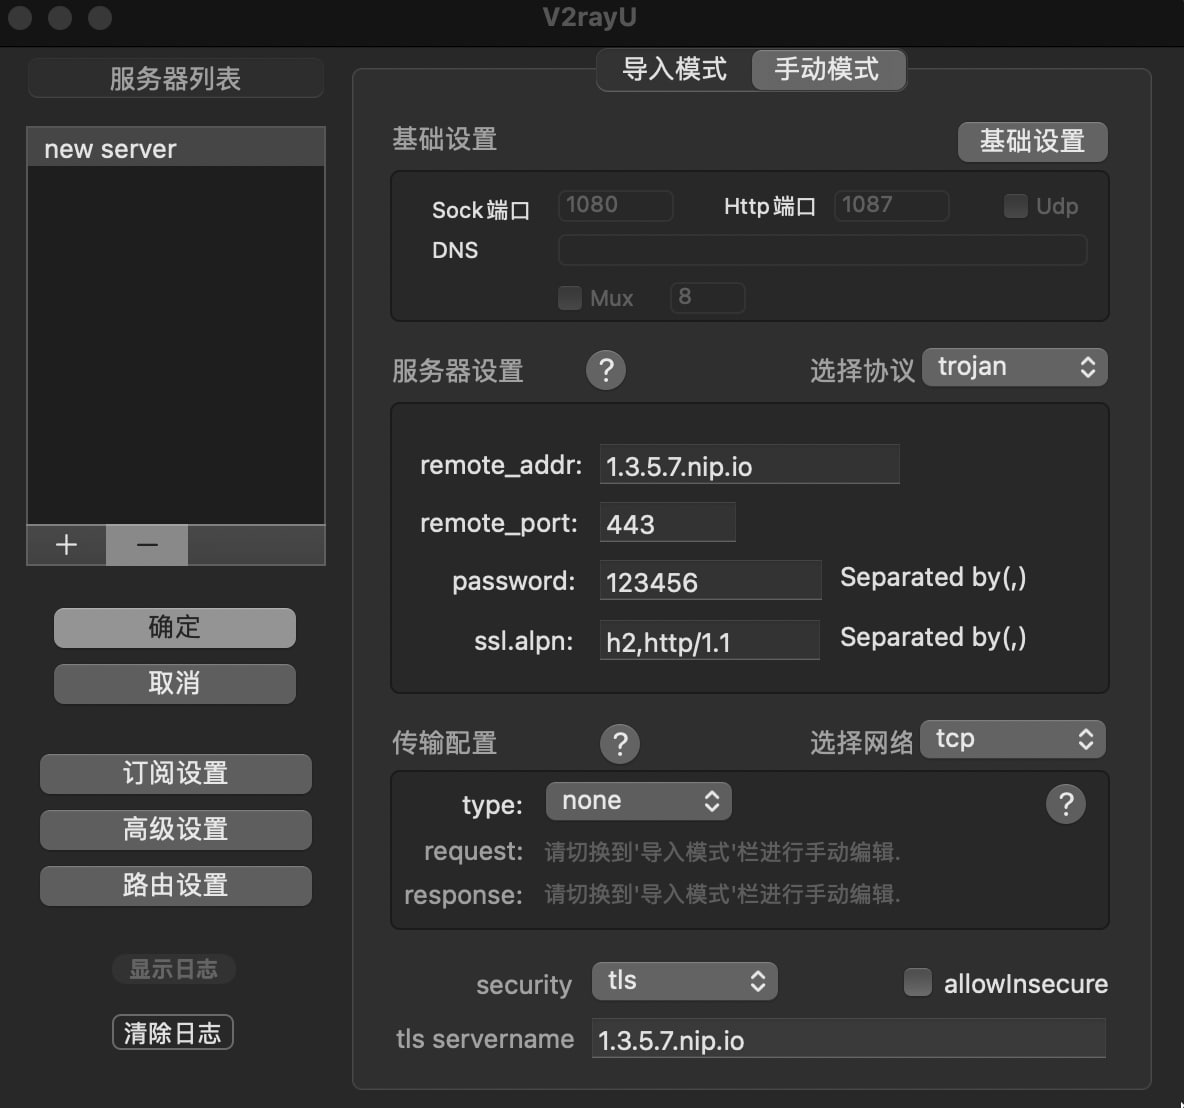
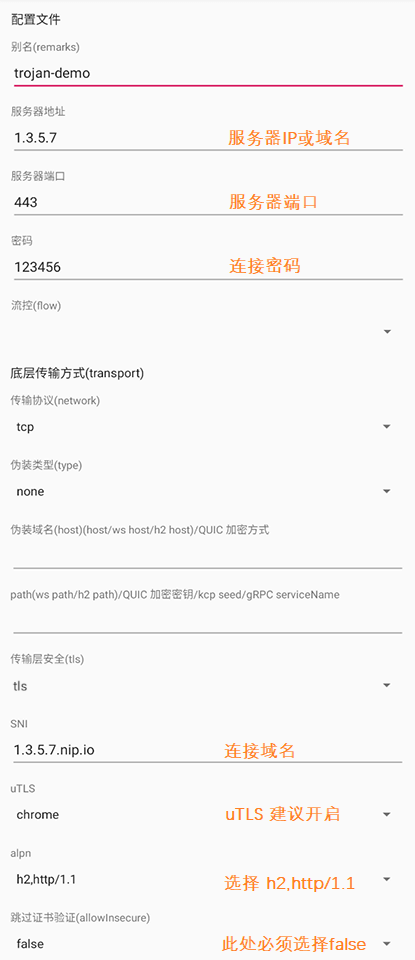
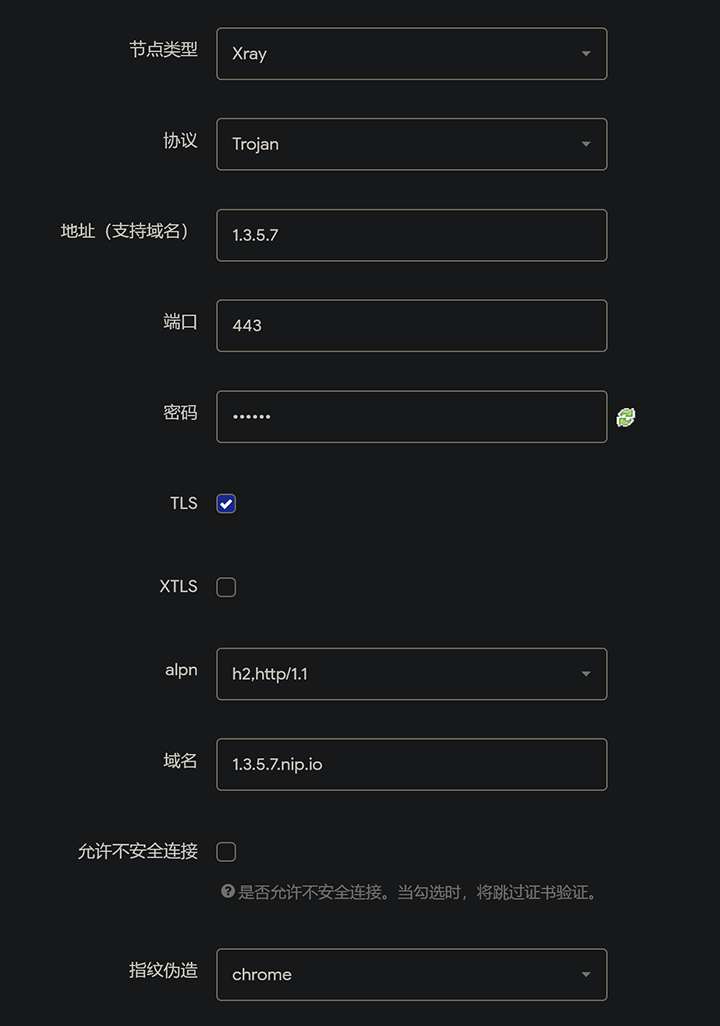
规则使用方法
在 ShadowRocket 应用中,进入 [配置] 页面,点击右上角的 + 按钮添加规则。会在远程文件下显示刚刚添加的规则地址,选择这个规则,并使用配置即可。
国内外划分 + 广告过滤
国内外划分,对**网站直连,外国网站代理。包含广告过滤。国外网站总是走代理,对于某些港澳台网站,速度反而会比直连更快。
规则地址:https://github.com/zhouzhouprogram/Shadowrocket-ADBlock-Rules/raw/master/sr_cnip_ad.conf
国内外划分
国内外划分,对**网站直连,外国网站代理。不包含广告过滤。国外网站总是走代理,对于某些港澳台网站,速度反而会比直连更快。
规则地址:https://github.com/zhouzhouprogram/Shadowrocket-ADBlock-Rules/raw/master/sr_cnip.conf
黑名单过滤 + 广告过滤
黑名单中包含了境外网站中无法访问的那些,对不确定的网站则默认直连。
代理:被墙的网站(GFWList)
直连:正常的网站
包含广告过滤
规则地址:https://github.com/zhouzhouprogram/Shadowrocket-ADBlock-Rules/raw/master/sr_banlist_ad.conf
白名单过滤 + 广告过滤
白名单中包含了境外网站中可以访问的那些,对不确定的网站则默认代理。
直连:top500 网站中可直连的境外网站、**网站
代理:默认代理其余的所有境外网站
包含广告过滤
规则地址:https://github.com/zhouzhouprogram/Shadowrocket-ADBlock-Rules/raw/master/sr_top500_whitelist_ad.conf
黑名单过滤
现在很多浏览器都自带了广告过滤功能,而广告过滤的规则其实较为臃肿,如果你不需要全局地过滤 App 内置广告和视频广告,可以选择这个不带广告过滤的版本。
代理:被墙的网站(GFWList)
直连:正常的网站
不包含广告过滤
规则地址:https://github.com/zhouzhouprogram/Shadowrocket-ADBlock-Rules/raw/master/sr_banlist.conf
白名单过滤
现在很多浏览器都自带了广告过滤功能,而广告过滤的规则其实较为臃肿,如果你不需要全局地过滤 App 内置广告和视频广告,可以选择这个不带广告过滤的版本。
直连:top500 网站中可直连的境外网站、**网站
代理:默认代理其余的所有境外网站
不包含广告过滤
规则地址:https://github.com/zhouzhouprogram/Shadowrocket-ADBlock-Rules/raw/master/sr_top500_whitelist.conf
直连+广告过滤
如果你想将 SR 作为 iOS 全局去广告工具,这个规则会对你有所帮助。
直连:所有请求
包含广告过滤
规则地址:https://github.com/zhouzhouprogram/Shadowrocket-ADBlock-Rules/raw/master/sr_direct_banad.conf
代理+广告过滤
如果你想将 SR 作为 iOS 全局去广告 + 全局翻墙工具,这个规则会对你有所帮助。
直连:局域网请求
代理:其余所有请求
包含广告过滤
规则地址:https://github.com/zhouzhouprogram/Shadowrocket-ADBlock-Rules/raw/master/sr_proxy_banad.conf
回国规则
提供给海外华侨使用,可以回到墙内,享受国内的一些互联网服务。
直连:国外网站
代理:**网站
不包含广告过滤
规则地址:https://github.com/zhouzhouprogram/Shadowrocket-ADBlock-Rules/raw/master/sr_backcn.conf
回国规则 + 广告过滤
提供给海外华侨使用,可以回到墙内,享受国内的一些互联网服务。
直连:国外网站
代理:**网站
包含广告过滤
规则地址:https://github.com/zhouzhouprogram/Shadowrocket-ADBlock-Rules/raw/master/sr_backcn_a
请保护好自己
谷歌中英文的搜索体验都优于百度,而刷美剧、ins 追星、去推特看看特朗普也都挺有意思。但是,随着看到的人和事越多,我越发想要在这里说一些话,告诫路过的各位:
请务必保护好自己 我们自认为打破了信息的壁垒,其实打破的是保护我们的屏障。因为外网真的存在很多误导性言论,来自各个利益集团对**网民疯狂洗脑,他们往往还喜欢以平等自由等旗号自称,但仔细想想真的是这样吗?我只知道美国是最善于运用舆论的国家,会结合大数据潜移默化地改变你的观念。如果大家在上网过程中不经意看到了某些观点,务必保留自己独立思考的能力,如果你是一个容易被带偏的人,则建议回到屏障之中。
本规则只提供给大家用于更便捷地学习和工作。如果你是对上述观点持反对意见的极端政治人士,或者已被洗脑,请立即离开,本项目不对你开放。
常见问题
- 上千行的代理规则,会对上网速度产生影响吗?
不会的。
我之前也认为这是一个每次网络数据包经过都会执行一次的规则文件,逐行匹配规则,所以需要尽可能精简。但后来和 SR 作者交流后发现这是一个误区,SR 在每次加载规则时都会生成一棵搜索树,可以理解为对主机名从后往前的有限状态机 DFA,并不是逐行匹配,并且对每次的匹配结果还有个哈希缓存。
换句话说,2000 行的规则和 50 行的规则在 SR 中均为同一量级的时间复杂度 O(1)。
- 你提供了这么多规则,如何选择适合我的?
最常用的规则是黑名单和白名单。区别在于对待 未知网站 的不同处理方式,黑名单默认直连,而白名单则默认使用代理。如果你选择恐惧症爆发,那就两个都下载好了,黑白名单切换使用,天下无忧。
广告过滤不完全?
- 该规则并不保证 100% 过滤所有的广告,尤其是视频广告,与网页广告不同的是,优酷等 App 每次升级都有可能更换一次广告策略,因此难以保证其广告屏蔽的实时有效性。
Recommend Projects
-
 React
React
A declarative, efficient, and flexible JavaScript library for building user interfaces.
-
Vue.js
🖖 Vue.js is a progressive, incrementally-adoptable JavaScript framework for building UI on the web.
-
 Typescript
TypeScript is a superset of JavaScript that compiles to clean JavaScript output.
-
TensorFlow
An Open Source Machine Learning Framework for Everyone
-
Django
The Web framework for perfectionists with deadlines.
-
 Laravel
A PHP framework for web artisans
-
D3
Bring data to life with SVG, Canvas and HTML. 📊📈🎉
-
Recommend Topics
-
javascript
JavaScript (JS) is a lightweight interpreted programming language with first-class functions.
-
web
Some thing interesting about web. New door for the world.
-
server
A server is a program made to process requests and deliver data to clients.
-
Machine learning
Machine learning is a way of modeling and interpreting data that allows a piece of software to respond intelligently.
-
Visualization
Some thing interesting about visualization, use data art
-
Game
Some thing interesting about game, make everyone happy.
Recommend Org
-
Facebook
We are working to build community through open source technology. NB: members must have two-factor auth.
-
Microsoft
Open source projects and samples from Microsoft.
-
Google
Google ❤️ Open Source for everyone.
-
Alibaba
Alibaba Open Source for everyone
-
D3
Data-Driven Documents codes.
-
Tencent
China tencent open source team.